Printfriendly

Showing posts with label Desserts. Show all posts

Friday, September 1, 2017

Wheat free Fruit Crumble

fruit crisp

Fruit crumbles are probably one of the easiest desserts you'll ever make, and a fantastic way to use up leftover fruit. What drew me to them initially was that I've never been a fan of pastry, so a traditional pie has never been my thing-not to mention that pastry making was kind of my nemesis for awhile as I learned and practiced how to make it.

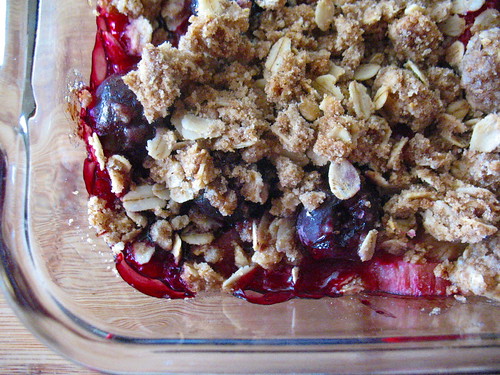
Years ago we used to go to a little restaurant that would have all kinds of crumble choices; peach and raspberry, pear and cranberry, apple, and more. Feel free to play around with whatever fillings you want to create with this recipe-it's pretty open to whatever your heart desires! In the pictures I made plain apple and then apple and blueberry, because I had berries to use up but not enough for a solid blueberry on it's own. You can change the amount of sugar in the filling (more if you want, less if you want, none if that's how you roll), and even the thickening agent. Some fruit needs a little help to not become watery, such as frozen blueberries. Some is pretty thick from natural pectin all on it's own.

The amounts for the filling is also open to interpretation. Generally, I fill up my dish nearly to the top before piling the topping over the fruit, making sure to cover every little space. It may look completely overfilled and impossible at the time, but remember that the fruit will cook down. I love to have a good amount of fruit to hold up against the oatmealy topping.

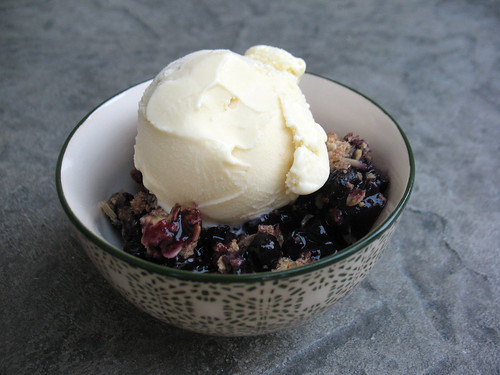
Fruit crumble is fantastic not only as dessert topped with creamy vanilla ice cream, but I am known to eat it for breakfast with a dollop of thick Greek yogurt. Hey, it's fruit and oatmeal, why not?

Yield: a 9x9 inch baking dish (or about 6 servings)

Ingredients:

Crumble Topping:

1/2 cup whole barley flour (if gluten free sub the barley and sunflower flours for gluten free flour)
1/4 cup sunflower flour
1/4 cup packed brown sugar
1/2 tsp salt
1/2 tsp cinnamon
1/2 cup cold unsalted butter, cubed
1 cup rolled oats

Filling: 

Blueberry
5-6 cups of fresh blueberries
2 Tbsp sugar
2 Tbsp barley flour, all purpose flour, or 2 tsp tapioca starch (gluten free)

Apple, peach, or pear

4-6 medium/large apples OR peaches, OR pears (try a combination!), peeled, cored, and sliced
1/2 tsp cinnamon
2-3 Tbsp sugar
1 tsp fresh lemon juice
2 Tbsp barley flour, all purpose flour, or 2 tsp tapioca starch (gluten free)

Directions: 

1. Pre-heat the oven to 350 F. Find a 9x9 inch ceramic dish, or you can use two smaller dishes and make 2 different kinds of crumbles if you like.

cutting in

2. In a large bowl, stir together the flours, sugar, cinnamon, and salt. Using a pastry cutter or two knives, cut in the butter until the mixture resembles coarse crumbs. Add the oatmeal and then, using your hands, squeeze clumps of the mixture together to make some chunks of topping. You want there to be some so that when it cooks you'll have chunks of filling that become almost cookie-like. Put the bowl in the fridge so that the clumps harden up a little.

topping


3. Next, prep your filling while the topping chills. Toss it all together and fill up your baking dish.

unbaked crisp

4. Pull the chilled topping out of the fridge and pile the oatmeal goodness over the fruit, covering it all to the edges. Place the dish on a pan so that it catches any overflow and  place in the center of your hot oven.

5. Bake the fruit crisp about 50-60 minutes, until the topping is browned and the fruit is bubbling and soft. Remove from the oven and let stand for about 15 minutes before serving.

blueberry crumble

6. Try not to eat it all one go.
Read More

Saturday, May 17, 2014

Rhubarb Cherry Crumble

cherry rhubarb crisp

Fruit crisp? Crumble? We use the names interchangeably in our house for a warm baked fruit dessert topped with an oatmeal, flour, sugar and butter mixture. The fruit combinations are endless! Rhubarb has not always been my favorite fruit, but paired with cherries, it goes from ho-hum to downright amazing. I could eat this for breakfast, but for dessert with a scoop of ice cream it's absolutely heavenly.

Frozen cherries are great when fresh aren't available in store or when the prices are higher, and you don't feel like pitting them. I also used frozen rhubarb, but you could likely use fresh fruit and it would be just as good. Make sure you pit them, but do it in a sink or the cherry juice splatter may make your kitchen look like a murder scene!

What's your favorite kind of fruit crisp? And do you call it crisp or crumble?

 Filling:

2 cups frozen pitted cherries (you can find these at Superstore, President's Choice brand)
3 cups fresh or frozen chopped rhubarb
1/3 cup sugar (you can reduce it if you wish, but found this much good-it's still a bit tart and not overly sweet)
1 tbsp cornstarch
1/4 tsp almond extract (optional)

Topping:

1/2 cup flour
1/2 cup oats
1/2 cup brown sugar
1/4 cup melted butter
1/2 tsp cinnamon
pinch nutmeg

Pre-heat oven to 350F.

In a large bowl, toss together the cherries, rhubarb, sugar, and cornstarch. Put into an 8x8 pyrex glass pan. Set aside.

In a small bowl, stir together the flour, oats, brown sugar, cinnamon, and nutmeg. Melt the butter in the microwave and stir into the flour mixture.

Sprinkle the oat mixture over the fruit. Bake for 30-40 minutes, until bubbly and the fruit is soft.

Let sit for about 20 minutes to cool, then serve with ice cream.

Serves four


Read More

Wednesday, March 26, 2014

Birthday Baby Vanilla Cheesecakes

Mini Vanilla Cheesecakes

Cheesecake is one of my most favourite desserts. Topped with fresh whipping cream and fruit or drizzled with chocolate sauce, if there is cheesecake in the house I'm eating it for breakfast, lunch, and dinner. It's just too hard to resist it's siren call from the fridge, calling me to sample yet more of it's creamy goodness.

A whole cheesecake feels overly indulgent to make just for myself; rich, far too large for our little family of three, but little babycakes are acceptable. Babycakes can be frozen for another day or shared with friends. Baby cheesecakes don't seem so sinful, right? This week I turned 43 and took these little bites to work. Repeatedly people stopped me in the hall, asking (begging?) me to bring the recipe so they can make these as well because oh my, were they delicious.

Be warned; if you make these, you won't be able to resist eating them all. I certainly couldn't.

Ingredients: 

2 cups of graham wafer crumbs
1/4 cup sesame seeds
2 tbsp sugar
1/4 tsp cinnamon
pinch of nutmeg
4 tbsp butter, melted
1 cup sugar
three 8 oz packages of brick cream cheese, room temperature
4 eggs, room temperature
2 tbsp fresh lemon juice and if you can find Meyer lemons, some zest too
1 tsp vanilla
2 cups whipping cream for garnish
fresh berries

Directions: 

Pre-heat the oven to 325 F. Line two muffin tins with paper cups and set aside.

In a medium sized bowl, stir together graham wafer crumbs, sesame seeds, 2 tbsp sugar, cinnamon, and melted butter with a fork until well blended. Divide the mixture among  the 24 cups ( about 1 1/2 tbsp per cup) and press into the bottom. Bake the crusts 5 minutes.

Using an electric mixer, beat the cream cheese and sugar until smooth. Scrape down the bowl and beat in the eggs, one at a time, until smooth. Stir in the vanilla. Beating the mixture well is important, so you don't end up with little bits of cream cheese floating around in it. Be sure to take the time and scrape down the bowl as you go, so that your filling is nice and smooth. It doesn't have to be perfect, but taking the time is worth it.

Pre-heat the oven to 350 F.

Pour the filling over the warm crusts that you removed from the oven until they are about 3/4 full. Bake the filled pans for 18-20 minutes. Cool the pans on the stovetop, then gently remove the cheesecakes from the muffin tins and cool completely. Place in an airtight container and chill in the fridge for at least 3 hours. Overnight is even better because the cheesecake develops even more flavour if it has to sit for a day.

Top cooled and chilled cheesecakes with whipping cream and fruit, or chocolate sauce if you wish. Store them in an airtight container in the fridge.

Makes 24

Adapted from Whitewater Cooks with Friends
Read More

Tuesday, August 20, 2013

Teeny Mocha Cheesecakes

A while ago, I wrote a post over at Philadelphia Cream cheese about the time I made cheesecake in a toaster oven and it got me craving cheesecake, which always ends up in me making cheesecake. It's just that without anyone really around here to eat it, I didn't want to risk coming up with some enormous dessert that I'd then be required to devour.

I can't say no to cheesecake. It's not possible.

This summer I've finally had time to really look through my cookbooks and relax a little, and I found this fantastic recipe for little mocha cheesecakes that you make in a muffin tin. They give you a perfect amount of luscious cake without having to commit to a whole cake, they are easily shared with friends, or perfect to take to a family barbeque.

mocha cheesecakes


On the other hand, you can hoard them all to yourself and sneak one or two late at night when nobody is looking. (Did I just say that?)

Adapted from Whitewater Cooks with Friends

Ingredients:

1/2 cup chocolate cookie crumbs
1/2 cup ground almonds
2 Tbsp sugar
3 Tbsp butter, melted
1/2 tsp cinnamon

One 250 g package brick cream cheese, room temperature
1/4 cup sugar
2 Tbsp sour cream
1 egg, room temperature
2 oz good quality dark chocolate, melted
1 tsp dark coffee, very finely ground. I used some Ethical Bean coffee
1 Tbsp vanilla (or try 2 Tbsp of Baileys or Kaluah)
1/4 tsp salt

1 cup whipped cream mixed with 1 Tbsp unsweetened, sifted cocoa powder and a bit of sugar

Directions:

Pre-heat oven to 325 F and line a muffin tin with paper liners.

In a medium bowl, stir together the cookie crumbs, almonds, sugar, and cinnamon. Drizzle the butter over top and stir together well. Divide the mixture evenly among the muffin cups, and press the mixture firmly into the bottom. Set aside.

Making mini cheesecakes


Using your electric mixer, beat the sugar and cream cheese together until smooth. Add in the egg, sour cream, melted chocolate, coffee, vanilla, and salt. Mix it all together well until it's smooth. You'll have to stop the mixer and scrape down the bowl once or twice to make sure all the bits are incorporated.

cheesecake2


Spoon the filling into the pan, smoothing it with the back of a spoon. Bake for 15 minutes. You'll notice the cheesecakes will puff a teeny bit and fall, but don't worry. They also won't look completely baked but they are. Just remove the pan from the oven and let it cool for about 30 minutes.

Peel off the liners and set the teeny cakes in a sealed container in your fridge to chill. You could eat them at room temperature, and many people do, but I love them cold. They taste better, and when allowed to sit for a day, these cakes go from good to amazing. I think it's because the bits of ground coffee become soft and supple, whereas when you eat them right away they still taste a little gritty. Either way, I recommend making these the day before you're going to eat them.

Just before you serve these babies, whip up the whipping cream with a bit of sugar (depending on how sweet you like it), and the cocoa. Dollop some on top of each cake, and to make them look pretty you can sift a little more cocoa right over top. A chocolate covered coffee bean on top of each would be a fantastic touch as well.

Try not to eat them all at once. This may take fantastic will power.

Makes 12 teeny cakes!

Want more teeny cheesecakes? Try these chocolate cherry ones I wrote up for Work It, Mom! Need a whole cheesecake? This recipe is my go to and is amazing.
Read More

Tuesday, July 12, 2011

Roasted Pears

pears and ice cream


This is the simplest summer dessert, and so versatile-you can change up the pears to peaches, plums, apricots, or even nectarines if you wish. The trick is to roast them until tender and then serve with the best quality ice cream possible. I chose to make vanilla bean ice cream, which turned out to be the best we'd ever had. To things even more over the top, drizzle with chocolate sauce.

Adapted from John Bishop

4 pears
unsalted butter, melted (about ¼ cup)

Gently peel the pears and then cut in half. Toss with melted butter and place, cut side down, in a tin lined with parchment paper. Roast at 375 F for about an hour until golden brown on the bottom. Remove from the oven and let cool.

Serve the two halves with a scoop of ice cream and a drizzle of chocolate sauce, if desired.
Read More

Tuesday, April 26, 2011

Home made Vanilla Bean Ice Cream

pears and ice cream

Roasted Pears with Vanilla Bean Ice Cream

Two weeks ago, my friend Katie dropped by and joined us to watch Jamie Oliver's Food Revolution. I had been talking about trying an ice cream maker, and since she had one, she brought it by so that I could have a go at making my own ice cream. Perfect timing since Jamie had talked about how beaver anal gland is used in the cheaper ice creams, which completely disgusted everyone in our family.

Ice cream has a bit of a finicky relationship with the guys in my house. John can't have sugary items, so he rarely ever touches the stuff. Kevin LOVES ice cream, but because he has some issues with dairy products, he can never eat very much of it. Cheap ice cream never seems to like his stomach that much, and the expensive ice cream is...well...expensive! I can't bring myself to pay $7 for a pint of Ben and Jerry's.

So basically we don't eat a lot of ice cream, except in the summer when I break down and buy it.

One batch of home made ice cream later, and now I covet that ice cream maker so much that when we go to the USA this summer I am going to scope one out. There is nothing like home made ice cream, and I don't think I could ever go back to the store bought stuff again. The best part is, Kevin can eat it with no issues-which has made me wonder if it really is an issue with dairy products that he has, or rather an issue with food additives and preservatives.

Don't let the idea of home made ice cream scare you into thinking that it's a long, drawn out, scary process. Basically all you do is make a custard and chill it. Then you pop it in the maker, turn it on, and presto! Ice cream! If you can stir, you can make this. The only problem is you need an ice cream maker. Do I recommend you go out and buy one? If you eat a lot of ice cream or don't want to have food with weird additives, then I say yes.

Now, a bit of advice before you start. I believe that in this case, you want to use the very best ingredients possible. Don't use the cheap fake vanilla extract or cheap milk, but rather the very best you can afford. It makes a huge difference in your end product. I used Madagascar vanilla beans from The Vanilla Food Company, along with a bottle of their real vanilla extract, and the flavor was just incredible.

Also, home made things are way more satisfying. One small scoop of this stuff was enough-it's so rich and creamy, it doesn't need toppings or anything. Maybe just a little fresh fruit.

Adapted from Cuisinart

2 1/3 cups whole milk
2 1/3 cups heavy cream
1 whole vanilla bean
3 large eggs
4 large egg yolks
1 1/8 cup sugar
1 tsp pure vanilla extract

Stir the milk and cream together in a medium sized pot. Cut your vanilla bean in half lengthwise with a sharp knife, scrape out all the seeds in the middle, and add them to the pot along with the pod. Give it a stir. Don't worry if the seeds are a bit clumped together, they will separate on their own.

Turn the heat to medium and stirring, bring the mixture to a slow boil. Turn the heat down to low and simmer for 1/2 hour. Stir it occasionally so nothing burns, and keep an eye on it.

In the bowl of an electric mixer, combine the eggs and egg yolks. Mix them on low to medium until they become thick and pale yellow, almost like mayonnaise, or a pudding. It takes about 2 minutes or so.

When your milk is finished, remove from the heat, fish out the vanilla pod and discard. Pour 1 cup of the hot milk/cream into a measuring cup. With the motor of the electric mixer running, pour the hot milk into the egg mixture in a slow, steady stream. This is called tempering the eggs, which means it slowly warms them up so that when you add them to the hot milk/cream mixture they don't scramble on you.

Once you have added the 1 cup of milk, stop the mixer and take the bowl to the stove. Pour the egg mixture into the pot with the remaining milk, mixing as you go. Turn the heat to medium low and, stirring constantly with a heat proof spatula, cook until the mixture will coat the back of a spoon.

Well, I reasoned, how the hell am I supposed to figure THAT out?

Basically I stirred and stirred, and stopped when I could dip in a spoon, turn it over, run my finger through the mixture on the back, and it left a good line. Does that make sense? If not I'll post a picture.

Take your custard off the heat and pour into a a bowl. Cover with cling film that is directly touching the custard (so no skin, right?) Set the bowl in the fridge to chill.

Now at this point, you need to churn it according to your personal ice cream machine's instructions. With the one I was using, I had to set the freezer bowl in my freezer for a few hours and then pour in the custard, and churn it for about 30 minutes.

Put the finished ice cream into an airtight container and into the freezer for about 2 hours for it to firm up a little more before you serve.

Yum!


Kevin enjoying home made ice cream
Read More

Tuesday, April 5, 2011

Vanilla Bean Pudding

vanilla pudding 2

My trip to the Kraft kitchens really got me thinking about what it means to cook from scratch. Is it really that time consuming? Does the food laden with chemical stuff really taste better? Or are we conditioned to think it does? The only pudding that I have ever had usually has come from a box that you add milk to. The difference is that the boxed version of vanilla pudding has high amounts of sugar and salt, there's artificial colors and flavors, along with things I can't pronounce. If you add milk, is that considered scratch?

I don't think so. This vanilla pudding, adapted from a recipe over at Smitten Kitchen, doesn't take that long to make and is really delicious. I really love the little black specks of vanilla and if you don't have real vanilla pods, that's ok-just use a good quality vanilla extract. Is it hard? No way. If you can stir, you can make this. Time consuming? I had it from saucepan to cooling in the fridge in less than 10 minutes.

Adapted from Smitten Kitchen

2 2/3 cup whole milk
1/2 cup sugar
1/4 cup cornstarch
1/4 tsp salt
seeds from 1/2 vanilla bean (or 2 tsp vanilla extract)
1 large egg

Pour 2 cups of the milk into a saucepan and bring it to a simmer over medium heat. Meanwhile, in a large, heatproof bowl whisk together the cornstarch, sugar, salt, and vanilla bean seeds.

Tip: You can either submerge the leftover pod in the milk heating on the stove to give it extra vanilla flavor, or put it in a jar and fill with white sugar. Put a lid on, leave it overnight, and the next day you will have vanilla sugar! It's delicious in whipping cream.

Once the milk has come to a simmer, remove from the heat. Now stir the reserved 2/3 cup of milk into the cornstarch and sugar a little at a time so you don't end up with lumps, and add the egg. Continue to whisk it well.

The next step is called tempering. You want to heat up and effectively cook the egg, but not so that you have chunky bits of egg floating around in your pudding. Dumping in the hot milk will cause the egg to cook in clumps, but adding it gradually and whisking as you go will prevent this.

Add the hot milk, a little at a time, whisking constantly. It may seem like a lot of work but if you do this correctly, you'll have a smooth pudding. Eventually you'll have added all the hot milk. Pour the whole thing back into a saucepan and continue to heat until it starts to bubble, all the while stirring with a silicon spatula. In that time your pudding with thicken up dramatically, but don't panic-once it bubbles, let it cook for about a minute longer and then remove from the heat. Don't stop stirring or it will burn!

Spoon into small dishes and cover with plastic film.

Makes about 6 half cup servings.


vanilla pudding
Read More

Sunday, March 20, 2011

Meyer Lemon Tarts

Meyer Lemon Tarts


Awhile ago I found Meyer Lemons at the store. To be honest I didn't even really know what they were (besides the obvious lemons, of course), but somehow knew they were special and slipped a package of 8 into my shopping cart. Once they were home with me, it was all what do I do with these things? I can't just make any old lemon item, I have to make something special. Something decadent. Something worthy.

Twitter offered all sorts of great suggestions, and at first I settled on a lemon vinagrette and marinade for a prawn salad. Good, but not quite what I was thinking of. Scouring the internets some more ideas, I finally stumbled across David Lebovitz's blog and his post about improved lemon curd.

At first I was a little skeptical. I've never enjoyed lemon meringue pie, with all that foamy meringue perched a top tart lemon stuff. Meh. As I read, the post drew me in and suddenly, all I could think of was creamy, tart, lemon curd.

I had made curd before, but it was never that great, and now I know why. I used *gasp* bottled lemon juice, once. Never, ever do that. The next time, I didn't press the mixture through a strainer. Don't skip that step. As much as you whisk, you will get little bits of cooked egg white in your curd. The strainer weeds those babies out and leaves you with a perfectly smooth concoction, which is what you are going for.

Adapted From David Lebovitz
Makes about 1 cup

1/2 cup freshly squeezed lemon juice
1/3 cup sugar (or if using regular lemons, 1/2 cup)
2 large egg yolks
2 large eggs
pinch salt
6 tbsp unsalted butter, cubed

Before you do anything else, put a mesh strainer over a bowl or in my case, a big 4 cup pyrex measuring cup.

In the top part of a double boiler over simmering water, whisk together the lemon juice, sugar, eggs, and salt. Add the butter cubes and continue to whisk constantly over low heat. The whisking is the trick to truly creamy, smooth curd-it keeps the bits of egg from cooking and floating around in it. Whisk away over low heat, and the butter will eventually melt, even though at times it will seem to clump up and try to drive you crazy.

Once the butter melts, increase the heat to medium and continue to whisk constantly. The mixture will suddenly thicken up into a thick pudding-like consistency, and you'll know it's finished when you lift the whisk from the mixture, and the mixture "holds it's shape when it falls back into the saucepan from the whisk". Immediately remove it from the stove and pour into the strainer, forcing it through by pressing with a spatula. That's when any little bits of egg white that globbed together will be weeded out of your delicious curd.

Transfer to a jar, seal, and keep in the fridge for up to a week. You can spread it on toast or crumpets, use as a filling for cake, eat by the spoonful, or make lemon tarts like I did.

Now I'd love to say that I made those tart shells from scratch, but I didn't. I bought them. Then I pricked them all over with a fork and baked them at 400 F until they were browned, which was about 8-10 minutes or so. Removed them from the oven and let them cool before filling with the lemon curd and topping with whipped cream. The above recipe for curd filled about 9 tarts quite generously, so if you are making for a crowd I'd double the amount of curd you are making. Store the tarts in the fridge for a few days-but I doubt that they will last that long.

Makes about 9 or 10
Read More

Friday, December 31, 2010

White Chocolate Grand Marnier Mousse in Dark Chocolate Cups

Grand Marnier Mousse 2


Years ago, I worked in a restaurant that served Grand Marnier mousse in fancy crystal dishes, topped with a tiny butter cookie. Light, orangey, and delicious, it was one of my favorite desserts next to the strawberry pie.

A few weeks ago when I found dark chocolate cups in the grocery store, all I could think of was filling them with that mousse. For the longest time I was never that fond of chocolate and orange flavors together, but in recent years I've grown to love them. I scoured the internets for a good mousse recipe, did a little testing, and I think I've found it just in time for our New Year's Eve dinner.

A tip here: use the very BEST whipping cream and chocolate you can find. I used Avalon Dairies Organic whipping cream and Green and Black's white chocolate.

Adapted from Emeril Live, Food Network Canada

4 large egg yolks
1/4 cup Grand Marnier
2 tbsp sugar
1 tbsp grated orange zest
2 cups whipped cream (unsweetened)..about 1 3/4 cup unwhipped
2 bars of Green and Blacks White Chocolate (or, 1/2 cup)

In a stainless steel bowl over simmering water, whisk together the egg yolks, Grand Marnier, sugar, and orange zest. Stand and whisk constantly while it heats and cooks, occasionally taking the bowl off and away from the boiling water if it's getting too hot.

What you should have happen is the egg yolks and other ingredients come together and become thick enough to coat the back of a spoon. What you don't want is scrambled eggs, so hence the constant watch and stirring. The original recipe said it should take 4-5 minutes and the water should be boiling, but I found the water too hot and mine was finished in about 3 minutes. Use your judgment. The consistency was about that of melted chocolate.

Take the bowl off the heat and set aside to cool.

Whip the cream. You need about 2 cups of it whipped, so I'm guessing 1 3/4 cup before you start whipping it would be good. Don't add anything to it-you need the whipped cream to be plain.

Meanwhile, also start melting your chocolate. I do this directly on the stove over low heat in a saucepan, but you can use your microwave, a double boiler, etc. Let it cool. (Important! You don't want a warm chocolate wrecking the whipped cream)

Once your egg yolk mixture (also known as sabayon) is cool, fold in the whipped cream, and then the cooled chocolate.

At this point I spooned the mousse into chocolate cups and let them chill in the fridge for 5 hours, before serving topped with shaved white chocolate, and fresh berries. When I halved the recipe it filled 7 cups, generously.
Read More

Tuesday, December 21, 2010

Chocolate Guinness Cake

Chocolate Guinness cake


Deep, dark, heavy and chocolatey with a blanket of fluffy cream cheese icing, this cake is over the top delicious without a lot of work. In fact I was so amazed at how easy it was I read the instructions three times just to be sure. This is a cake to share with a crowd, as you don't need a large piece and it will surely elicit moans of delight from everyone who tastes it-before they lick their plates entirely clean. It's a must try. MUST.

Adapted from The Funky Kitchen (who originally adapted it from Nigella Lawson's Feast)

1 cup Guinness beer
1/2 cup butter
3/4 cup unsweetened cocoa
2 cups granulated sugar
3/4 cup sour cream
2 large eggs
1 tbsp vanilla extract
2 cups all-purpose flour
2 1/2 tsp baking soda
1/4 tsp salt

Icing:

1 1/4 cups powdered sugar
8 oz cream cheese, softened
1/2 cup heavy cream

Pre-heat your oven to 350 F. Grease a 9 inch springform pan well up the sides and all over the bottom, the set aside.

In a large saucepan, melt the butter with the beer. Whisk in the cocoa and sugar until smooth. Set aside to cool until lukewarm.

In a bowl, lightly beat the eggs and then add the sour cream and vanilla, continuing to beat until smooth. Add a little of the lukewarm beer mixture to temper it, and whisk. Add the rest, whisking as you go.

Stir in the flour and baking soda whisking until the batter is smooth.

Pour the batter into the prepared pan, smoothing the top. Bake in the center of your oven for about 45 minutes to 1 hour, until a cake tester inserted into the center comes out clean. Allow to cool completely before frosting.

Icing:

Whip the cream cheese in an electric mixer until fluffy. Add the icing sugar, bit by bit. At this point I had thought that the icing would be enough without the whipping cream, but being the dutiful girl I am, into the bowl it went. Whip up that icing until it is smooth.

Oh my, the addition of whip cream really is delicious in that icing, especially when you whip it for awhile and it becomes all creamy and scrumptious. It was all I could do not to shove my head in the bowl and lick it clean.

Frost the cooled cake; now, you'll probably wonder why on Earth there seems to be SO MUCH icing, but really it's not that much, and it's so good when all is said and done. Put the cake in the fridge for a few hours to chill. Before you serve it, shave some chocolate over top and you are good to go!

Serves 12
Read More

Monday, September 20, 2010

Best Apple Crisp

(This post is re-posted from Notes From the Cookie Jar)

With a fridge full of apples from a friend with her own tree, I had been planning to make apple crisp for awhile. I've been using the same recipe for a long time and wasn't about to change.

That is, until I got my October issue of EveryDay Food. I had seen this recipe and it had piqued my interest, so tonight I took the plunge and whipped up the most buttery, delicious, BEST apple crisp that my family has EVER eaten.

So here it is!

3/4 cup flour
1/4 cup packed brown sugar
1/2 tsp salt
1/2 cup plus 2 tablespoons granulated sugar (the 1/2 cup is to add to the apples-I used only a few tablespoons because I prefer my apples somewhat tart)
8 tbsps (1 stick) butter, cold, cut into small cubes (I actually used salted butter and then omitted the salt
1 cup old fashioned rolled oats (not the quick cooking ones)
3 lbs apples-peeled, cored, and sliced (the original recipe recommends Empire, Gala, or Braeburn)
2 Tbsp fresh lemon juice (I only used a sprinkle)
1/2 tsp cinnamon

Pre-heat oven to 375 F.

In a large bowl, mix together the flour, brown sugar, 2 tbsps of the granulated sugar, and salt. Cut the butter into this mixture using a pastry cutter, until it resembles coarse crumbs. Add the oatmeal and then work it together. Use your hands even-get right in there, squeezing the oatmeal and working it right into the flour/butter mixture. Put it in the fridge to keep it cold while you get the apples ready. This is an important step, and it's great to have clumps of the oatmeal mixture so feel free to moosh it together like that.

Peel core, and slice up the apples. Sprinkle with lemon juice to prevent browning and toss with the cinnamon and as much sugar as you would like (up to 1/2 cup...I like far less, and the less sugar I use, the less lemon juice. You can judge!) Pour apples into a shallow 2 quart baking dish and sprinkle topping over top.

Bake for 55-65 minutes or until bubbling and golden brown. Let cool and do what we did....serve it up with big scoops of good quality vanilla ice cream.
I certainly won't be making the old recipe again!
Read More

Wednesday, August 25, 2010

Late Summer Frozen Treat To Die For

Blackberry Yogurt Pops


What do you do when you have blackberries growing in every nook and cranny outside, hanging all juicy and luscious from the bushes?

You make blackberry honey yogurt pops, of course. These are incredibly easy to make, although a little messy. Extracting the juice from the berries took a little doing, and I don't mind saying that I got a little aggressive about it. The results are the best yogurt pops I've ever made, and I daresay that they are better than anything you can buy.

Adapted from Bon Appetit August 2010

2/3 cup water
2/3 cup sugar
3 1/2- 3 3/4 cups of blackberries (three 6 oz containers)
1 cup plain non fat yogurt (I used organic 6%, it was all I had)
5 tsp honey
4 tsp fresh lemon juice

The recipe doesn't say this originally, but I think the best way to get juice out of blackberries is to freeze them. Put them on a cookie sheet lined with wax paper and freeze them solid. Then take them out, thaw, run through the food processor to make a pulp, and drain in a strainer lined with cheesecloth. I actually picked up the cheesecloth and squeezed it, forcing all the juice to come out, but that's really messy and you come away looking like you've murdered someone. Also, blackberry juice doesn't come out easily, if at all, so be careful!

In the end you need 2 cups of blackberry juice/puree. Toss the leftover bits of blackberry.

Measure the water and sugar into a pot and set over medium heat. Bring it to a boil, stirring, until the sugar melts. Let cool and put into the fridge until nice and cold (about an hour)

In a large bowl, whisk together your blackberry puree, cold simple syrup, honey, lemon juice, and yogurt. Pour into molds and top with a stick, then freeze until solid (overnight is good).

Makes 10

*a note about when you eat these...blackberry juice is virtually impossible to get out of clothes/carpet. If you give them to your kids make sure they are outside or at least in something you don't mind getting stained.
Read More

Monday, July 12, 2010

Bittersweet Chocolate Mousse


chocolate mousse


It's only taken about two years to finally have a photo for this recipe, but here it is! Easy and oh so delicious, this makes a great end to a meal. Top with whipping cream and strawberries to make it extra special. Make sure to use really good quality chocolate, it makes a huge difference.

6 oz bittersweet chocolate, chopped
1 cup whipping cream
3 egg whites
pinch of salt
2 tbsp sugar

garnish-chocolate curls, fresh raspberries, mint leaves, whipped cream

Melt chocolate in a double boiler over hot, not boiling, water until smooth. Set aside.

In a bowl with an electric mixer, beat the whipped cream until stiff peaks form. Set aside. In a separate bowl, beat the egg whites and salt until soft peaks form. Add the sugar, and continue beating until stiff peaks form. Stir 1/4 of the whipped cream into the chocolate. Fold the chocolate mixture into the egg whites until combined, and then fold in the remaining whipped cream. Spoon into small serving dishes. Cover and chill in the fridge up to 6 hours.

Makes 4-6 servings.
Read More

Tuesday, June 8, 2010

Peppermint Patty Brownie Cupcakes

I found this recipe awhile ago over at The Crepes of Wrath, and was intrigued. Would you believe I had never eaten a York Peppermint Patty? Maybe it's a Canadian thing. I HAVE had Jr. Mints, and I love them. So these just seemed like something I had to try.

These aren't cupcakes per se, but more like brownies baked in muffin cups. They are then twice the size of the normal slice of brownie I would take, and with the addition of a mini peppermint patty nestled in the middle, they are over the top decadent. We ate some of them (I highly recommend you try one fresh out of the oven while still warm, with ice cream) and then I took the remainder to work where the staff devoured them like vultures.

I know. It just makes you drool all over the keyboard, right?

Anyway, these are super easy to make so even those of you who are shy of baking, never fear.

Adapted from The Crepes of Wrath
8 oz bittersweet or semi-sweet chocolate (I used semi-sweet)
1/2 cup unsalted butter
1 cup sugar
3/4 tsp salt
3 large eggs, at room temperature
1/2 cup flour
1/4 cup dutch process cocoa powder (Fry's cocoa in Canada is Dutch Process)
12 mini York Peppermint patties (the fun sized ones work)

Line a muffin tin with paper cups, and turn your oven on to 350 F.

In a saucepan over low heat, melt the chocolate and butter together until smooth, stirring. Whisk in the sugar, and then the eggs, 1 at a time until they are incorporated. The mixture will be glossy and smooth.

In a separate bowl whisk the flour and salt together, then gently stir into the chocolate mixture until just combined. Spoon about 1 tbsp into the bottom of each cup, then top with an unwrapped mini peppermint patty. Spoon another 1 1/2-2 tbsp of batter on top, making sure that it reaches the edges.

Bake at 350 F for about 35 minutes.

These would be amazing served warm with a scoop of ice cream!

Makes 12. Store for up to 3 days in an airtight container.
Read More

Tuesday, April 27, 2010

Blueberry Tarts

Over on Food Revolution Friday, the lovely Alex posted a link to her recipe for blueberry pie and I got to thinking....

I have blueberries. I have tart shells. Together they could make blueberry TARTS.

(Psst...I've never made blueberry tarts. Ever. This was totally an experiment. Let's take a look at how they turned out, shall we?)


How about a little closer up?


These were AMAZING with a capital A, and I would SO serve them warm with a scoopful of Chapman's frozen yogurt. Swoon!

I improvised with the recipe a bit-taking a blueberry pie recipe and changing the measurements so that it would work for the 15 tart shells I had, but I easily could have filled 20.

Filling:

20 pre-made tart shells
5 cups of fresh or frozen blueberries
1/2 cup sugar
1/4 cup flour
1 1/2 tsp lemon zest
2 1/4 tsp lemon juice

Toss together in a bowl. Fill your tart shells. Don't be shy here, those blueberries cook down so fill those suckers as fill as you can get them.

Topping:

1/2 cup brown sugar
1/2 cup rolled oats
1/4 cup flour
1/4 tsp cinnamon
1/4 cup cold butter

Stir the flour, cinnamon, oats, and brown sugar together in a bowl. With a pastry cutter, cut in the butter until the mixture resembles coarse crumbs. I found it hard to get this topping on the tarts when they were piled high so I just did the best I could, allowing the bits to fall all over the cookie sheet. Then I took out a clean cookie sheet and transferred the tarts to that one to bake on.

Bake in a pre-heated, 375 F oven for about 30 minutes. Keep a good eye on them. They should be bubbly, and the topping lightly browned.

Makes 20 tarts

Read More

Thursday, December 24, 2009

Butter Tarts


Nothing says holidays in my house like butter tarts. For you Americans out there scratching your heads, read about the history and what they are here. Sweet, full of raisins, a little bit messy to eat, these are scrumptious. I have to warn you, I do not make pastry from scratch. Instead I buy ready made tart shells, because it's just a whole lot easier. This picture to the left are my tart shells all ready to go in the oven.

Also, these freeze really well! I like to eat 'em straight from the freezer, actually. Just be careful how you pack them. They do best if you freeze them on a cookie sheet first until they are nice and hard, and then pack them into an airtight container with a sheet of waxed paper between the layers.

This recipe is from my mom, and I have no idea where it came from.

Ingredients:
1/2 cup seedless raisins (preferably golden)
1/4 cup butter (you must use butter, not margarine)
1/2 cup brown sugar
1/2 cup corn syrup
1/4 tsp salt
1 egg, beaten
1 tsp vanilla
and about 12-14 tart shells

Pre-heat oven to 400 F.Measure raisins into a bowl. Pour boiling water over to cover and allow to steep for 10 minutes. In a separate bowl, mix together brown sugar, corn syrup, salt, and vanilla. Drain raisins. Add butter directly to drained raisins and stir until butter is mostly melted. Add to sugar mixture and combine until butter is melted. Stir in beaten egg. Fill tart shells 3/4 full and bake for about 10-12 minutes, or until pastry is browned and filling is browned and bubbly.

Yummy! They freeze really well too. Makes about 12-14.


Read More

Tuesday, June 23, 2009

Berry Jello Parfaits


This is one of our favorite summer desserts. The best combination of flavors is blackberries mixed with raspberry jello. Delish! This recipe was inspired by one I found over at Kraftfoods.com

1 four serving sized box of raspberry jello
3/4 cup boiling water
1/2 cup cold water
250 ml whipping cream
1 tbsp vanilla sugar (plain sugar will also do)
1 cup raspberries, blackberries, blueberries, or chopped strawberries (frozen works really well)

Whip the whipping cream, adding the vanilla sugar.

Combine the jello powder with the boiling water and stir until the powder is dissolved. Add the 1/2 cup of cold water to chill it slightly.

Divide the berries among 4 one cup wine glasses or parfait glasses. Pour 1/2 of the liquid jello over top of the berries, dividing the mixture among the four glasses.

Whisk about 1/2 cup of whipped cream with the remaining jello liquid. Pour the cream mixture over the jello mixture, dividing among the four glasses. Chill.

Top with remaining whipped cream and berries, shavings of white chocolate, or springs of mint.

Best eaten the same day you make them.


Note: To make vanilla sugar, put a vanilla bean in a mason jar and pour sugar over top up to the rim. Seal and put away for about a week.
Read More

Tuesday, May 19, 2009

Carrot Snacking Cake


This moist, not too sweet cake makes a great lunch box treat and freezes well-even with the glaze! Whip it up when you need a treat for lunch boxes or something to take to work in a hurry. I like that it uses applesauce so it's not chock full of oil, and the pineapple keeps it nice and moist. There's also no nuts, so if you are allergic then it's a great alternative.

Adapted from Canadian Living

3/4 cup crushed pineapple, drained well with a fine sieve (keep the juice!)
2 eggs
3/4 cup sugar
1/3 cup vegetable oil
1/4 cup unsweetened applesauce
1 tsp vanilla
1 1/4 cups flour
1 tsp cinnamon
1 tsp baking powder
1 tsp baking soda
1/4 tsp salt
1 1/2 cups grated carrots

Pineapple Glaze:
1 cup icing sugar
reserved pineapple juice

Pre-heat oven to 350 F, and line a 9 inch pan with parchment paper.

In a large bowl beat the eggs with sugar until pale. Beat in oil, applesauce and vanilla.

In a separate bowl, whisk together the flour, cinnamon, baking powder, baking soda, and salt. Stir flour mixture into the egg mixture just until moistened. Fold in pineapple and carrots.

Scrape batter into prepared pan and bake about 45 minutes, or until a cake tester inserted into the middle comes out clean. Let cool in the pan, then top with pineapple glaze.

Pineapple glaze:

In a small bowl whisk the icing sugar and 2 Tbsp of the reserved pineapple juice together, adding up to 1 tsp more juice if you need to make it spreadable. Spread it over the cake and let stand about an hour, until set.

Makes 16 pieces
Read More

Thursday, July 31, 2008

Havpia

Photo by Basheertome
Got someone in the family that is lactose intolerant, allergic to milk, or are you just dairy free? I nabbed this recipe from a Hawaiian friend of mine. It's sort of like a creamy, soft jello (molded pudding?) that you serve cut in squares with fresh fruit. Try it with fresh pineapple and mango. Yum! It's very light and refreshing.

2 cans of coconut milk (not coconut cream for desserts, but milk)
2/3 cup sugar
12 tbsp cornstarch

Whisk all ingredients together in a saucepan until smooth. Stirring constantly, warm over medium heat until it thickens. Pour into a greased 11x7 inch pan and chill for about 3 hours. Cover with plastic wrap when cool (when it's hot you'll just get the steam condensing on the wrap).

Cut into serving squares and serve with sliced fresh fruit.
Read More

Sunday, June 22, 2008

Pumpkin Pie


Pumpkin pie is such a favourite in this house that we don't even wait for a holiday to eat it, we'll take any excuse. In fact we love it so much that during Christmas and Thanksgiving my family doesn't care about any of the other holiday food, they just want pie. We are pumpkin pie purists-no chocolate, no cream cheese, nothing weird in our pie, just pure, delicious, pie.

This is it.

Makes 1 pie

2 eggs
398 ml of canned pumpkin
1 cup of packed brown sugar
1 tsp cinnamon
1 tsp nutmeg
1/4 tsp ginger
1/4 tsp salt
3/4 cup evaporated milk
*1 deep dish unbaked pie shell (crust)

In a large bowl, combine the canned pumpkin with brown sugar, cinnamon, nutmeg, ginger, and salt. Stir until combined. Beat eggs in a seperate bowl and add to pumpkin mixture. Stir well. Add evaporated milk a gently stir until well combined. Pour into pie crust and bake at 425 F for 15 minutes, then reduce the oven heat to 350 F and bake for approximately 30-35 minutes. It is finished when a knife inserted into the center comes out clean. Cool, chill, top with real whipped cream, and enjoy with a hot cup of coffee.

*As for the pie shell, I do not make pastry from scratch. I don't buy it ready made either, I get this stuff which is sorta homemade, but also sorta cheating. But it's good for those of us that aren't so hot at making pastry entirely from scratch.
Read More
© 2005-2017 all written and photographic content by Scattered Mom/Karen Humphrey (unless otherwise specified) and may not be reproduced or used in any manner without consent. All rights reserved.

© 2014 Chasing Tomatoes, AllRightsReserved.

Designed by ScreenWritersArena