Printfriendly

Showing posts with label Bread. Show all posts

Friday, April 3, 2015

Challah Bread


IMG_8517

At Christmas time, I was gifted my grandmother's old recipe book-a ledger filled with newspaper and magazine clippings, some going as far back as the 1950s. It was fascinating to leaf through the pages, seeing what was popular at the time in my grandma's kitchen. Soon I'll get some photos and show you all. I'm not sure where Grandma would've found some of the ingredients in those recipes since she was way out on the farm, but it's pretty clear she was adventurous! Everything from Chinese to Indian, Greek and even French cuisines were tucked away in her scrapbook, carefully cut out and glued onto the pages.

One thing grandma really excelled at was bread. Homemade buns were a staple in her kitchen and little better was one warm from the oven, slathered in butter. My mom learned how to make buns from her and when I was married, I asked Mom to teach me too. The joke in our house is I must've inherited the bread making gene. There is no bread maker here; I'm the kind of person who loves to get a feel for the bread with my fingers. I'd rather knead it right on my counter, working the dough by hand with the sweet smell of yeast wafting through the kitchen.

This challah recipe is something I had in my own binder full of clip outs, from a Today's Parent magazine back when Kevin was only 3 years old. For some reason I never did try it until this weekend for a French toast recipe I'm whipping up for BC eggs. Not only is this a super easy recipe, I love that the rise times aren't that long. The loaves look impressive once you bake them, and you'll have two baguette sized ones to eat, serve with dinner, or make your own French toast with.

Challah is a traditional Jewish bread often served during Passover. It is dairy free and is wonderfully tender, yet substantial so that it makes amazing French toast. We couldn't even resist it's call as soon as it came from the oven. As soon as it cooled, one of the loaves was immediately sliced into thick pieces and slathered with butter.

Ingredients:

3 1/2-4 cups all purpose flour
4 1/2 tsp instant rise yeast
1/4 cup sugar
2 tsp salt
1 cup hot water
1/2 cup vegetable oil
2 eggs, beaten
1/2 cup sesame seeds or poppy seeds

Directions: 

1. In the bowl of your electric mixer, stir together 2 cups flour, the yeast, sugar, and salt.

2. In a medium bowl whisk together the eggs and vegetable oil. Still whisking, add the water a little at a time so you don't 'cook' your eggs. With the motor running on the electric mixer, pour the water and oil mixture into the flour and yeast.

3. Continue to mix until smooth. Change from the paddle attachment to a dough hook. With the motor running, continue to add up to another 2 cups of flour, 1/2 cup at a time until the dough becomes stiff. Turn it out onto the counter and knead for a few minutes until it's smooth and elastic. Shape the dough into a large ball.

challah dough

4. Lightly coat a large bowl with vegetable oil, and then set the ball of dough in the bowl, turning the dough so it's coated all over with oil. Cover with cling film and set in a cold oven with the light on.

A light in the oven will generate enough heat to make the dough rise and the oven will protect it from any drafts. Let the dough rise for 30-45 minutes, until doubled in size.

5.  Turn the dough out onto a lightly floured counter and punch down the dough to get ride of excess air bubbles. Divide the dough into two portions. Set one aside. Then divide one of the balls of dough into three equal portions.

6. Stretch and shape your small balls of dough into three 20 inch long ropes of dough. You want them all to be similar thicknesses. Line them all up together and pinch them all together at one end.

challah braid 2

7. Braid the ropes together tightly. When you get to the end, pinch the loose pieces together and tuck them underneath, forming a long braid.


Challah braid

8. Repeat with the other ball of dough and place them both on a well greased baking sheet. Cover them with a clean tea towel and put them back in a cold oven with the light turned on.

challah braid 3

9. Let the challah rise another 30 minutes until it's almost doubled in size again, before removing the pan from the oven.

10. Turn the oven on to 375 F. While it's heating up, brush the dough with a lightly beaten egg and sprinkle them well with either poppy seeds or sesame seeds. Bake the bread for 25-30 minutes until it's a dark golden brown and sounds hollow on the bottom when tapped.


IMG_8516

11. Remove the bread from the pan to a cooling rack and let cool to room temperature. Slice, slather in butter, and eat!

Adapted from Today's Parent
Read More

Sunday, February 23, 2014

Sour Cream Banana Bread

sour cream banana bread

We've spent our weekend glued to the TV, watching the Olympics and cheering on our men's hockey team as they took the gold medal in Sochi. With the wind howling outside and sending us a pile of snow, baking and hibernating seems like the thing to do. When you're holed up inside to stay warm and dry, nibbling on banana bread is a great treat, especially for breakfast!

A few weeks ago, Kraft sent me a lovely treat in the mail; chocolate flavoured peanut butter! I'm not much of a fan of chocolate in the morning on my toast, but as an afternoon treat on banana bread? Oh my goodness. With snow lightly falling outside it just seemed like a great idea to whip up a batch of banana bread with the bit of leftover sour cream I had kicking around my fridge. Once it was cooled, thick sliced pieces slathered with the chocolate peanut butter made a wonderful afternoon snack.

Banana bread is really easy to make-I actually have a few recipes here on Chasing Tomatoes, from a healthier one to one paired up with carrots, and another with big chocolate chunks. Sour cream makes this basic version moist and a bit tangy.

Ingredients:

2 cups flour
2 tsp baking powder
1/2 tsp salt
1/2 tsp baking soda
1/2 tsp cinnamon
1 cup sugar
2 large eggs, room temperature
1/3 cup vegetable oil
1 tsp vanilla
4 very ripe bananas, mashed
1/2 cup sour cream

Directions:

Pre-heat the oven to 350 F.

Slather the inside of a 9x5 inch loaf pan with butter, and then dust with a bit of flour. Set aside.

In a medium sized bowl, whisk together the sugar, oil, and vanilla until well blended. Add the bananas and sour cream, whisking until combined. Set aside.

In another bowl, stir together the flour, baking powder, salt, baking soda, and cinnamon so the mixture is well blended and there's no lumps. Stir into the banana mixture until just combined.

Scrape the batter into the prepared loaf pan, smoothing the top. Bake in the middle of the oven for about an hour or until a skewer inserted in the middle comes out clean.

Let the loaf cool before slicing.

Makes one loaf, 10 slices

Adapted from Chow
Read More

Tuesday, January 21, 2014

Cinnamon Buns


When I was a child, my Mom used to bake a lot. I think it was because we grew up in a small town and the nearest grocery store was 15 minutes down a highway, or that it was just a cheaper way to feed three kids. Either way, homemade buns and cinnamon buns were something that Mom made often. We'd race up the driveway after getting off the bus and leap up the stairs two by two, hoping to get a warm mouthful of bread.

Honestly, there's really little else that is better than a warm mouthful of bread.

Cinnamon buns are, truthfully, not that hard to make. They do take a little practice like most breads, but I think you can do this. When I got the urge to bake bread this weekend, Kevin practically did a dance in my kitchen.

"You haven't made cinnamon buns in YEARS!" he cried. "At least not since I was 14 or something." He was right, too. I had written about cinnamon buns the last time I baked them, back in 2010. OY.

This recipe makes about one dozen large cinnamon buns. You could make them a little smaller and get about 16-18, too. Sometimes I double the dough and also make about 16-18 plain dinner rolls to put in the freezer.

Makes 12-18 cinnamon buns

Ingredients:

Dough:

1 1/2 cups milk
1/4 cup sugar
2 tsp salt
1/4 cup unsalted butter, melted
1 egg, room temperature
4-5 cups flour
2 1/4 tsp instant rise yeast

Filling:

1/2 cup unsalted butter, room temperature
1 cup brown sugar
2 tbsp cinnamon

Glaze:

1 tbsp vanilla
4 tbsp whipping cream
1 cup icing sugar

Directions:

1. Stir together 3 cups of the flour and yeast in a large bowl. Set aside.

2. In a medium sized pot, stir together the milk, sugar, and salt. Warm over medium low heat until steaming, then remove from the heat and set aside. Stir in the melted butter. Crack the egg into a medium sized bowl and whisk it.

3. Cool the milk mixture to about 130 F. Add about a tbsp to the egg, whisking well. You want to temper the egg so that you can add it to the warm mixture without cooking it and ending up with scrambled egg. Add the hot milk, little by little, whisking as you go, until it's all incorporated.

Check the temperature of your milk mixture now. All that whisking and adding an egg probably cooled it. You still want it fairly warm (around 125 F) before you add it to the yeast and flour. If it's not warm enough, pour it back into the pot you heated the milk in and warm it a bit over low heat, stirring. Don't let it boil or get too hot!

4. Stir the milk into the flour and yeast mixture. It will form a pretty sticky dough. Add more flour until the dough is smooth and elastic. If you are using a stand mixer, this is quite easy-just get your mixer going with the dough hook and let it run for a few minutes to knead the dough. If you don't have a mixer, once you have a dough turn it out onto a floured counter and knead for about 5 minutes or so.

5. Slather a large bowl with butter and place the dough inside it. Cover with a clean tea towel and sit it in a warm place for 90 minutes, or until it's doubled in size.

6. In a medium bowl, mix filling ingredients together. Set aside.

7. Dump the risen dough out onto the counter and knead it a bit, or punch it down to get rid of the excess air. Using your hands and a rolling pin, roll the dough out into an 18in x 12 inch rectangle. Slather it with the sugar cinnamon butter. It won't seem like a lot, but you don't need a lot. Make sure to leave an inch border along one long edge so it will seal.

8. Roll up the dough tightly into a log, starting at the longest side, and pinching the dough together when you get to the end. Brush the log lightly with butter. Slice into 12-14 pieces for large cinnamon buns, 16-18 for smaller. Set them cut side up on a lightly oiled, rimmed baking sheet about 2 inches apart. Set the pan aside with a clean tea towel over top for about 60 minutes, while they rise and double in size.

9. Pre-heat oven to 350 F. Bake the cinnamon buns for about 25-30 minutes or until they lightly browned and bubbly. The filling will seep out and bubble on to the pan. Remove the buns from the pan so that they don't stick and set them on a wire rack to cool. Be careful not to burn yourself on the sugary mixture!

10. When the rolls have cooled so that you can touch them, whisk the glaze ingredients together in a medium sized bowl and drizzle over top.

Try not to devour them all at once!
Read More

Wednesday, September 25, 2013

Cinnamon Loaf

I think I have a problem. You see, I am somewhat of a recipe hoarder.

They are everywhere. Scribbled on scrap pieces of paper, neatly printed out and filed in binders, ripped out of magazines and stuffed in a drawer in the kitchen, falling out of my giant calendar, in my purse or school bag, lunch bag, car, written on napkins, they are EVERYWHERE.

Whether I saw it at the doctor's office, in the staff room at work, nabbed it from a co-worker or created it on my own, my world is full of paper-and food. Sometimes I keep them for years and eventually make them, other times I reconsider. Sometimes I look at them and think, "What on EARTH was I thinking? This is craziness!"

This is one of those recipes. Since I almost never buy sour cream, it's been one that I've held onto forever, but never got around to making. I'm not even sure of the source anymore. All I know is that I've had it for probably at least 6 years, hiding in a drawer, until the other day when I decided to just make it. Warm, a little tangy from the sour cream, with sweet cinnamon and brown sugar in the middle, I can't believe that I didn't make it sooner. This post was supposed to come with a photo, but silly me-I allowed my family to go ahead and dig in before I snapped one, and there's nothing left. Add in a busy week, a bit scattered brain, and an auto publish button, and here you go. Trust me, it's tasty. So much so that when I make this again, I'll get a photo. Promise!

Any tips on how I can tame my recipe paper mess? Oy. I'm open to any suggestions.

Ingredients:

1/2 cup butter
1 cup sugar
2 eggs
1 cup light sour cream
2 tsp vanilla
1 1/2 cups flour
1/2 cup whole wheat flour
1 tsp baking powder
1/2 tsp baking soda
salt

Filling:
3 tbsp brown sugar
1 1/2 tsp cinnamon

Directions:

Pre-heat oven to 350 F and lightly butter a 9x5 inch loaf pan.

Cream the butter and sugar together until fluffy.  Scrape down the bowl and add in the eggs, sour cream, and vanilla, beating until well incorporated.

In a separate bowl, whisk together flours, baking powder, baking soda, and salt.  Fold into wet ingredients until combined.

Spread half of the batter into the bottom of the pan.  Sprinkle the brown sugar/cinnamon mixture over top, then spread the other half of the batter on top.  Smooth the top and then bake in the center of the oven for about 45-50 minutes, or until a skewer inserted in the center comes out clean.

Let the loaf cool before slicing. Wrap in cling film and store at room temperature for 2 days, or slice and freeze for a few weeks. If you slice it before you freeze it, the loaf is much easier to then pull off a slice and tuck it, frozen, into a lunchbox.

Makes 1 loaf


Read More

Thursday, May 23, 2013

Maple Oat Waffles

Maple Oat Waffles


Breakfast, lunch, dinner, or a snack, waffles are a favourite in my house. When these were cooking away in my new Krups waffle maker (read about how well that baby cooks up waffles), both John and Kevin came wandering into the kitchen and took a sniff. Sweet and bread-like, this is an extremely tasty recipe.

Oat flour may be a bit difficult to find in a typical grocery store. I found oat flour at Anita's Organic Mill here in Chilliwack on Yale Road. You can actually find a lot of specialty flours at the store, along with all kinds of other things such as beans, lentils, and baking supplies. Anita's products are also carried in retail locations in Western Canada and online. I love using different flours and experimenting with the various tastes and textures. Oat gives a slightly nutty flavour to these waffles, and combined with the oat bran, they really are somewhat healthy.

Anitas Organic Mill Oat Flour


Ingredients:

1/2 cup oat bran
1 cup oat flour
2 cups all purpose flour
1 tbsp baking powder
1 tsp salt
2 cups whole milk
4 eggs, separated
1/2 cup maple syrup
2 tsp vanilla extract
1 tbsp sugar

1. Heat 1 cup of the milk until steaming hot. Pour over the oat bran and let it sit while you continue with the recipe.

2. In a large bowl, sift and then whisk together the oat flour, all purpose flour, baking powder, and salt. If you get a few little bits of grains left behind in the sifter, be sure to add them back into the mixture. Set aside.

3. In a medium bowl, whisk together the egg yolks, vanilla, and maple syrup.

4. Stir 1 cup of cold milk into the oat bran and warm milk. The cold milk will bring the temperature down. Whisk the milk and oat bran mixture with the egg yolks and maple syrup.

5. Using an electric mixer, beat your egg whites. At first, they will be frothy but then will begin to become thick, like pictured below. Add 1 tbsp of sugar.

eggwhites3

Continue beating the egg whites until fluffy, like cotton candy. It takes approximately three minutes.

eggwhites2

Once the egg whites look like this, stop beating them. You don't want to over beat them. If you do, they'll crack and look mealy.

6. Stir the egg and milk mixture into the flour mixture until blended. Don't worry if there are a few lumps still throughout the batter. Fold half of the egg whites into the batter. You don't want to deflate the egg whites so be extra gentle. Add the other half of the egg whites and fold them in as well, being very careful to completely incorporate them but still being careful not to deflate them.

7. The batter will be fluffy and should be cooked right away, or the batter will deflate as it sits. Brush the waffle maker with melted butter, then ladle out about 1/2 cup of the batter at a time (per waffle) into a pre-heated waffle maker. Close the lid and cook the waffles for about 4 minutes.

Maple Oat Waffle


8. Eat those babies right out of the waffle maker, while they are hot. We liked them topped with yogurt and then drizzled with blueberry syrup. The yogurt is a much nicer (and less fattening) substitute for whipping cream or ice cream. I found a fantastic yogurt from Ridgecrest Dairy at Abbotsford's Lepp Farm Market. Sometimes people find natural yogurt to be a little sour, but this one is really fantastic.

Ridgecrest Dairy yogurtMaple Oat Waffles

Makes about 12 waffles

 Adapted from Good to the Grain
Read More

Thursday, September 13, 2012

Grandma's Flax Seed Buns

Grandma's Flax Buns
Mmm..is there anything better than fresh bread from the oven?

When I think of my Grandma, I think of a farmhouse that smelled like buns. Grandma was always baking, and when we were hungry, buns and jam would be on the counter.  Every Sunday we'd make the trek out to her farm, where the table would be laden with farm fresh chicken, milk, vegetables right from the garden, and her home made bread.  There was no such thing as kid food, just real, simple, delicious things to eat straight from the farm.

These days, people usually buy bread from the store and if one is going to bake it, usually they throw everything in a bread maker and turn it on.  When I got married, I asked my Mom to come to the house and teach me how to make bread from scratch.  I wanted to keep my roots and be able to pass the skill of bread making on to my own kids and grandkids.  In the years that have followed I've had the chance to buy a bread maker, but I refused since I prefer making bread by hand.  There's nothing like the smell of yeast and the feel of dough beneath my fingers to take me right back to Grandma's kitchen.

I don't know where this recipe comes from originally, but my Grandma made them in her 90s and they were a favourite when I was a teenager.  While they are made with white flour, you could try substituting 1/2 whole wheat flour but you'll get a heavier bread.  Flax seeds add a delicious texture and flavour to the dough.  Originally they didn't contain any butter or oil and were a little dry, but I added 1/4 cup olive oil to the dough and they rose up light and fluffy.  You can, if you wish, make these in your stand mixer but if you make the full recipe the amount of dough may be a little too much even for a Kitchen Aid Artisan Stand mixer (which is what I use).

8 cups all purpose flour
3/4 cup ground flax seeds (buy them ground or grind your own in a spice grinder)
2 packets (or 4 1/2 tsp) of rapid (instant) yeast
3/4 cup sugar
3/4 tsp salt
2 eggs
1/4 cup olive oil
3 cups very warm warm water

Combine FOUR cups of flour and the yeast in a large bowl. Set aside. In a different bowl, combine sugar, salt, oil, and hot water. Add the water very gradually to the eggs, whisking as you go,  slowly warming the eggs, but being careful not to scramble them. Once you've combined the eggs and water mixture, pour into the flour/yeast mixture and stir with a wooden spoon.  You could use a stand mixer, but I found with 8 cups of flour total the amount of dough was a little too much for my mixer.

Gradually add about two more cups of flour, continuing to stir, until a dough forms. If the dough is still very sticky, add the remaining cup of flour. Turn out onto a floured surface and knead about 5-10 minutes.

Ready to rise


Let the dough rest, covered with a clean tea towel, about 15 minutes, in a nice warm spot. I like to put mine in the oven with the light on-the heat from the light generates enough  heat to help dough rise.
Punch down and shape the dough into 24 rolls, placing them on two greased (or parchment paper lined) baking sheets.   Cover the shaped rolls with clean tea towels and allow them to rise for 1 hour until doubled in size.

Pre-heat oven to 350 F. Just before putting the rolls in the oven, beat together 1 egg and 2 Tbsp of water and brush over the rolls.  Adjust the racks in your oven so that you can bake both pans at once, rotating and switching the pans (swap the one on top and bottom) half way through your baking time, at about 8 minutes.   Bake for about 16-20 minutes total, until the tops and bottoms are browned and they sound hollow when tapped on the bottom. Remove from the oven to the counter and let the buns cool.

Makes 2 dozen

If you aren't going to eat these within 2 days it's best to wrap them up well and freeze them.


Read More

Monday, July 16, 2012

Homemade Pita Bread

I love pita.  Warm, soft, bread that I can dip into things like carrot hummus or top with spiced chicken and veggies to make into a sandwich, it's one of my favorites.  Buying fresh Greek pita at the store costs me about $5 for a small package but I recently discovered that I can make a pile myself for just pennies.

Making pita is a little time consuming because you need to let it rise like bread for a total of 2 hours, which you can think of as work intensive, or just find something else to do while it rises.  The cooking time, however, goes really quick.  Don't be afraid if you've never made bread before, this is really easy and you can even get the kids involved!  Just make sure your water is good and warm-not lukewarm, but not hot, either. 


Fresh pita bread


Adapted from Fine Cooking

1 tsp sugar
4 ½ tsp quick rise yeast (or, two ½ oz packages of quick rise yeast)
3 cups unbleached all purpose white flour
3 cups whole wheat flour
2 tsp salt, plus more for sprinkling
1/3 cup plus 2 tbsp extra virgin olive oil

Measure out the flours, sugar, salt, and yeast into the bowl of a stand mixer.  Give it all a good whisk to mix together.   Using the dough hook attachment and with the motor running, gently pour in 2 cups of warm water mixed with 1/3 cup of olive oil.   The dough will come together into a ball.  Knead the dough in the mixer for about 5 minutes.  It may crawl up the dough hook, so stick around and make sure it stays put.   Turn out onto the counter and shape into a ball.

If you don’t have a stand mixer, you can do this by hand.  Make a well in the center of the dry ingredients and pour in the water/oil mixture, while stirring with a wooden spoon.  It will take some muscle, as it’s a stiffer dough.  Turn out onto the counter and knead for 5 minutes, until smooth and elastic.   Shape into a ball.

Measure out the 2 tbsp of olive oil into a large bowl and slather it around the bowl, then put the dough in the bowl, turning it so that the oil coats it all over.  Cover the bowl with plastic film and set aside in a warm place for about an hour.

Once the dough has risen and is double in size, gently punch it down and let it rest for 20 minutes.  Divide into about 12 pieces at about 3 3/4 oz each (I actually ended up with 16-18 pieces in the end)  Shape each piece into a ball.


IMG_1527
Your finished balls of dough will look like this. Not perfect, but nice and round.
Place a ball of dough on a clean counter, then cup your hand over it and quickly move your hand in a circular motion.  If the counter has no flour on it and the dough is a little sticky, this is a great trick for shaping the dough into a tight ball.   When you have finished doing this with all the balls of dough, lightly flour your counter and then roll out each ball into a circle 7 inches in diameter.  Set each aside on a floured surface and cover with a damp tea towel.  Let them rise for another hour.  They won’t rise a whole lot now, since the cool tea towels will stop that.  However, they will get slightly puffy.

Pre-heat your oven to 500F.  You will need a rimless baking sheet but if you don’t have one, don’t worry-just take your rimmed cookie sheets and turn them upside down.  Weird, right?  It works.


Waiting to be baked
Try not to crowd on too many.  I could fit 3-4 pitas.  Don't forget to sprinkle with a little salt!

Set however many pitas that will fit on your baking sheets and sprinkle with salt.  I liked using a coarser salt here, as it gave a little bit of crunch on the finished product. 

Your oven rack should be around the middle to bottom third of your oven.  Bake the pitas about 4-5 minutes, watching carefully at the 4 minute mark.  You want the bottoms of the pitas to be golden, but it’s a fine line when they go from golden to slightly burned.  I burned the first batch and found that 4 ½ minutes worked the best for me.  You be the judge!

Remove the freshly baked pitas from the oven and pile on a cooling rack to cool.  These are best eaten warm, but if you can’t eat them all,  once cooled they also can be wrapped up and stored in the fridge for about 3 days or the freezer for 6 months.
They are extra tasty when warmed up in the oven-just wrap in foil and heat in a 350 F oven for about 5-10 minutes.

Makes about 14-18

Note:  These pitas typically don’t always become super puffy and have pockets, as are common with pita breads you buy at the store.  Some poofed up in the oven, and some didn’t.  Greek pitas don’t have pockets, and are more for dipping and piling ingredients onto, rather than stuffing.   Either way they are very tasty and good with tzatziki, hummus, souvlaki, or just on their own.
Read More

Friday, April 6, 2012

Vanilla Cloverleaf Sweet Rolls


vanilla buns


Easter dinner, for me, isn't complete without some kind of sweet, tasty bread to go with it.  Usually I love to have hot cross buns on the table, but this Easter I tried some really tasty vanilla buns.  I'm a sucker for anything vanilla, so these were an obvious choice.  If you don't have a vanilla bean handy, vanilla bean paste is a tasty option.  This recipe is different from most bread recipes I've ever made, but if you follow the directions, you are rewarded with delicious results.  These tend to be best eaten the same day they are made, as they tend to be drier as they sit.   You can also make the dough the night before, then shape and allow them to rise in the morning before baking for Easter dinner.  Look for the bold make ahead hint in the recipe below for instructions.

Adapted from Bon Appetit

2/3 cup whole milk
5 tbsp sugar, divided
1 3/4 tsp active dry yeast
2 large eggs, room temperature
2 3/4 cups flour
1 vanilla bean
1 tsp salt
1/2 cup unsalted butter, room temperature,  cut into 1 inch pieces

Heat the milk on your stove until it's about 110-115 F.  Pour into a 2 cup measuring cup, and stir in 1 tbsp sugar. Sprinkle the yeast over top and allow to sit for about 5 minutes until foamy.  Whisk in the eggs.

Measure out the flour, remaining 4 tbsp sugar and salt into the bowl of your mixture.  With the dough hook attachment, stir it together and then add the milk/egg mixture and scraped vanilla bean seeds with the motor running.  Continuing to run the motor, add the pieces of butter, one at a time, mixing well after each. Mix it on medium high for 1 minute, then on medium for about 5 minutes.

Don't worry that the dough seems really sticky, wet, and unlike bread dough you've seen before. It should be sticky, but not greasy.  If the dough seems greasy, knead it with the machine about another 2-3 minutes longer.

Brush a large bowl with melted butter.  Put the dough in the bowl, and brush the top of the dough with a little more melted butter.  Cover with plastic wrap and place in a draft free area for 1 1/2 hours.

Make ahead: Instead of putting the dough on the counter to rise, put it in the fridge to chill overnight. Pull out in the morning and allow to rise for 2-2 1/2 hours before continuing with the recipe.

Brush a muffin tin with melted unsalted butter.

Punch down the dough on a lightly floured counter.  Divide the dough in half, then each half into six equal pieces.  Taking a piece at a time, break into three equal pieces.  Roll each into a ball and fit the  three balls of dough in each muffin tin.  Continue with the remaining half of the dough.

Cover the buns with a clean tea towel and set in a draft free place to rise for 1 or 1 1/2 hours, until the dough rises about an inch above the top of the pan.  Gently brush each bun with milk and sprinkle each with 1/2 tsp sugar.

Bake at 375 F for 15-18 minutes, until golden brown.  Transfer to a rack and let cook completely.

You can make these ahead and then freeze in an airtight container for up to a month. Thaw, and then reheat by placing on a baking sheet and placing in a 350 F oven for about 5-10 minutes.

Makes 1 dozen.


vanilla buns in basket
Read More

Tuesday, January 24, 2012

Whole Wheat Sunflower Baguettes

Sunflower Baguette

Warm bread, straight from the oven, is a favorite in our house. Specialty breads are available at the store, but often they are about $4-5 a loaf and are never as good as homemade. This recipe is something that I used to make long ago, but then forgot about until recently. These are really difficult not to just slather with butter and devour seconds after you take them from the oven, but the bonus is that you get not one, but two baguettes with this recipe.

Today as the wind howled and the rain pounded the windows outside, and I lay in bed sick with a cold, I dreamed of these baguettes. Too sick to actually make them, I thought all was lost until I remembered the thick slice I had tucked into my lunch in anticipation of going to work.

All was not lost - I finally had my warm bread slathered with butter for lunch, and you can too!

Adapted from Canadian Living

2/3 cup raw sunflower seeds
1 1/2 cups flour
1 1/2 cups whole wheat flour
2 tbsp flax seeds
2 tsp quick rise instant dry yeast
1 1/4 cup warm milk
3 tbsp packed brown sugar
2 tbsp vegetable oil
1 1/2 tsp salt
1 egg, beaten

Toast 1/2 cup of the sunflower seeds in a dry skillet over medium heat until golden.  Watch them carefully! Seeds go from perfect to burned in seconds.  Set them aside to cool.

In a bowl, whisk together 1 cup of flour, the whole wheat flour, flax, and yeast.  Set aside.

Using a small saucepan, warm the milk, brown sugar, oil,  and salt until the milk is steaming. Set it aside to cool, but you want it to be around 110 F, or as warm as a baby bottle.

Pour the milk mixture into the flour mixture, stirring.  I have a stand mixer so I just let it go using the dough hook.  Sometimes I have to stop it and with a wooden spoon, scrape down the sides to get the flour incorporated into the dough.  Add the 1/2 cup of remaining flour if you need it, but the dough should be somewhat sticky. Turn out onto a lightly floured counter and knead for about 8-10 minutes until smooth and elastic.

Place the dough into a greased bowl, turning to coat,  and cover with a clean tea towel.  Let rise for about an hour and 15 minutes.

Punch down the dough, cut in half, and roll out out each piece  to about a 16x4 inch rectangle.  They make fairly skinny baguettes, so I usually make mine about 12x 5 inches.  Starting at the side closest to you, roll up until you have a long roll, pinching the seams when you get to the end.  Set each onto a baking sheet and cover with a clean tea towel.  Set aside in a warm place to rise, about 30 minutes.

Pre-heat the oven to 375 F.

Brush the risen baguettes with the beaten egg, and sprinkle with the remaining raw sunflower seeds. You have to press them onto the dough a little, as they will tend to fall off.  When the oven is good and hot, put the baguettes in on the middle rack, and bake for about 15 - 20 minutes, until the bottoms are golden and sound hollow when tapped.  Keep an eye on them, the original recipe said to bake for 25 minutes but I didn't go near that long and they were definitely done early.

Remove from the oven and let cool on a wire rack.

These are best served the same day, or you can wrap one up in plastic film and then foil, and put in the freezer for another day.  Being home made, they do go stale a little quicker than bread that you buy from the store.

Makes two baguettes
Read More

Sunday, September 4, 2011

Make Your Own Flour Tortillas

There's a lot of things that you can cook from scratch, and some are worth it, while others not so much. Then there's the things that you make from scratch and are so delicious that you wonder why you ever bothered to buy them in the first place!

Tortillas are like that for me. Sure, I do buy them when I don't have the time to make them, but when I have a weekend free and feel like playing with some dough, nothing beats home made tortillas. These are really easy-and the kids could even help so it's a win-win situation! I love this recipe because the resulting tortillas are soft and delicious, ready to be filled with whatever you want or even rip up and dip into guacamole, hummus, etc. I think they would be a perfect afternoon activity with the kids, and the best part is they get a snack too!

This recipe makes about ten 8 inch tortillas. Personally, I find that a teeny bit small and prefer to double the recipe, then pinch off about 2 oz of dough instead of the usual 1 1/2 oz. You can make them whatever size you wish.

Adapted from Rebar

1 1/2 cups flour
1/2 cup whole wheat flour
1 tsp sugar
1 1/2 tsp baking powder
1 tsp salt
5 tbsp vegetable shortening
3/4 cup hot water

Mix the flours, sugar, baking powder, and salt in a large bowl. Cut in the shortening with a pastry cutter or two knives until the mixture is like coarse crumbs. Then gradually add the hot water, stirring with a wooden spoon as you go, until the mixture comes together.

Dump the dough out onto a lightly floured counter and knead it just a bit, gently, to bring it together. Shape it into a ball, put it in a clean bowl, and cover with plastic wrap. Let it rest for a good hour.

Now, line a cookie sheet with parchment paper, sprinkle it with flour, and set aside. Pinch golf ball sized bits off your dough and roll them in your hands to make a ball, then set on the cookie sheet. If you make the balls golf ball sized, you will end up with about ten 8 inch tortillas. Cover them with plastic wrap and let them rest for another hour.

tortillas 1

Resting the dough

When the hour is up, lightly flour your counter and one by one, roll out your little balls of dough. Don't worry about getting them perfect, mine never are. That's part of the charm. Stack them with some waxed paper or parchment between them, and keep the rolled dough covered with plastic wrap or a clean tea towel. Try to get the tortillas quite thin-this takes some practice, but you'll get the hang of it the more you make them, trust me!

rolled

Rolling it out. I can never get them perfectly round.

Once your tortillas are rolled out, get either a cast iron skillet or a non stick skillet on the medium high heat. Brush it with a little oil. Gently lay your first tortilla in the pan-this is a bit tricky, it took me some practice to get it in the pan without folding it accidentally!

Now, don't leave the stove. Stand right there and watch as your tortilla will cook fairly quickly. Watch until you see bubbles forming underneath, then flip the tortilla over and cook the other side until it's light golden. Slide out of the skillet onto a rack and let cool, then continue with the next one.

in pan

Watch for bubbles!


Your tortillas will last a few days, or you can wrap them well and freeze them for about a week. They never last that long in our house, though.

Enjoy!


Read More

Monday, April 25, 2011

Cloverleaf Dinner Rolls

We were there every Sunday without fail. The little farmhouse out in the middle of nowhere, where we gathered eggs from the chickens, watched the cows, and occasionally helped Grandma harvest things from the garden. My uncles would sit in the living room with the TV blaring, arguing about politics. I usually did my homework and devoid of child-friendly entertainment, contented myself with wandering around the barnyard.

Grandma's table would be laden with simple, wholesome, farm food-barely anything from the store but rather all made, grown, butchered, or harvested by her and my uncle's hands. She'd sit in her chair by the wood stove, resting after doing all that work, and watch us eat.

Grandma always wanted us to eat. It was her way of showing how much she loved us. There was never a time we went to her house that we didn't leave stuffed, and one of the things I remember most was her home made buns and jam.

I hadn't thought of grandma, or her homemade buns, for years. Even when I decided to make this recipe, I didn't remember ever seeing them before. I kneaded and baked, puttering along and not thinking much about anything, until I removed the pan from the oven. These look familiar, I thought as I poked at them. Where have I seen these before? A few minutes later one was cool enough to eat and as I reached for one, slathered it with butter, and then took a bite, I was 8 years old again and in my Grandma's kitchen. I can't be sure, but I'm positive she made buns just like these.

Buttery and easy to pull apart to slather with your choice of topping, these are a favorite in our house. I'm sure they will be something I'll be serving to Kevin, and maybe my own grandchildren, in years to come.

Cloverleaf Dinner Rolls


Adapted from Fine Cooking

2 1/4 tsp instant yeast
1/4 cup sugar
3 1/2 cups flour
1 cup warm milk
3 oz/6 Tbsp unsalted butter, melted
2 Tbsp vegetable oil
1 egg, room temperature, gently beaten
1 tsp salt

In the bowl of an electric mixer with a dough hook, stir together the flour, sugar, and salt.

Warm the milk and butter on the stove until it's about 100-110 F, then set it aside until it's tepid, or rather, warm but not hot.

With the mixer on low, stir in the milk/butter mixture, egg, and oil. The dough will be quite soft compared to regular bread dough. If you have a mixer with a dough hook, let the mixer do the kneading for you-but if you don't, knead the dough for about 5 minutes.

Slather the inside of a bowl with some oil, then take your dough and turn it over in the bowl, coating the outside of it. Cover with some cling wrap and set in a warm, draft free place for about an hour. I like putting my bread dough inside a cold oven with the light on, because then the light gives enough warmth to make the dough rise.

After an hour, gently punch the dough down and divide it into 36 pieces. Brush the inside of a muffin tin with melted butter.

Roll each piece of dough in your fingers to form a small ball, then fit 3 of the balls inside each muffin cup. Brush them lightly with a little extra melted butter when you are finished, and set aside again in a warm, draft free area for about an hour so that they rise.

When they are finished rising, pre-heat your oven to 375 F.

In a small bowl, whisk an egg yolk, pinch of sugar, and 1 Tbsp of milk together. Brush over the rolls. Bake in the middle of the oven for about 12-15 minutes, until they are golden and sound hollow on the bottom when tapped.

Makes 1 dozen
Read More

Monday, April 11, 2011

Hot Cross Buns

hotxbun


A few years ago, I found this recipe over at Canadian Living, in my quest to make hot cross buns that were just as good as those at our local bakery, but a whole lot cheaper.

These ones?

Better. Spiced lightly with cinnamon and nutmeg and topped with sweet icing, these are melt in your mouth goodness that is truly hard to beat.

1/2 cup sugar
1/4 cup warm water
1 package dry yeast (or 1 tbsp)

3 1/2 cups flour (Cookie Jar Tip: I think it's best to keep about 1/2 c to 3/4 c of the flour aside, just adding it in as you stir/knead until the dough is smooth and elastic. The second time I made these I either killed the yeast or had too much flour, and they were terrible.)

2 tbsp cinnamon
1 tsp nutmeg
1/2 tsp salt
1/4 tsp ground cloves
3/4 cup warm milk
1/4 cup butter, melted
1 egg
1 egg yolk
1/2 cup dried currants (or raisins)
1/4 cup chopped mixed candied peel ( I don't like peel, so I sometimes throw in a bit of extra raisins instead)

Glaze:
2 tbsp sugar mixed with 2 tbsp water

Icing
1/2 cup icing sugar
2 tsp water

Dissolve 1 Tbsp of the sugar in warm water and add the yeast. Let it sit for about 10 minutes, giving the yeast enough time to foam and bubble. Meanwhile, in a large bowl whisk together the remaining sugar, flour, cinnamon, nutmeg, cloves, and salt. Set aside. In a separate bowl whisk together the warm milk, melted butter, and eggs. Make a well in the center of the flour mixture and pour the milk mixture in. Add the yeast mixture and stir until a soft dough forms.

If you don't have active dry yeast, but instead have instant yeast, add the dry yeast to the flour mixture, and the warm water to the milk mixture. Just blend wet and dry ingredients as above and proceed as usual.
Turn the dough out onto a lightly floured counter and knead for about 8 minutes, or until smooth and elastic. Rub butter all over the inside of a large, clean bowl and put the dough inside, turning to grease all over. Cover it with plastic wrap and set inside the oven with the light turned on for 1 hour. This will keep it nice and warm. The dough should double in size.

Take the dough out and on a lightly floured counter, punch it down and knead in the raisins/currants/peel. Shape into a log and pinch off about 12-15 pieces, shaping and stretching until each one is shaped like a ball. Place in a greased 9x13 inch metal cake pan. Cover with a clean tea towel and return to the cold oven, with the light turned on to keep the dough warm.

Let rise for 35 minutes.

hotcrossbun


**Remove them from the oven** and turn it ON to pre-heat to 400 F. When ready, bake the buns for about 15 minutes or until golden brown.

After you remove the buns from the oven, prepare the glaze by dissolving the sugar in water over medium heat. Brush over hot buns. Allow the buns to cool completely.

When the buns are cool, mix the icing sugar and water together in a bowl. Spoon into a ziplock baggie, snip one end, and pipe icing in an x shape on top of each bun.

Makes 12-15 buns
Read More

Monday, January 17, 2011

Whole Wheat Cinnamon Raisin Bread

Cinnamon Raisin Bread 2


The idea of cinnamon raisin bread really appeals to me-sort of like a cinnamon bun without so much sweet, it makes a really great breakfast toasted with some cream cheese slathered on top. On Sunday I was awake early, so I got the dough going, by lunch I had it all tucked into loaf pans, and by the time we came home from a walk it was ready to go into the oven.

Bread really isn't so that hard to make, just a bit time consuming. This recipe is pretty easy though, and I'm sure you guys will whip some up some in your own kitchens without a problem. This recipe was not like anything I've made before, since it uses oil instead of butter-but it was really very tasty. With two loaves you can freeze one, share it, or make some killer French toast!

Adapted from Food Network Magazine January/February 2011


2 cups bread flour, plus more for dusting (or just regular all purpose flour works too)
2 cups whole wheat flour
1 1/4 cups warm water (check with a thermometer-should be between 120-130 F)
1/4 cup non fat dry milk
1 large egg
2 tbsp oil
3 tbsp honey
2 tsp salt
1 1/2 tsp instant dry yeast
2/3 cup raisins (soaked in boiling water about 30 minutes)
1 tbsp plus 1 tsp ground cinnamon
1/3 packed brown sugar

In a large bowl, combine the flours, dry milk, egg, oil, honey, salt, water, and yeast. Mix until you get a dough. If you have a stand mixer, use the dough hook and mix 3 minutes on the lowest setting, then increase to the next highest and mix another 5 minutes. Or, if you don't have a stand mixer, just turn the dough out onto a floured counter and knead that baby for about 5 minutes or so.

Get a nice big bowl, and slather the inside with some oil. Add the dough, and cover with plastic wrap. I like to let dough rise in my oven with the light on-that way the dough is draft free, and the light generates enough heat to really make it rise.

Let rise for an hour and a half until doubled in size.

Punch down your dough to get rid of air bubbles, then divide it in half and roll each half into an 8 inch square. Brush each square with oil, then sprinkle with half of the brown sugar, then raisins and cinnamon. Actually what I did was just mix the sugar and cinnamon together in a bowl, and then just use half of that. Starting with the end closest to you, roll up tightly and place in a loaf pan that has been lightly brushed with oil. (Or buttered, like I did. All that oil seemed weird to me. ) Cover with plastic wrap and stick back in the oven with the light on for an hour and a half so that they can rise some more.

Before baking, remove those loaves from the oven and turn your oven on to 375 F. Brush the loaves lightly with oil and bake about 25 -30 minutes, or until golden.

Remove to a wire rack to cool.

Makes 2 loaves
Read More

Friday, December 31, 2010

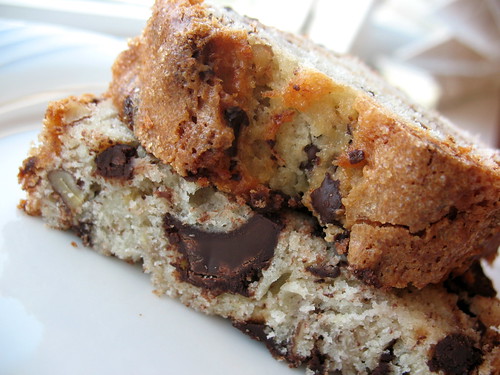
Chocolate Chunk Banana Bread

Chocolate Chunk Banana Bread2


Better than plain old banana bread, this one is decadent and delicious with huge chunks of melty chocolate and crunchy pieces of pecans. You could serve this warm for dessert with a scoop of vanilla ice cream, or just slice and tuck into school lunch boxes for a treat.

2 eggs, beaten
1 cup mashed banana
1/3 cup vegetable oil
1/4 cup milk
2 cups flour
1 cup sugar
2 tsp. baking powder
1/4 tsp salt
8 oz of semi sweet chocolate chunks, chopped
1/2 cup walnuts or pecans
coarse sugar (I use sugar in the raw) to sprinkle on top before baking.

Pre-heat oven to 350 F.

In a large bowl, mix together the milk, eggs, oil, and bananas until blended. Set aside. In a separate bowl, whisk together the flour, sugar, baking powder, and salt. Add to wet ingredients and stir until just combined. Fold in chocolate and nuts. Pour into a greased loaf pan and top with a sprinkle of coarse sugar to get a crunchy top (optional)

Bake at 350 F for about 60 minutes, or until a cake tester inserted in the center comes out clean.

Makes 1 loaf.
Read More

Monday, November 29, 2010

Cornbread

cornbread


Years ago, we visited Mesa Verde National Park in Southern Colorado, and ordered chili and cornbread. Never having been to the Southwest before, we weren't sure what to expect. Large bowls of steaming chili were placed in front of us and we dove in; only to quickly discover that chili in the Southwest USA is FAR hotter than chili in Canada. Our poor virgin Canadian tastebuds were about fried to oblivion, and just to get through it we dunked huge, buttery pieces of cornbread into the fiery sauce and nibbled.

Back home I found this recipe, which is obviously not authentic Southern cornbread (if any of my readers have a recipe for authentic, please share!) but it's still easy and really delicious dunked in a chili.

Adapted from Food To Grow On
1 cup cornmeal
1/2 cup flour
2 tbsp sugar
1 tbsp baking powder
1 tsp salt
1 egg, beaten
1 1/2 cups milk
2 tbsp melted butter

Pre-heat your oven to 375 F and butter a 9x9 inch square baking pan.

In a bowl, whisk together the cornmeal, flour, sugar, baking powder, and salt. Set aside. In a separate bowl, whisk the egg and milk together. Pour into the cornmeal mixture and mix until it's well blended. Then pour in the melted butter, and mix some more.

Pour into your prepared pan, and bake for 25-30 minutes, or until golden and when a toothpick inserted into the center comes out clean. Let cool on a baking rack. I love to slice it up while the cornbread is still warm, and serve with chili or stew.

Makes a 9x9 inch pan, about 6 servings.
Read More

Monday, November 22, 2010

Cheese Straws

Cheese Straws
Awhile ago I stepped into the Cooking Class at school, only to be greeted with the deliciously cheesy smell of these straws baking away in the ovens. You see, I love cheese. It's my favorite snack. Cheddar, havarti, blue, brie, Parmesan, you name it, I love it-which is why these babies are a perfect appetizer. Served along side veggies, with some hummus or a great dip, they are a great finger food to nibble on. They are also so incredibly easy, you'll have a batch or two babies baked up in no time.

Adapted from Caren McSherry's More Than Salt and Pepper
1 cup extra sharp cheddar cheese, grated
1 cup flour
1 tsp dry mustard
1/4 tsp smoked paprika
1 tbsp melted butter
1/3 cup milk
sea salt
pepper

Pre-heat your oven to 450 F.

In a bowl, mix together the cheese, flour, mustard, paprika, melted butter, and milk to form a soft dough. My dough was a little dry so I added a little extra milk. Form the dough into a flat disk, wrap in cling film, and put in the fridge for about 30 minutes.

Roll out the dough on a floured board to about 1/4 inch thick, in a rectangle about 20 cm long. Using a pizza cutter, slice the dough into strips 1 cm thick and 20 cm long. Sprinkle with sea salt and pepper.

Transfer the strips to a parchment paper lined baking sheet and twist them gently. Bake for about 5 minutes, watching carefully-they bake quickly! Remove from the oven. Allow to cool completely on the baking sheet before transferring to a baking rack.

Makes about 20 cheese straws
Read More

Tuesday, October 12, 2010

Pumpkin Loaf

Pumpkin Loaf


This sweet but not too sweet loaf is delicious with a slather of cream cheese mixed with a little maple syrup. I often make it to use up last bits of pumpkin left over from pies, or just as a nice treat to tuck into Kevin's lunchbox.

Adapted From Food To Grow On, by Rena and Susan Mendelson

2 cups flour
2 tsp baking powder
1/4 tsp salt
1/4 tsp cinnamon
1/4 tsp ground ginger
pinch of ground cloves
pinch of ground nutmeg
1/4 tsp baking soda
1/3 cup shortening (I used butter)
1 cup brown sugar
2 eggs
1 cup canned pumpkin
1/4 cup milk

Pre-heat oven to 350 F.

Whisk together the flour, baking powder, salt, cinnamon, ginger, cloves, nutmeg, and baking soda in a medium sized bowl until combined. Set aside.

With an electric mixer, cream the butter (or shortening) with the sugar until fluffy. Add in the eggs, one at a time, until blended. Stir in the pumpkin and milk.

Add the flour mixture and stir until just smooth, then pour batter into prepared loaf pan. Smooth the top. Now, I like crunchy tops on my quick breads, so I sprinkle some sugar in the raw over the top, and then bake. This step is optional. It does add extra sugar and the loaf is already quite sweet, but I like the little extra sugary crunch.

Bake at 350 F for about an hour, until a cake tester inserted into the middle comes out clean. Cool in the pan, and then remove and cool completely.

Makes 1 loaf
Read More

Monday, September 13, 2010

Home made Pizza Pretzels

Pizza Pretzel


One of the things sold at Kevin's school that is sort of popular, next to those instant noodle cups, are pizza pretzels. Made with white flour, smeared with pizza sauce, and sprinkled with poppy seeds, lots of kids buy them to eat for lunch. I think they are kind of gross, to be honest.

Awhile ago I was reading over at A Peek Inside the Fishbowl, and I noticed that Andrea had a soft pretzel recipe, so it just seemed natural to take the on the pretzels this week. Can we do from scratch? Will they be any good? Jake watched as I rolled, then boiled, and baked these-the smell of bread filling the house, until he couldn't stand it any longer and descended on a newly baked pretzel for a snack.

"Oh my GOD, Mom!" His mouth full, his eyes shining, he plucked crispy bits of cheese off the edges. "This is the best pizza pretzel EVER. Make them for my lunch. PLEASE."

Baked ahead of time, wrapped and frozen, they would make a delicious addition to any lunchbox. You could even get the kids involved in rolling and make it a fun weekend activity!

Adapted from A Peek Inside the Fishbowl

1 Tbsp sugar
1 package of rapid rise yeast (or 2 1/4 tsp)
1 3/4 cups whole wheat flour
1 3/4 cups all purpose white flour
2 tsp sea salt
1 1/2 cups warm water
coarse salt
1 1/2 cups shredded mozzarella
1/2 cup pizza sauce

In a large bowl, whisk together the flours, sugar, salt, and yeast. Pour in 1 1/2 cups of warm water, stirring until it forms a ragged dough. Turn out onto a lightly floured board and knead for about 8 minutes. The dough will be a bit sticky still. I used my mixer with a dough hook for this step, which was great. You can do that too.

Coat the inside of a large, clean bowl with some olive oil and place in the dough, turning to coat all over. Cover and set aside to rise until double in size for 45 minutes.

Punch down the dough to get rid of some of the air bubbles. Cut (don't rip) the dough into 8 equal portions, and roll each out into a long, thin log about 24 inches long. Twist each into a pretzel shape. Set on a parchment paper lined cookie sheet.

Let rest for 20 minutes. Meanwhile, get a big pot of water boiling on the stove and turn the oven on to 425 F.

Boil each pretzel for 3 minutes per side, flipping over after 1 1/2 minutes. Removed from the boiling water with a slotted spoon. They do puff up nicely, and I did 2 pretzels at a time. When all the pretzels are finished, brush them with the beaten egg. If you plan to make plain soft pretzels, sprinkle them lightly with coarse salt and bake for 30-35 minutes.

For pizza pretzels, brush lightly with the egg wash, omit the salt, and bake for 15 minutes. Remove from the oven, and smear the tops with pizza sauce, then sprinkle lightly with mozzarella cheese. Return the pretzels to the oven for an additional 15-20 minutes.

Serve warm.

Now if you can't eat all 8 pretzels (and I'll bet that they are a lot), then wrap them in cling film, then tin foil and freeze for another day. Or you can store them in a ziplock baggie on the counter for a day or two. They are absolutely delicious fresh though, and totally beat out any store bought pizza pretzel I've ever had.

Makes 8
Read More

Tuesday, June 29, 2010

Hamburger Buns by Ali

I've tried making hamburger buns before, but I wasn't entirely happy with the results. I tried a recipe from Martha Stewart and I found them quite heavy. I also found the flavor of the molasses to be a little strong for my liking. Since then I've been searching for another recipe to try but nothing was grabbing my attention. And now I've found it. I'm not entirely pleased with how I handled the dough but that's my problem and not the recipes. Dough and I are still not the best of friends (see below). We are, however, on much better terms.

Back to the bun recipe. I found this recipe on Annie Eats. She referred to the original recipe on smitten kitchen which was actually adapted from a restaurant in LA and published in the NY Times. Were you able to follow all of that? Doesn't matter really. In the end I decided to follow the recipe posted at Smitten Kitchen. Disclaimer: my buns look nothing like the pictures posted on Annie Eats or Smitten Kitchen. My ego is still trying to recover.


This is a very sticky dough that requires 8 - 10 minutes of kneading. I used my stand mixer with the dough hook attachment. It's really the only reason I attempt any dough that requires kneading. My wrists are not up to the task and I'm not sure my kidlets would let me have that much time to myself. They get a kick out of watching the mixer anyway.


I unceremoniously plopped it in a greased bowl to rise. Note the confiscated figurine in the background.


After letting the dough rise for almost 3 hours, it had finally doubled and was ready to shape, I use the term loosely here, into buns. Such a sticky dough! I didn't use enough flour when handling it which resulted in the blobs above. Please don't be intimidated by the 3 hour rise; it took three hours for the dough to rise in my warm and draft free kitchen because I didn't use the freshest of yeast. My bottle has been in the fridge for ages and is well past it's expiry date. It still works but I have to be patient. And plan things out just a little bit more. Oh well.


My strangely shaped buns after the second rise. Note the well oiled plastic wrap on top. There's no way a tea towel would have worked here. This dough is really really sticky.


And we have the nicely browned buns. I brushed the tops with an egg wash before baking them and, presentation wise, it was worth the effort. I used the leftover scrambled egg in the hamburgers so nothing went to waste.

Phew! Anybody make it to the end? Congratulations! Thanks for sticking with me. Hahaha.

*********************************

About the Blogger:


Ali Grimshaw is the author of the blog I Have Bubbles in my Tummy and a stay at home mom with a precocious 3 year old preschooler and an adventurous 18 month old toddler. She loves food and have an addiction to cookbooks that would be grounds for divorce if her husband didn't enjoy the fruits of her obsession so much.
Read More

Thursday, June 10, 2010

Peanut Butter Pancakes

If you like peanut butter cookies, make sure to check out these pancakes. A bit softer than regular pancakes, they are pretty tasty topped with bananas and maple syrup. If you want to get a little of that salty/sweet thing going on, serve them with sausages and let the rave reviews come in! Jake commented that he thought they would be delicious with chocolate chips for a special occasion.

Click on over for the recipe....
Read More
© 2005-2017 all written and photographic content by Scattered Mom/Karen Humphrey (unless otherwise specified) and may not be reproduced or used in any manner without consent. All rights reserved.

© 2014 Chasing Tomatoes, AllRightsReserved.

Designed by ScreenWritersArena