Printfriendly

Friday, December 31, 2010

White Chocolate Grand Marnier Mousse in Dark Chocolate Cups

Grand Marnier Mousse 2


Years ago, I worked in a restaurant that served Grand Marnier mousse in fancy crystal dishes, topped with a tiny butter cookie. Light, orangey, and delicious, it was one of my favorite desserts next to the strawberry pie.

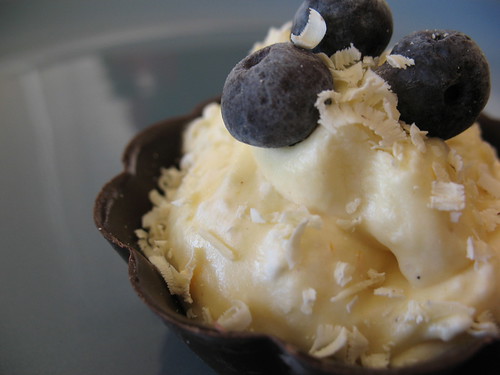
A few weeks ago when I found dark chocolate cups in the grocery store, all I could think of was filling them with that mousse. For the longest time I was never that fond of chocolate and orange flavors together, but in recent years I've grown to love them. I scoured the internets for a good mousse recipe, did a little testing, and I think I've found it just in time for our New Year's Eve dinner.

A tip here: use the very BEST whipping cream and chocolate you can find. I used Avalon Dairies Organic whipping cream and Green and Black's white chocolate.

Adapted from Emeril Live, Food Network Canada

4 large egg yolks
1/4 cup Grand Marnier
2 tbsp sugar
1 tbsp grated orange zest
2 cups whipped cream (unsweetened)..about 1 3/4 cup unwhipped
2 bars of Green and Blacks White Chocolate (or, 1/2 cup)

In a stainless steel bowl over simmering water, whisk together the egg yolks, Grand Marnier, sugar, and orange zest. Stand and whisk constantly while it heats and cooks, occasionally taking the bowl off and away from the boiling water if it's getting too hot.

What you should have happen is the egg yolks and other ingredients come together and become thick enough to coat the back of a spoon. What you don't want is scrambled eggs, so hence the constant watch and stirring. The original recipe said it should take 4-5 minutes and the water should be boiling, but I found the water too hot and mine was finished in about 3 minutes. Use your judgment. The consistency was about that of melted chocolate.

Take the bowl off the heat and set aside to cool.

Whip the cream. You need about 2 cups of it whipped, so I'm guessing 1 3/4 cup before you start whipping it would be good. Don't add anything to it-you need the whipped cream to be plain.

Meanwhile, also start melting your chocolate. I do this directly on the stove over low heat in a saucepan, but you can use your microwave, a double boiler, etc. Let it cool. (Important! You don't want a warm chocolate wrecking the whipped cream)

Once your egg yolk mixture (also known as sabayon) is cool, fold in the whipped cream, and then the cooled chocolate.

At this point I spooned the mousse into chocolate cups and let them chill in the fridge for 5 hours, before serving topped with shaved white chocolate, and fresh berries. When I halved the recipe it filled 7 cups, generously.
Read More

Chocolate Chunk Banana Bread

Chocolate Chunk Banana Bread2


Better than plain old banana bread, this one is decadent and delicious with huge chunks of melty chocolate and crunchy pieces of pecans. You could serve this warm for dessert with a scoop of vanilla ice cream, or just slice and tuck into school lunch boxes for a treat.

2 eggs, beaten
1 cup mashed banana
1/3 cup vegetable oil
1/4 cup milk
2 cups flour
1 cup sugar
2 tsp. baking powder
1/4 tsp salt
8 oz of semi sweet chocolate chunks, chopped
1/2 cup walnuts or pecans
coarse sugar (I use sugar in the raw) to sprinkle on top before baking.

Pre-heat oven to 350 F.

In a large bowl, mix together the milk, eggs, oil, and bananas until blended. Set aside. In a separate bowl, whisk together the flour, sugar, baking powder, and salt. Add to wet ingredients and stir until just combined. Fold in chocolate and nuts. Pour into a greased loaf pan and top with a sprinkle of coarse sugar to get a crunchy top (optional)

Bake at 350 F for about 60 minutes, or until a cake tester inserted in the center comes out clean.

Makes 1 loaf.
Read More

Tuesday, December 28, 2010

Veggie Squares

Veggie Squares


A biscuit like crust topped with cream cheese and then layers of veggies is not only an easy, but tasty appetizer to take to parties. I like them even just for a snack!

2 cans of Pillsbury Crescent Rolls
1 8oz package of cream cheese
1 tbsp of horseradish
1 package of dry Knorr veggie soup mix
1/2 cup of margarine
1/2 cup of chopped broccoli (very small)
1/2 cup chopped green onion
1/2 cup finely chopped, seeded Roma tomatoes
1/2 cup finely chopped mushrooms
sliced black olives
1/2 cup finely chopped sweet red pepper.

Unroll dough onto a cookie sheet. Seal the perforations together and press pieces to cover the bottom. Prick with a fork and bake at 350 F for about 8-10 minutes (or until golden brown, watch it carefully). Remove from oven and cool. In a bowl combine the cream cheese, horseradish, soup mix, and margarine. Spread over biscuit base. Top with veggies and press gently into filling. Cover with Saran wrap and chill until ready to cut into pieces and serve.

Best served the day it is made, as the crust goes a bit soggy when it sits.
Read More

Blueberry Cream Cheese Stuffed French Toast

Blueberry Cream Cheese Stuffed French Toast


When @vinoluci began tweeting about this French toast recipe, I knew exactly what I was making Christmas morning. Not only did it look just amazing, but the make ahead factor completely sold it to me. Prep the night before and let it sit in the fridge overnight? The BEST idea ever.

Eggy bread, loads of rich cream cheese and smothered with blueberry sauce, this is our favorite breakfast recipe ever. Try switching up the fruit with different kinds of berries, peeled and sliced peaches, pitted cherries, or whatever strikes your fancy. This recipe halves well too for smaller families like ours-and the leftovers are great from the microwave the next day.

Adapted from Vino Luci

French Toast:

1 loaf french bread, cubed (I allowed my bread to get somewhat stale first)
two 8 oz packages of cream cheese, cubed
1 cup blueberries (I used frozen, they worked fine)
12 large eggs
1/2 cup maple syrup
2 cups milk

Grease a 9x13 inch pyrex pan with butter. Scatter 1/2 of the bread cubes over the bottom. Top with the cream cheese, then the blueberries, and the remaining bread cubes. Set aside. In a large bowl, whisk together the eggs, maple syrup, and milk. Pour evenly over all the bread cubes. Cover with plastic wrap and put in the fridge overnight.

In the morning, pre-heat your oven to 350 F. Take off the cling film and cover the pan with foil. (I would grease the side that is touching the bread, as some stuck when I pulled it off). Bake for 1/2 hour, then remove the foil and bake 1/2 hour longer until puffed and browned on top.

Makes 8 good sized servings. Serve with blueberry sauce below.

Blueberry Sauce:

1 cup sugar
1 cup water
1 tbsp cornstarch
1 cup blueberries, rinsed and drained (I used frozen)
1 tbsp butter

Heat the sugar, water, and cornstarch over medium heat until boiling and thickened. Add the blueberries and stir. They will pop and meld into the sauce. I didn't think mine was quite thick enough, so I stirred about 1 tbsp more cornstarch into some cold water and then stirred that in. When your sauce is thick enough, remove from the heat and add the butter, stirring until it's melted. Serve with the French toast.
Read More

Sunday, December 26, 2010

Kraft Recipes For Joy: Chocolate Raspberry Thumbprints

Chocolate Raspberry Thumbprints


When I saw this recipe in my pack of Recipes for Joy, I knew without question that it was a must try. Deliciously chocolatey, with cream cheese and raspberry jam, these cookies are really yummy. I think I'd like to try them drizzled with chocolate to take them over the top. After I baked them, I noticed they seemed a little lighter than in the picture so I looked the recipe over once more and my mouth fell open-they were supposed to have UNsweetened chocolate, and I had used SEMI-sweet. Oops. I'm sure with the unsweetened they are even better. Yummy!

Remember, go to Kraft Recipes for Joy to send your friends an e-card packed with recipes, and Kraft will donate $2 to Food Banks Canada. You have until December 31st 2010!

Re-printed with permission from Kraft

What you need:
2 cups flour
1 tsp baking soda
1/4 tsp salt
4 squares Baker's unsweetened Chocolate
1/2 cup butter
1 package (250 g) Philadelphia Brick Cream Cheese, softened
1 1/4 cups sugar, divided
1 egg
1 tsp vanilla
1/3 cup Kraft Pure Red Raspberry Jam

Make it:

Heat oven to 375 F.

Mix flour, baking soda, and salt. Microwave chopped chocolate and butter in large bowl on medium 2 min; stir until chocolate is completely melted. Whisk in cream cheese. Add 1 cup sugar, egg and vanilla; mi well. Stir in flour mixture. Refrigerate 15 min.

Roll dough into 1 inch balls; coat with remaining sugar. Place, 2 inches apart, on baking sheets. Press your thumb into center of each ball; fill each indentation with abut 1/4 tsp jam.

Bake 8-10 min, or until lightly browned. Cool 1 min on baking sheet; transfer to wire racks. Cool completely.

Makes about 4 1/2 dozen cookies
Read More

Saturday, December 25, 2010

No Fail Pie Crust

This guest post is by Katie Trant! You may have noticed that I have featured Katie in some meal plans, and her yummy maple oatmeal pecan cookies were on here a little while ago. As Thanksgiving approached, I whined that pastry and I are are not friends. "I can't make pie crust", I pouted to anyone who would listen on Twitter.

Katie came to the rescue. She sent me the below instructions by email and when I followed them, I came out with the most flaky, amazing pie crust I have ever created. I asked if I could then post her instructions for this so that other pastry challenged pie makers could take her words of wisdom and create their own delicious pies.

She said YES. Because she's just AWESOME.

So here it is-a delicious, no fail Pie Crust lesson. If I can make it work, you certainly can.

By Katie Trant (go see The Muffin Myth, she has a great blog too)

I think the key to making a great pie crust is understanding a little bit about gluten. Gluten is the protein in wheat, and one of it's amazing properties is the ability to form polymers. In plain talk, a molecule of gluten is able to link up with another molecule of gluten which can link with another molecule of gluten . . . and it goes on and forms long chains. The chains are a really good thing if you're making, say, a bread, or a pizza crust, when you want your dough to be smooth and elastic and stretchy. The gluten chains are the reason bread dough can stretch and rise, and has that great chewy texture. When you're kneading a bread dough, what you're doing is encouraging gluten chains to form.

If you're making pastry, a cookie, a cake, or say, your pie crust, chewy and stretchy is NOT the thing you're looking for. This is why it's so critical not to over mix cake or cookie doughs - you don't want long gluten chains to form, or you'll end up with tough cookies. In a flaky pastry like a pie crust, this is where the fat is really important. The role of fat in pastry is to physically coat the individual molecules of gluten and prevent them from forming chains. Shortening does just that; it "shortens" the gluten chain. Neat, hey? It is important that the fat you're using is very cold - not frozen, but cold.

When you mix it into the pastry, you want to blend it in so that the dough just holds together, but you also want little flecks of fat to remain in your dough, little bits the size of grains of rice, or small peas. When you bake your crust they will melt and create steam, which will create teeny little pockets in your crust, giving you the flaky pastry you're after.

To recap, the key to a good pie crust is threefold:

1) handle it as little as possible - the more you handle it, the more gluten chains will form,
2) keep your ingredients very cold, and

3) make sure your fat is the right texture.

1/2 lb cold shortening or unsalted butter
2 1/2 c. unbleached all purpose flour
1/3 c. cold water
2 Tablespoons white vinegar
1/2 tsp. salt

In a large bowl combine the flour and salt. Add the fat, and using a pastry cutter, cut up into pea sized chunks (if you don't have a pasty cutter, cut into small cubes and then add into the bowl), then use your fingers to work the fat into the flour until you have a crumbly mix with bits the size of small peas or grains of rice remaining.

Add cold water - start with only 1/4 cup, and add the vinegar. Mix in with a wooden spoon. If the mixture seems really dry, add the rest of the water. Stir to combine, and then turn out onto clean counter top and gather the mixture together with your hands. It should hold together and not be crumbing and falling apart, but nor should it be wet and sticky.

Form into two flat disks (easier to roll out later than if you form into balls), wrap in plastic wrap, and put in the fridge for an hour, until firm (you can also put in the freezer for less time if you need it sooner). Dough will be much easier to roll out and handle when it is quite cold. When you're ready to roll it out, place on a lightly floured surface, and away you go.

Makes 2 pie crusts, or 1 two crust pie.
Read More

Wednesday, December 22, 2010

Tequila Lime Shrimp

Tequila Lime Shrimp

When Kevin found this recipe he stood and pointed to it, declaring it to be his birthday dinner. So easy and yet so delicious, I think these shrimp would make a fantastic appetizer as well as main course! Yum! Some ingredients weren't in the fridge so I had to adapt a little, but they were sooooo yummy.

Adapted from Oprah.com

2 lbs prawns, peeled and deveined
1 1/4 cups tequila, divided
1/2 cup fresh lime juice
lime zest
1 tbsp chili powder
1 jalapeno pepper, seeded and minced (I used 1 fresh chili instead)
black pepper
Olive oil
1 cup chopped fresh cilantro (didn't have any)
salt

In a bowl, stir together 1/4 cup of tequila with the lime juice, zest, chili powder, jalapeno pepper, and black pepper. Pour over shrimp and allow to sit for 30 minutes.

After 30 minutes, stir in 1/4 cup of olive oil, the cilantro, and salt.

Get a frypan going on medium high heat with about a tbsp of olive oil in it, until the oil is smoking. Remove it from the direct heat and add 4 tbsp of tequila. (just so it doesn't catch fire). Remove the shrimp from the marinade and toss some into the pan, stirring and moving around to cook. Fish them out with a slotted spoon and start over-but be sure to move the pan off the stove when you add the tequila, or you could end up with it catching fire and burning your eyebrows. Now THAT wouldn't be good.

Serves 4
Read More

Tuesday, December 21, 2010

Chocolate Guinness Cake

Chocolate Guinness cake


Deep, dark, heavy and chocolatey with a blanket of fluffy cream cheese icing, this cake is over the top delicious without a lot of work. In fact I was so amazed at how easy it was I read the instructions three times just to be sure. This is a cake to share with a crowd, as you don't need a large piece and it will surely elicit moans of delight from everyone who tastes it-before they lick their plates entirely clean. It's a must try. MUST.

Adapted from The Funky Kitchen (who originally adapted it from Nigella Lawson's Feast)

1 cup Guinness beer
1/2 cup butter
3/4 cup unsweetened cocoa
2 cups granulated sugar
3/4 cup sour cream
2 large eggs
1 tbsp vanilla extract
2 cups all-purpose flour
2 1/2 tsp baking soda
1/4 tsp salt

Icing:

1 1/4 cups powdered sugar
8 oz cream cheese, softened
1/2 cup heavy cream

Pre-heat your oven to 350 F. Grease a 9 inch springform pan well up the sides and all over the bottom, the set aside.

In a large saucepan, melt the butter with the beer. Whisk in the cocoa and sugar until smooth. Set aside to cool until lukewarm.

In a bowl, lightly beat the eggs and then add the sour cream and vanilla, continuing to beat until smooth. Add a little of the lukewarm beer mixture to temper it, and whisk. Add the rest, whisking as you go.

Stir in the flour and baking soda whisking until the batter is smooth.

Pour the batter into the prepared pan, smoothing the top. Bake in the center of your oven for about 45 minutes to 1 hour, until a cake tester inserted into the center comes out clean. Allow to cool completely before frosting.

Icing:

Whip the cream cheese in an electric mixer until fluffy. Add the icing sugar, bit by bit. At this point I had thought that the icing would be enough without the whipping cream, but being the dutiful girl I am, into the bowl it went. Whip up that icing until it is smooth.

Oh my, the addition of whip cream really is delicious in that icing, especially when you whip it for awhile and it becomes all creamy and scrumptious. It was all I could do not to shove my head in the bowl and lick it clean.

Frost the cooled cake; now, you'll probably wonder why on Earth there seems to be SO MUCH icing, but really it's not that much, and it's so good when all is said and done. Put the cake in the fridge for a few hours to chill. Before you serve it, shave some chocolate over top and you are good to go!

Serves 12
Read More

Wednesday, December 15, 2010

Vanilla Sugar Trees

Vanilla Sugar Trees


Last week I asked a co-worker what her favorite Christmas cookie was. She stopped, her eyes took on a dreamy, far away look, and she smiled.

"Sugar cookies. With icing."

I must admit, I've never been a fan of the sugar cookie. Possibly it's the work of rolling them out, then baking, and then good Lord, do I have to decorate them too? It always seemed like too much work. Sugar cookies were for children to slather with sticky bright icing and coat with every candy imaginable until they were an indefinable, sugary mess, right? After they present you with their work and you imagine every licked finger that may have found it's way to a nose, the very last thing I want to do it EAT it.

Not these cookies. I had made them before using vanilla extract and they were just average. THIS time I remembered a stray vanilla bean that I had sitting in the cupboard, and I chose to bake them for my co-worker, but I'd use the vanilla bean instead and the recipe originally dictated. This explains the little black specks in the cookies pictured above; it's not pepper or dirt, but real, delicious, vanilla.

OH MY GOODNESS.

These cookies are the best sugar cookies I've ever eaten. Vanilla permeates right through them, so deliciously that I'd daresay you don't even need to ice them. I would eat them just plain, or perhaps cut them into small rounds and sandwich chocolate ganache, or some equally decadent and worthy filling. You could also try drizzling them with Green and Black's Chocolate. At any rate, they are a permanent resident in my Christmas cookie repertoire from this day forward.

Mostly because yesterday the girl who usually can bake cookies and eat none, ate FIVE.

Adapted from Canadian Living

3/4 cup salted butter, softened
1 cup sugar
1/2 vanilla bean
1 egg
2 1/2 cups flour
1/2 tsp baking powder

In a bowl with an electric mixer, beat the butter until it's light and fluffy. Add in the sugar and continue to mix.

On a cutting board with a sharp knife, slice the vanilla bean in half lengthwise. Using the knife, scrape out all the seeds inside and add them to the butter/sugar mixture. What to do with the leftover empty pod? Don't throw that baby out, make vanilla sugar with it. What about the leftover half that's still full of vanilla goodness? I saved mine in a ziplock for another week, and then used it to make another batch of cookies.

Beat the egg into the butter mixture until everything is well combined.

In a separate bowl, stir the flour and baking powder together with a fork. Add to the butter mixture and combine on low speed. It will look crumbly, but if you grab a bunch and squeeze with your hand, it will form a clump.

Dump the cookie dough out onto a counter, bringing it together with your hands and forming it into a ball. Divide the ball into two disks.

The original recipe says that you need to chill the dough, but both times I've made these I didn't and they worked fine. Just flour your counter and rolling pin, roll the dough out to about 1/4 inch thick, and then cut into shapes. Transfer to a greased or parchment paper lined cookie sheet, about 1 1/2 inches apart.

Bake at 350 F for about 10 minutes, until very lightly browned and set. Remove from the oven and allow to cool on the stove top for just a minute or so before moving to racks to cool completely.

Makes about 2 1/2 dozen

Icing, if you must....

2 cups icing sugar
2-3+ Tbsp milk or water

Just drizzle the milk or water into the icing sugar and stir, stir, stir until you have the consistency you want. Use the icing immediately, or if you must, just wet a paper towel and place it gently over top to keep the icing from drying out.
Read More

Monday, December 13, 2010

Oven Fried Chicken

Crunchy Cornflake Chicken


I have a lot of oven fried chicken recipes, but this one is my favorite. So crunchy and delicious, it's hard to go wrong with it! I love to serve this with garlic mashed potatoes and a big crunchy green salad. Kevin and I had to show self restraint and not sneak out to the fridge late at night to steal a cold piece as a midnight snack, as we both had the leftovers in our lunches the next day.

Adapted from Crazy Plates

2/3 cup flour
1 tsp oregano
1/2 tsp dried thyme
1/2 tsp paprika
1/4 tsp salt
1/4 tsp pepper
1/4 tsp garlic powder
1 1/2 cups crushed cornflake cereal
2 tbsp Parmesan cheese
1 cup butter milk
3 lbs of skinless chicken (I use boneless skinless breasts)

Line a roasting pan with tin foil and set aside. Pre-heat your oven to 425 F.

Stir together the flour, oregano, thyme, paprika, salt, garlic powder, and black pepper in either a pie plate or shallow bowl. Set aside.

In different shallow dish, combine the crushed cornflakes and the cheese.

Working assembly line style, first dip the chicken into the buttermilk, and let the excess drip off. Roll in the flour mixture until well coated, then dip into the buttermilk again. Next, roll in the cornflake mixture and set it on the roasting pan. Continue with the other pieces of chicken.

This is extremely messy-your fingers are going to be coated with piles of crap and you'll be washing your hands every few minutes because you will barely be able to stand it, but keep going because it's SO worth it.

Bake your chicken pieces about 40 minutes for bone in, but for the boneless breasts I bake mine about 30 minutes. Cut into the thickest part of the meat to check that the juices run clear and nothing is pink.
Read More

Baked Potato Pancakes

Potato Pancakes and Crustless Quiche


An interesting take on potato pancakes, these have an eggy bit to bind them, and potato to give them bulk. We like them as a snack with apple sauce. Baked instead of deep fried, they are far less greasy than their hashbrown counterparts. Kevin used to love them as snacks.

2 Tbsp diced onion
1/2 garlic clove, minced
2 large eggs, beaten
1 tsp salt
1/4 tsp pepper
4 medium potatoes, peeled and grated
1/4 cup crushed corn flakes
2 tbsp flour
1/2 tsp baking powder

Pre-heat oven to 450 F

In a food processor (or with a good sharp knife), process the onion and garlic until it's very finely chopped. Place in a large bowl with the eggs, salt, and pepper.

Grate the potatoes, then grab the grated bits and squeeze them in handfuls over the sink to get out all the liquid. You'll be surprised at how much juice is in potatoes! Add to the bowl with the onion and egg mixture.

In a separate bowl, mix the flour, cornflake crumbs, and baking powder together. Add to the potato mixture and stir well.

Spray a cookie sheet with non stick spray, then spoon out 1/4 cup of the mixture onto the sheets, flattening them slightly. Bake for about 12 minutes, flipping part way through.

Serve with applesauce.

Makes about 12
Read More

Saturday, December 4, 2010

Candy Cane Brownie Bites

Candy Cane Brownie Bites

Remember those little one bit brownies that you can get at the grocery store? These are similar, if not a lot tastier. Go hog wild and use you imagination, topping them however you see fit! Not only do they look cute, they make a great addition to a Christmas goodie tray.

1/3 cup brown sugar
1/4 cup margarine
3 oz semi sweet chocolate
1/2 tsp vanilla
1 egg
1/3 cup flour

In a saucepan, melt together the brown sugar, margarine, and chocolate over low heat, stirring until it's melted and smooth. Let cool for 1 minute or so until it's . Whisk in the vanilla and egg. Fold in flour until blended.

Line a mini muffin tin with liners, and spoon your batter into them about 2/3 full.

Bake at 350 F for 7-10 minutes or when a toothpick inserted in the center comes out clean.

Makes about 1 1/2 dozen

Naked Brownie Bite

Oooo look! This one is naked!

Toppings:

Ganache:

Melt together 2 oz chocolate, 1/4 cup whipping cream until smooth. Spread over the tops and sprinkle with crushed candy cane.

OR

immediately after removing the brownies from the oven, top with any of the following...
-mini peanut butter cups
-junior mints
-chocolate rosebuds
-hershey's kisses (try the caramel or peanut butter ones)
-mini m&ms

Or, you could let cool completely and ice with your favorite frosting. Our favorite combination is butter cream frosting and crushed candy cane, but you really could just use your imagination here. They are very, very tasty.

Now just try not to EAT THEM ALL.

A bunch of them!
Read More

Wednesday, December 1, 2010

The Very Best Lemon Bars

Lemon Bars

About three years ago, I began the hunt for the perfect lemon square recipe. I tried them from near and far, by Martha, Canadian Living, and more. Not ONE fit the bill. Some were too puckery, the filling too runny, the bottoms too hard, nothing was just right.

I was doomed to wander the Earth, searching for the perfect lemon bar until last week, when they suddenly appeared in the staff room; not too sweet, or too sour. The proportion of filling to base was perfect. They were soft, but not runny. The staff literally fought over them, trying to get just ONE before they were devoured with sticky, icing sugar covered fingers.

In other words, I had found perfection. Before the bell went, I raced down the hall, found the student whose mother it was rumored had produced those amazing bites of heaven, and begged, practically on my knees, to have it. In front of a whole pile of teenagers, right there in the hallway.

Now I'm going to share it with YOU! If you were here, I'd hand you the pan and tell you to please take them away, because I really could literally eat them ALL.

Adapted from the Fannie Farmer Baking Book

Crust:
1/2 cup unsalted butter, softened
1/4 cup icing sugar
1 tsp grated lemon zest
1 cup flour  **if you are allergic to wheat flour, you can directly substitute barley flour**
pinch of salt

Filling:
2 eggs
1 cup sugar
2 tbsp flour  (or barley flour)
*3 tbsp freshly squeezed lemon juice
*1 tsp grated lemon zest
(*note: It was recommended I add more zest and a little more juice, depending on how juicy the lemons are. I'd try another 1/2 tsp more zest and an extra tbsp juice in total. Buy 2-3 lemons for the small pan, 3-4 for the large one just to be safe.)

Pre-heat the oven to 350 F, and line a 9x9 inch square pan with parchment paper. This recipe also works well if you double it and use a 9x13 inch pan.

Make the crust:

In a bowl with an electric mixer, mix the butter and sugar together until fluffy. In a separate bowl, whisk the flour, salt, and lemon zest together. Add to the butter mixture and combine. The result will look like a butter cookie dough. Press it evenly into the bottom of your parchment paper lined pan.

Bake for 15-20 minutes, until the edges are browned. Remove from the oven and pour in the filling.

While it Bakes, Make the filling:

In a clean electric mixer bowl, combine the eggs, sugar, flour, lemon juice and lemon zest. Mix well. Pour over the warm crust and return it to the oven for about 20 minutes, until the top is dry and the edges are just starting to brown. Remove from the oven and let cool.

When completely cooled, dust the squares with icing sugar, and slice. I keep them in a sealed airtight container in the fridge. I doubt they will last very long!


Finally! The Perfect Lemon Bar!


See? Wasn't that easy?

If you plan to make these ahead, freeze them and just dust with icing sugar before you serve them.
Read More
© 2005-2017 all written and photographic content by Scattered Mom/Karen Humphrey (unless otherwise specified) and may not be reproduced or used in any manner without consent. All rights reserved.

© 2014 Chasing Tomatoes, AllRightsReserved.

Designed by ScreenWritersArena