Printfriendly

Tuesday, September 20, 2011

Snickerdoodles, Three Ways

Snickerdoodle Snacks


I have never really made Snickerdoodles before and truth be told, I never understood what they actually were. Was it the name? How could they compete with my first loves, chocolate chip and oatmeal?

The Cookiepedia drew me in and seduced me with all it's cookie recipes, and before I knew it I was making Snickerdoodles. I discovered that Snickerdoodles really are similar to a sugar cookie, but are rolled in cinnamon and sugar. I used an amazing cinnamon from the Vanilla Food Company, which I think makes all the difference.

Also, I didn't make just plain old Snickerdoodles, but three different kinds, mind you. Be adventurous! You may have a little bit of cinnamon sugar left over, but you could use it to make cinnamon sugar toast with, even! Yum.

Peanut butter cup Snickerdoodles Peanut butter snickerdoodle sandwich

Right: stuffed with Kraft whipped peanut butter Left: with Trader Joes mini peanut butter cups.


There's always plain, but I thought plain might be kind of boring.

Snickerdoodle


1 1/3 cups flour
1/2 tsp cream of tartar
1/2 tsp baking soda
1/8 tsp salt
1/2 cup unsalted butter, at room temperature
1/2 cup plus 2 tbsp sugar
2 tbsp light brown sugar
1 egg
1 tsp vanilla extract

Roll them in:

1/4 cup sugar mixed with 4 tsp cinnamon

Pre-heat the oven to 350F and line some cookie sheets with parchment paper. Or, you can grease them. I prefer parchment-less clean up!

In a medium sized bowl, sift the flour, cream of tartar, baking soda, and salt together. Set aside.

In a large bowl with an electric mixer, beat the butter and sugars until fluffy. Add the egg and vanilla, beating until well mixed. Dump in 1/2 of the flour mixture and mix until it's all incorporated, then add the other 1/2 of the flour mixture and continue to beat until combined.

Roll the dough into 1 inch sized balls, and then roll in the cinnamon sugar. Set on your parchment paper line cookie sheet about 2 inches apart and flatten each slightly with the palm of your hand.

Bake for about 9-10 minutes for chewy cookies, or 12-13 for crispy. Cool on the sheets for a bit before transferring to wire racks.

Makes about 18-20 cookies, depending on how big you roll them.

Peanut butter Sandwich Snickerdoodles: When the cookies are cooled, spread Kraft Whipped Peanut butter on the bottom of one cookie and sandwich with another.

Peanut butter cup Snicker doodles
: When you are rolling the dough, stuff 4-5 mini peanut butter cups into the cookie dough before you roll it in the cinnamon sugar. Trader Joes makes awesome mini peanut butter cups, but if you can't find the really mini ones, you can chop up some mini Reece's cups-although I think now they've come out with ones even smaller.
Read More

Saturday, September 17, 2011

Rice Krispy Yogurt Cups and Berries


Peter Callahan recently published a book of appetizers called "Bite by Bite." Glossy and full of amazing ideas for small bites at any sort of party you could throw, this one recipe struck me as something you could also adapt for small kids. I think they would be great for a kid's party where little ones are more likely to nibble than eat large amounts, and you could swap the yogurt flavors and fruit to whatever suits you best. I think using lemon yogurt and raspberries could be a hit as well.They won't tuck into a lunchbox well, likely falling apart as they are jostled around, but I can assure you that they were so delicious that after taking the photos I ate three.

Adapted from Bite by Bite

1 tbsp unsalted butter
6 large marshmallows
1 cup Rice Krispies cereal
1/2 yogurt (I used unsweetened Greek yogurt)
2 pints fresh blueberries

Grease two mini muffin tins with butter, or spray them with non stick spray. If you only have 1 mini muffin tin, I suggest you half the recipe and make it twice because otherwise it won't work for you.

In a small sauce pan over medium low heat, melt the butter. Add the marshmallows, and stand and stir until they are fully melted and smooth. You can't really walk away from this, they could burn and make a big mess-which you would really never want. When the marshmallows are melted and smooth, take the pot off the heat and stir in the cereal until it's well coated.

Quickly spoon 1 tsp of rice krispie mixture into each muffin cup, molding them to the cup with your fingers so you have little cups to fill with yogurt. It works best if you rub some butter on your hands first, and that way the mixture won't stick to you. Be quick, here because the longer the mixture sits in the pot it's going to harden up and be hard to work with.

Let the cups harden up-about 5 minutes or so, before you fill them with a little yogurt and top with fruit. If you like, you can also store the cups in an airtight container for up to 2 days. Filled cups do not keep well, they will be soggy the next day.

Makes about 24

Rice Krispy Canapes
Read More

Monday, September 12, 2011

Zucchini Ribbon Salad

Zucchini Salad


Do you like zucchini? If I were to be completely honest, I'd have to admit that I've never been a fan. Maybe it has to do with the days when we had foster kids and the boys would accidentally cook cucumbers and leave zucchini raw when they couldn't tell the difference, or from having too many of White Spot's deep fried zucchini sticks when I worked there at 19 years old. Either way, zucchini is not my favorite veggie. The thing is, this time of year it just looks so pretty-all that yellow and green in the farmer's market, and a friend of mine offered me some out of her garden, so how could I resist? Really? Maybe I could find a yummy recipe, right? Hadn't I seen something with zucchini ribbons?

The other night when Kevin had a friend over, I cleaned out the fridge and decided to try this salad that I found over on Choosy Beggars. Not only did it look pretty, the salad tasted really good too! Win, win!

Adapted from Choosy Beggars

2 green zucchini
2 yellow zucchini
3 tbsp olive oil
1 lemon
fresh basil, chopped
feta cheese
1 roma tomato, seeded and chopped, or about 3-4 cherry tomatoes, halved
salt and cracked pepper

Using a veggie peeler, peel long strips off your zucchini. It's easy really-just keep peeling until you get to the seeds. Don't throw the zucchini away when you get that far, just keep them and chop up to throw in a stir fry or something.

Toss the peeled zucchini strips and tomato together in a bowl. Set aside.

In a jam jar with a lid, measure out the lemon and oil. Put on a lid and give it a shake. Now, to be honest I found this a little too sour for my taste, so I added a little sugar. You can taste it and see what you think. I like lemon zest too, so before I juiced the lemon I zested a bunch right onto the zucchini ribbons. Yum!

Toss the dressing with the zucchini and tomatoes. Let the mixture sit on the counter for about 15 minutes to soften.

Before serving, toss in the feta and basil gently. I added lots of feta, because I love tons of cheese. Yum!

Serves 4
Read More

Wednesday, September 7, 2011

Egg Toasts-Or Rather, the Best Lunch Box Egg Salad Ever

Egg Toasts


Sometimes, I just want something simple that doesn't compromise on taste, but just doesn't mean I have to be cooking all day.

Egg salad has always been the last thing you want in a lunch box. It smells funny, it makes the bread soggy, all that mayo is a problem if it's not kept cold. Then I discovered this recipe for egg salad, and now I'm in love with it all over again. I'll probably take some in my lunch back to work this fall.

Adapted from Super Natural Every Day

2 tbsp plain yogurt, or more if you wish. I used Greek yogurt because it's so thick.
salt and fresh cracked pepper
2 tbsp chopped fresh dill or chives, and a small pinch of fresh thyme (I used 1 tbsp each dill and chives)
4 slices artisan bread
unsalted butter
1 clove garlic, peeled
4 large hard boiled eggs, cooled


In a bowl, mix together the yogurt, salt and pepper, then herbs. Set aside.

Toast the bread. When it's nice and golden, butter it very lightly and rub with the garlic clove. Set aside.

In a bowl, coarsely mash up the eggs. You want some texture so leave some pieces bigger, some small, etc. Gently mix in the yogurt mixture. You don't have to use it all, but mix in enough to get it where you like it.

Mound the egg mixture on the toasted bread and serve immediately.

**If you are making this for lunches, pack the egg mixture separately from the bread and include a spoon. This way your child can mound the egg mixture into mini pitas, naan bread, crackers, etc. No more soggy bread!

Serves 2-4
Read More

Monday, September 5, 2011

Roast Your Own Garlic and Peppers

Curly Peppers, peppers, Commercial Drive, markets

Kevin checking out a funky looking pepper at a market on Commercial Drive in Vancouver


Roasted Peppers

Some of my recipes call for roasted red peppers. You can buy peppers already roasted and peeled, but in the summer when produce is at it's peak, why not just roast some yourself? It's really easy and you have a variety of options, depending on what sort of equipment you are using. While we're on the subject, why bother with only sweet peppers? Why not try roasting jalapenos and other peppers too? They won't bite you. A word of caution if you roast hot peppers though, make sure when you cut them open that you get rid of the seeds if you don't want a lot of heat, and wash your hands before you touch anything (like your eyes). With some kinds of really hot peppers it's a good idea to wear gloves, even.

Barbecue or gas stove

Leave the peppers whole. Roast them over the flame, using tongs to turn and move around. You want to cook them until the skins are charred and black. Transfer to a bowl and cover with plastic film, then let cool until you can handle them and peel off the skin.

Oven (which is what I do)

Cut the peppers in half and remove the core and seeds. Set them on a baking sheet that has been lined with greased foil (I use olive oil). Bake in a 400 F oven, cut side down, for about 15 minutes. Check on them and turn, then bake awhile longer (about 10 minutes?) until the skins are good and black. The time is very approximate here, you may cook them longer or shorter. I found that 15 minutes was not enough to make my peppers black and charred at all.

Transfer the hot peppers to a bowl and cover with cling film while they cool for a bit, and when they are cool enough to handle peel off the skins and use in your recipes.

Roasted Garlic

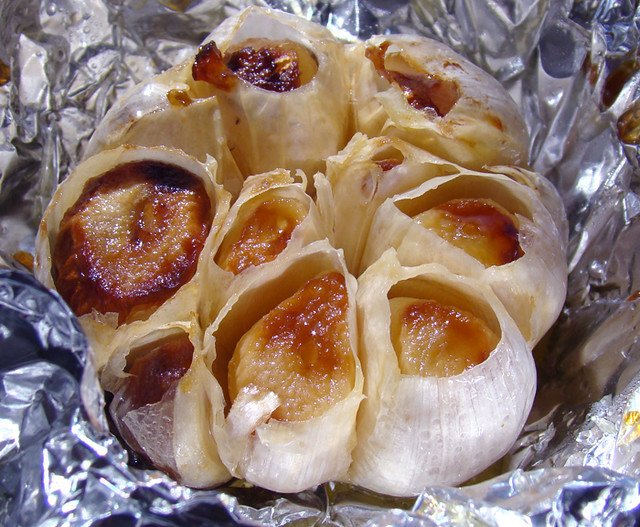
Photo by Christine Leiser


Roasted Garlic

I love roasted garlic. Spread on bread, whipped into hummus, added to soups and sauces, or chopped and put in salad dressings, it is delicious and SO easy to do. Right now, the farmer's markets here have garlic galore, so it's a good time to get something local rather than China produced, which is often in our markets. Really fresh garlic is completely different than the imported stuff-it's actually sticky!

Get 1 head of garlic. Chop off the top bit so you can see the cloves (like in the picture above). Put it in a square of foil. Drizzle olive oil over top and sprinkle with a little salt and cracked pepper. Fold up the foil so you have a little package. Place the garlic packet on a baking sheet and put into a 400 F oven.

Bake for about 45 minutes.

Your house will start to smell wonderful as the garlic bakes, but you will know it's one when you can poke it with a paring knife and it's soft.


Read More

Sunday, September 4, 2011

Make Your Own Flour Tortillas

There's a lot of things that you can cook from scratch, and some are worth it, while others not so much. Then there's the things that you make from scratch and are so delicious that you wonder why you ever bothered to buy them in the first place!

Tortillas are like that for me. Sure, I do buy them when I don't have the time to make them, but when I have a weekend free and feel like playing with some dough, nothing beats home made tortillas. These are really easy-and the kids could even help so it's a win-win situation! I love this recipe because the resulting tortillas are soft and delicious, ready to be filled with whatever you want or even rip up and dip into guacamole, hummus, etc. I think they would be a perfect afternoon activity with the kids, and the best part is they get a snack too!

This recipe makes about ten 8 inch tortillas. Personally, I find that a teeny bit small and prefer to double the recipe, then pinch off about 2 oz of dough instead of the usual 1 1/2 oz. You can make them whatever size you wish.

Adapted from Rebar

1 1/2 cups flour
1/2 cup whole wheat flour
1 tsp sugar
1 1/2 tsp baking powder
1 tsp salt
5 tbsp vegetable shortening
3/4 cup hot water

Mix the flours, sugar, baking powder, and salt in a large bowl. Cut in the shortening with a pastry cutter or two knives until the mixture is like coarse crumbs. Then gradually add the hot water, stirring with a wooden spoon as you go, until the mixture comes together.

Dump the dough out onto a lightly floured counter and knead it just a bit, gently, to bring it together. Shape it into a ball, put it in a clean bowl, and cover with plastic wrap. Let it rest for a good hour.

Now, line a cookie sheet with parchment paper, sprinkle it with flour, and set aside. Pinch golf ball sized bits off your dough and roll them in your hands to make a ball, then set on the cookie sheet. If you make the balls golf ball sized, you will end up with about ten 8 inch tortillas. Cover them with plastic wrap and let them rest for another hour.

tortillas 1

Resting the dough

When the hour is up, lightly flour your counter and one by one, roll out your little balls of dough. Don't worry about getting them perfect, mine never are. That's part of the charm. Stack them with some waxed paper or parchment between them, and keep the rolled dough covered with plastic wrap or a clean tea towel. Try to get the tortillas quite thin-this takes some practice, but you'll get the hang of it the more you make them, trust me!

rolled

Rolling it out. I can never get them perfectly round.

Once your tortillas are rolled out, get either a cast iron skillet or a non stick skillet on the medium high heat. Brush it with a little oil. Gently lay your first tortilla in the pan-this is a bit tricky, it took me some practice to get it in the pan without folding it accidentally!

Now, don't leave the stove. Stand right there and watch as your tortilla will cook fairly quickly. Watch until you see bubbles forming underneath, then flip the tortilla over and cook the other side until it's light golden. Slide out of the skillet onto a rack and let cool, then continue with the next one.

in pan

Watch for bubbles!


Your tortillas will last a few days, or you can wrap them well and freeze them for about a week. They never last that long in our house, though.

Enjoy!


Read More

Thursday, September 1, 2011

Santa Fe Pasta Salad

Southwest pasta salad


The other day, I bought corn from a the back of a truck in a bar parking lot. Weird, I know-but it seemed as though every day, I would see a farmer with a pick up truck heaped with corn. Curious to see what the corn was like, Kevin and I chose to go buy some. As we talked to the farmer we learned that the corn was from Chilliwack, and hauled all the way to the Sunshine Coast. He did a roaring business, too-selling out almost every day of an entire truckload.

After tasting the corn, I could see why! Juicy and sweet, it was the best corn I have ever tasted. While it was a little more expensive than the grocery store, it was still affordable and we will certainly be back to pick up some more.

This pasta salad is the best one that I have tasted in a long time. Smoky chipoltes add a little heat, while salty feta and roasted corn gives you some texture. Leftovers are fantastic and I daresay that this would be perfect in a lunchbox. Don't be scared off by the initial fiddly bit with roasting the peppers and corn, it's easy and the flavor is totally worth it.


Adapted from Rebar


Dressing
2 red peppers, roasted
4 cloves garlic, roasted
2 tsp chipolte puree* (see note below)
1 shallot, peeled and chopped
2 tsp maple syrup
1/2 tsp salt
2 tbsp rice wine vinegar
2 tbsp fresh lime juice
3/4 cup olive oil

Salad
4 cups dry fusilli pasta
3 cups corn, fresh or frozen, roasted (*see below!)
4 tbsp minced fresh sage
1 bunch green onions, chopped
4 oz candied salmon, smoked salmon, or you can throw in some chick peas
1 pint cherry tomatoes, halved
2 tbsp pine nuts, toasted
1/2 cup crumbled feta cheese
salt and pepper

First, make your dressing. Blend the roasted peppers and garlic in a food processor until smooth, then add the chipolte puree, shallot, maple syrup, salt, rice wine vinegar, and lime juice. Process a bit to mix it up. Then, with the motor running, slowly pour in the olive oil. The mixture will emulsify while you pour (become thick-yum!) Set aside.

Roast your corn! (directions below)

Cook your pasta according to package directions until it's el dente. Drain, run under cold water, and set aside.

While the pasta is cooking, assemble the other ingredients so that everything is ready to toss together once the pasta is cooled. When the pasta is ready, toss it with some dressing in a large bowl until well coated. I used all the dressing, you may decide to use more or less. Add the corn, salmon, sage, and green onions, toss some more. When you are serving, garnish the salad with the tomatoes, pine nuts, and feta. I liked to have a little more feta on mine so put some extra feta on the side for those who like lots of cheese.

Makes 6-8 servings

*chipolte peppers are smoked jalapeno peppers. You can buy them canned in the Mexican food section. They usually come packed in abodo sauce. Chipoltes have a smoky flavor and are really quite hot, and add a little mild heat to this recipe. To make the puree, just buy a can, whiz it up in a food processor, then fill your ice cube tray with the puree and freeze. Transfer the cubes to a ziplock bag and stash in your freezer. The chipolte puree can be added to hummus, salad dressings, sauces, soups, etc. Be careful, it's pretty spicy!

*roasted fresh corn is the best in this recipe, but you can use frozen if it's all you have. Cut the kernels off the cob and toss with 1 Tbsp of vegetable oil. Spread onto a baking sheet and sprinkle with salt and pepper, then roast in a pre-heated 375 F oven for 10 minutes. Allow to cool before proceeding with recipe.
Read More
© 2005-2017 all written and photographic content by Scattered Mom/Karen Humphrey (unless otherwise specified) and may not be reproduced or used in any manner without consent. All rights reserved.

© 2014 Chasing Tomatoes, AllRightsReserved.

Designed by ScreenWritersArena