Bacon Cheddar Pasta

Bacon Cheddar Pasta


Every now and then I get a craving for something so sinfully delicious, so luscious, that I can't help myself. A couple of weeks ago I was at a cafe with a friend having coffee and happened to browse through a Fine Cooking magazine. This recipe caught my eye and before I knew it, I was scribbling the directions down on the back of a stray receipt in my purse.

Cream, cheddar, and bacon are things that I rarely, if ever, eat in one sitting but this was so delicious it was worthy of every bite. I highly recommend it-possibly with a nice green salad and some fruit to finish off, because it's very rich.

Ohhhh but so worth it.

Adapted from Fine Cooking

1 lb pasta (fusilli is good, I used small shells)
3/4 lb bacon
2 cloves garlic, minced
3 cups heavy cream (I used whipping cream)
2 cups firmly packed shredded sharp Cheddar cheese
1/4 tsp freshly ground black pepper
1/2 cup sour cream, for garnish (I skipped this step)
1/2 cup thinly sliced green onions

Bring a large pot of water to a boil and add about 1 tsp water to it. Pour in your pasta and cook until el dente. Drain, but don't rinse. Return the pasta to the pot.

Fry up your bacon in a good sized fry pan, then set pieces aside on paper towel as the finish cooking. Pour off the fat into an empty can, and add your garlic to the hot pan. Stirring, cook for about 2 minutes over medium heat until fragrant. You don't want to let the garlic brown, it will become bitter. Pour in the cream.

Bring the cream to a boil over medium heat, stirring around to bring up the garlic and any bits from the bacon on the pan. Continue to cook and stir for about 3 minutes. Chop the bacon into small pieces, and add, along with the cheese, to the cream. Stir and continue to cook about another 3 minutes until it thickens. Add salt and pepper to taste. Toss the cooked pasta right into the pan, coating evenly with the sauce. Allow to cook over medium heat for about 2 or 3 minutes, until bubbling and heated through.

Serve immediately with a sprinkle of green onions and a dollop of sour cream, if desired.

Serves 4-6

Read more...

Creamy Paprika Chicken and Pasta

Paprika Chicken and Pasta


Since Hubs was diagnosed with type 2 diabetes, we don't eat a lot of pasta anymore. I won't lie and say that I don't miss it, but when I do make it, I'm always looking for something that I can adapt into a meal that everyone in my family will eat. This one was fantastic-you cook the chicken in the sauce, but then serve the chicken on the side and mix the sauce with pasta. That way Hubs could have a salad on the side while Kevin and I enjoyed some pasta! This recipe made quite a lot, so be prepared for some pasta leftovers that would be great in a lunch box the next day.

Adapted from Mimi on the Move and The Crepes of Wrath

5 large chicken legs or breasts (I used breasts, but they got a bit dry. I think that using some chicken thighs here would probably be the best thing-say, about 8?)

5 Tbsp paprika (whatever king you like-sweet, smoked, regular)
2 1/2 tsp basil
2 1/2 tsp oregano
1 1/4 tsp red pepper flakes, divided (I used a lot less-you can add more at the end if you need to)
2 1/2 tsp salt (I reduced this by quite a bit)
2 1/2 tsp pepper (reduced this too-you can use your judgment, I added some at the end)

1 large onion, sliced
4 garlic cloves, minced
3 bay leaves
38 oz crushed or diced tomatoes (I used a 24 oz can of crushed and a 14 oz can of diced, like Sydney recommended)
1 four oz can of tomato paste
1 pound of small pasta-shells are good
3/4 cup sour cream

In a small bowl, stir together the oregano, basil, paprika, 1/2 tsp red pepper flakes, and about 1/2 tsp each salt and pepper. Rub all over each piece of chicken. Set aside. Keep the remaining spices.

Using a large skillet, pour in a few glugs of olive oil and over medium high heat, brown the chicken well on each side until they are nice and browned, about 5 minutes per side. Set each piece aside on a plate. You may have to sear the chicken in batches.

When you're finished, using the same pan, add a little more oil and turn down the heat, then add in your onions and garlic. Reduce the heat to around medium, and stir them around to keep them from browning too much. Saute for about 5 minutes, until they are softened. Pour in the tomatoes, tomato paste, bay leaves, and stir around to get all the browned bits off the bottom. I had some leftover spices that were supposed to go on the chicken, and I think they would be really good added to the sauce, so if you had some I'd just dump them in. Add the chicken back to the pan, skin side down, and bring the sauce up to a boil.

Turn the heat down to low, cover the pan with a lid, and let it simmer for about an hour or two. This is where leg or thigh meat is the best, because it becomes tender-the breasts tended to go dry and I couldn't simmer it for very long, which is what I think makes the amazing flavor. Check and stir the sauce, flipping the thighs every once in awhile to make sure things don't burn.

About 20 minutes before you are going to serve the dish, cook some pasta in boiling salted water according to the package directions.

Right before you are about to eat, take the pan off the stove and set aside. Remove the chicken from the pan and cover to keep it warm. Measure your sour cream into a medium sized bowl, and then add a few spoonfuls of the hot sauce, stirring. What you are doing is tempering your sour cream so that it's warm-ish before you add it to the sauce. Add a little more hot sauce, and stir. I added about 1/2 cup total before I then dumped the whole lot into the pan of hot sauce and stirred it well.

Add the hot cooked pasta, stir to combine, and serve with the chicken on the side.

Serves 5 with pasta leftovers for the next evening.

Read more...

Kamut Shortbread

Can I have a nibble?


I have a confession to make. I never did bake this shortbread. A friend of mine caught John and I on the ferry last week, and thrust some into my hands, saying that I might want a snack later in the day. The truth is, I had completely forgotten about it until a few days later and once I started nibbling, I was in heaven. This is easily the best shortbread I've ever eaten-buttery, tender, with a little bit of sweet and salty going on, and enough to make me talk kindly to it as I snapped it's picture. If you love shortbread, you MUST make this.

Adapted from Pure Dessert

3/4 cup unsalted butter, melted and still warm
1/3 cup sugar
1 tsp pure vanilla extract
1/4 tsp salt
3/4 cup flour
3/4 cup Kamut flour
Turbinado sugar (to sprinkle on top, or you can use regular sugar)
flaky sea salt and freshly ground pepper for sprinkling

You will need a 9 inch tart pan with a removable bottom. Grease well.

Combine the melted butter with the sugar, vanilla, and salt. Stir in the flours until well combined, then pat the dough into the pan. Let it sit on the counter, at room temperature, overnight. Probably it would be a good idea to cover it with a clean tea towel.

Pre-heat your oven to 300 F. Bake the shortbread in the lower 1/3 of the oven for 40 minutes. Remove from the oven and sprinkle with the sugar, salt, and pepper. You don't need a lot of the salt and pepper, here less is better than more. Just a little.

Let the shortbread cool for about 10 minutes before you take it out of the pan and cut into wedges, then place on a parchment paper lined cookie sheet and return to the oven for another 15 minutes.

Cool on a wire rack when done, and store in an airtight container for about 2 weeks.

Makes 10-12 pieces

Read more...

Bittman Vegan Spiced Coconut Pancakes with Tropical Fruit

Bittman Tropical Vegan Pancakes

I don't usually cook vegan things, but these pancakes caught my attention with their coconutty, tropical flavors. We skipped the pistachios because of my sensitivity to nuts, but I think they would be a delicious addition, along with a scoop of Greek yogurt. Kevin thought they were good, but added that he doesn't think he could go vegan. The coconut added a nice texture, they were fluffy, light, and full of flavor. The tropical salad was amazing and we snarfed it down the next day in school lunches! We have heard a lot about Mark Bittman, and while I haven't really made any of his food, we thought these were good. I think I'll have to check out more of his books now.

Adapted from Bon Appetit January 2011

2 1/2 cups whole wheat flour
1 cup unsweetened coconut
2 tsp baking powder
3/4 tsp ground nutmeg
3/4 tsp allspice
1/4 tsp baking soda
one 13 1/2 oz can light unsweetened coconut milk (about 1 2/3 cup)
2 tbsp pure maple syrup
1 Tbsp vanilla

In a large bowl, whisk together the flour, coconut, baking powder, nutmeg, allspice, and baking soda. Set aside.

Using a smaller bowl, mix together the coconut milk, maple syrup, vanilla, and 1 1/4 cups of warm water. Pour into the dry mixture, stirring as you go, until you get a pourable mixture.

I use a non stick electric griddle-just grease it with a little oil and turn it on, and when it's hot pour about 1/4 cup of batter onto it and smooth them out into pancakes about 4 inches around. Let them cook until browned on the bottom and bubbly on top, then flip and cook the other side until golden.

Put your finished pancakes on a cookie sheet in the oven, set at it's lowest setting to keep them warm.

Serve with tropical fruit salad (below), maple syrup, and sprinkle with pistachios.

Makes about 20 pancakes.

Tropical Fruit Salad:

1 cup diced pineapple
1 cup diced mango
1 cup diced banana
2 tbsp maple syrup

Mix everything in a bowl and serve immediately. If you are going to serve it later, add the banana just before serving so it doesn't turn brown.

Read more...

Caramel Pecan Brownies

Caramel Pecan Brownies


Besides awhile ago when I tried to make maple caramel popcorn (and scorched a finger), I've never made caramel. Years before I've always just picked up Hershey's caramel sauce to spoon over ice cream or whatever else I had handy, but never have I made it from scratch.

Until I made these brownies.

Speaking of bought caramel sauce, what is IN Hershey's caramel sauce anyway? (cut and pasted from here)

high fructose corn syrup; corn syrup; sweetened condensed milk (skim milk and sugar); water; CONTAINS 2% OR LESS OF: modified cornstarch; disodium phosphate; natural and artificial flavor; sodium citrate; Monogycerides; salt; carrageenan; caramel color; artificial color (yellow 6; yellow 5)

Notes:
According to Wikipedia, Yellow #5 is Tartrazine

What's in MY caramel?

White sugar, water, lemon juice, butter, whipping cream, and a pinch of salt.

I like my caramel better. In fact, it was so good I never plan to buy caramel again. Ever. okay, okay-it was a little tricky, and you have to pay attention, but I know you can do it. However because it IS a bit technical, I have devoted a whole post to it that you want to read before you start. TRUST ME.

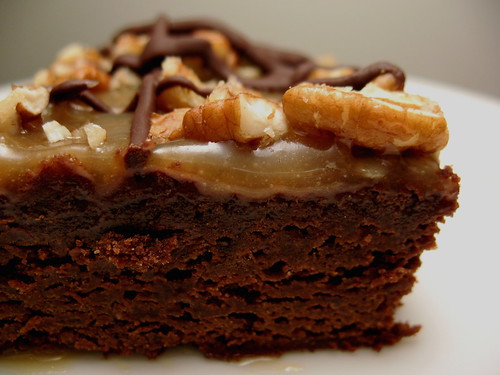
These brownies are amazing. Much like a Caramilk bar, they are dark and delicious with a gorgeous layer of caramel, then toasted nuts and drizzled chocolate take them over the top. I brought half a pan to work and was told, with no reservations, that I was sincerely loved.

Adapted from Fine Cooking

6 oz (12 tbsp) unsalted butter, cut into squares
4 oz good, unsweetened chocolate, chopped
4 large eggs
1 3/4 cup sugar
1 1/2 tsp vanilla
1/4 tsp salt
3/4 cup flour
1/4 cup unsweetened cocoa powder
1 1/2 cup pecans, chopped (optional)

Topping (caramel sauce):
1 batch of caramel
1/2 cup whipping cream
3 tbsp unsalted butter
1 tsp vanilla extract
1/4 tsp salt

Ganache Drizzle:
2 oz bittersweet chocolate, chopped (although I used semi-sweet and it was fine)
1 tbsp whipping cream
1/2 cup pecans, toasted and chopped

Line a 9x13 inch pan with parchment paper, leaving enough so it extends up the sides for handles (these brownies are a bit messy, this will help with clean up).

Pre-heat the oven to 350 F.

Measure out the flour, salt, and cocoa into a small bowl and stir. Set aside.

In a saucepan over low heat, melt the butter and chocolate together, stirring until smooth. Set aside to cool slightly.

Using a large bowl, whisk the eggs together until well blended. Gradually add the sugar, continuing to whisk until well mixed in. Pour in a small amount of cooled chocolate, whisking, to temper the eggs a little (you don't want to cook your eggs with the chocolate). Dribble in the chocolate a little at a time, stirring as you go, until you've dumped the whole lot in.

Stir in the flour and cocoa until it's nice and blended, then add the pecans (if using).

Pour the batter into your parchment paper lined pan, smoothing it out to make sure the batter is distributed evenly. Bake in the center of a 350 F oven for 20-22 minutes, until a toothpick inserted into the center comes out with just a few crumbs clinging to it.

Press down any spots that are puffed up or have a bubble-you want this baby to be nice and flat as you are going to then pour caramel sauce all over it.

Let your freshly baked pan of brownies sit on the counter for a good 10 minutes or so to cool. While it's doing that, make your caramel sauce. Start with making a batch of caramel (instructions here). After your caramel turned brown and looks done, remove the pot from the heat and add in the whipping cream. It's going to boil up, but don't worry-stir until it's calmed down, then whisk in the butter until melted. Stir in your vanilla and salt.

Allow the caramel to cool for just a couple of minutes, then pour the caramel over the brownies. Some is going to pool in the corners and drip down the sides, but no matter. Just use a knife to try to evenly disperse the topping. Let the brownies cool on the counter for about 45 minutes, then transfer the pan to the fridge to cool for an hour.

Once the brownies are cool and the topping has set a bit, melt the chocolate with the cream over low heat. Pour the mixture into a resealable sandwich bag and snip off one corner, then drizzle chocolate all over the top of the caramel in a random design. Sprinkle with pecans.

I like these best kept in the fridge, in a sealed container. They last about 5 days.

Makes a 9x13 inch pan of brownies-how many depends on how big you like them!

Read more...

Mexican Hot Chocolate Cookies

Mexican Hot Chocolate Cookie

Awhile ago my friend Anne made the most delectable brownies using Denman Island chipolte chocolate, and so when I saw this recipe for Mexican hot chocolate cookies, I was intrigued. Sweet with a hint of heat may sound a little weird, but the flavors are amazing.

As I began baking, I noticed a problem. The original recipe dictated that the cookies be baked at 400F, which seemed awfully high but I went along with it to see what would happen.

The first pan burned, of course. Why didn't I listen to my instincts? Anyway with the oven back down to 350 F, the remaining cookies baked up beautifully. Thin and a bit crispy, they are great with a glass of milk. With a little chili powder mixed in with some cinnamon sugar to roll them in, there's a bit of a Mexican hot chocolate feel, but not quite enough. I think I'd Next time I think I'd try using Chipolte chili powder to get a nice smoky flavor.

I have to admit I was really unimpressed with how this recipe was originally written. First I burned the cookies, then I noticed that the way it was written had been confusing, and I accidentally used a bit too much sugar. The cookies themselves were good but egads, I couldn't wait to get my hands on the words to change them to something something home bakers would actually be able to follow.

Adapted from Every Day Food April 2010

2 1/4 cups flour
1/2 cup unsweetened cocoa powder
2 tsp cream of tartar
1 tsp baking soda
pinch of salt
1 cup unsalted butter, softened
1 1/2 cups sugar
2 large eggs

Yummy sugar coating to roll dough in:
1/4 cup sugar
2 tsp cinnamon
1/2 tsp chili powder

Pre-heat oven to 350 F

In a large bowl, whisk together the flour, cocoa, cream of tartar, baking soda, and a pinch of salt. Sift it all together. Set aside.

With an electric mixer, beat the flour until fluffy. Add the sugar and continue to mix well. Stop and scrape down the sides of the bowl before adding the eggs, one at a time, beating well after each. Add the flour mixture on low until just combined.

Combine the 1/4 cup sugar, cinnamon, and chili powder in a small bowl. Set aside.

Using a tablespoon, spoon out the dough and roll into balls, then coat in the cinnamon chili sugar. Place about 2 inches apart on a cookie sheet, pressing down slightly. Bake for 10 minutes, or until the tops are cracked and just set. Let them sit on the stovetop on the pan just for about 3-4 minutes to firm up before you remove the cookies to a rack to cool completely.

Store in an airtight container for about a week.

Makes 36 cookies

Mexican Hot Chocolate Cookie2

Read more...

Making Caramel

Last year I made maple caramel popcorn without actually reading anything about working with caramel. That was dumb, mostly because I then ended up frying some fingers of mine. Ouch! To make sure that all of you are armed with everything you need to know, I found a great video on Fine Cooking to help you along. I had the magazine version in hand to follow, and my caramel sauce turned out deliciously-with no fried fingers!

Tips:

-Don't be distracted. This stuff is HOT, people.
-Caramel goes from light brown to burned quicker than you think. Don't leave the pan. EVER.
-Don't stir it, swirl the pan. Stirring tends to make sugar crystals form
-The pastry brush thing works. Keep it handy, right by the stove. A long handled one is best, if you have it.

Check out BakedBree's blog post about making caramel sauce-lots of great photos so you can get an idea what I'm talking about. Don't let her comments about failing spectacularly scare you off though, you CAN make this!

Also, watch this video. It might help.


Recipe for Basic Caramel (adapted from Fine Cooking)

1 cup sugar
1/4 tsp fresh lemon juice
1/4 cup cold water

Have some cold water handy nearby in a measuring cup or bowl, with a pasty brush.

Pour the sugar, lemon juice, and cold water into a 2 quart pot. Brush down the side of the pot with the pastry brush dipped in water to get rid of any sugar crystals, and bring the mixture to a boil over medium high heat. Don't stir! You don't need to. Just watch it carefully while it cooks, brushing down the sides of the pot to get rid of sugar crystals every now and then.

After cooking for about 5-8 minutes, the sugar will start to change color. Give the pot a swirl so that the color evens out, and watch carefully. Swirling also helps the caramel cook evenly, instead of having some spots burn on you. The color will continue to darken. What you want is medium amber, which should take about 30 sec after it starts to darken. As soon as it's the color you want, take the pot off the stove.

Now you can use your caramel to make sauces, and more. Most caramel sauces need butter and whipping cream, which will be coming up soon, along with the recipe for these incredible chocolate caramel pecan brownies. Oh MY.

Caramel Pecan Brownies

Read more...

Whole Wheat Cinnamon Raisin Bread

Cinnamon Raisin Bread 2


The idea of cinnamon raisin bread really appeals to me-sort of like a cinnamon bun without so much sweet, it makes a really great breakfast toasted with some cream cheese slathered on top. On Sunday I was awake early, so I got the dough going, by lunch I had it all tucked into loaf pans, and by the time we came home from a walk it was ready to go into the oven.

Bread really isn't so that hard to make, just a bit time consuming. This recipe is pretty easy though, and I'm sure you guys will whip some up some in your own kitchens without a problem. This recipe was not like anything I've made before, since it uses oil instead of butter-but it was really very tasty. With two loaves you can freeze one, share it, or make some killer French toast!

Adapted from Food Network Magazine January/February 2011


2 cups bread flour, plus more for dusting (or just regular all purpose flour works too)
2 cups whole wheat flour
1 1/4 cups warm water (check with a thermometer-should be between 120-130 F)
1/4 cup non fat dry milk
1 large egg
2 tbsp oil
3 tbsp honey
2 tsp salt
1 1/2 tsp instant dry yeast
2/3 cup raisins (soaked in boiling water about 30 minutes)
1 tbsp plus 1 tsp ground cinnamon
1/3 packed brown sugar

In a large bowl, combine the flours, dry milk, egg, oil, honey, salt, water, and yeast. Mix until you get a dough. If you have a stand mixer, use the dough hook and mix 3 minutes on the lowest setting, then increase to the next highest and mix another 5 minutes. Or, if you don't have a stand mixer, just turn the dough out onto a floured counter and knead that baby for about 5 minutes or so.

Get a nice big bowl, and slather the inside with some oil. Add the dough, and cover with plastic wrap. I like to let dough rise in my oven with the light on-that way the dough is draft free, and the light generates enough heat to really make it rise.

Let rise for an hour and a half until doubled in size.

Punch down your dough to get rid of air bubbles, then divide it in half and roll each half into an 8 inch square. Brush each square with oil, then sprinkle with half of the brown sugar, then raisins and cinnamon. Actually what I did was just mix the sugar and cinnamon together in a bowl, and then just use half of that. Starting with the end closest to you, roll up tightly and place in a loaf pan that has been lightly brushed with oil. (Or buttered, like I did. All that oil seemed weird to me. ) Cover with plastic wrap and stick back in the oven with the light on for an hour and a half so that they can rise some more.

Before baking, remove those loaves from the oven and turn your oven on to 375 F. Brush the loaves lightly with oil and bake about 25 -30 minutes, or until golden.

Remove to a wire rack to cool.

Makes 2 loaves

Read more...

Banana Blueberry Muffins

Banana Blueberry Muffin

With "sketchy" bananas hanging around on the counter (I totally stole that saying from a twitter buddy, but I can't remember which one) I couldn't wait to try this recipe, which produced some tasty muffins for the lunch box. Use bananas that haven't been frozen, as the frozen ones add a little too much liquid and can make them kind of mushy.

Adapted From Every Day Food January/February 2009

1 cup whole wheat flour
3/4 cup flour
1/4 cup wheat germ
1 tsp baking soda
1/2 tsp salt
1/2 cup unsalted butter
1/3 cup sugar
1/3 cup packed brown sugar
2 large eggs
1 ripe bananas
1/3 cup milk
1 tsp vanilla
1 cup blueberries

Pre-heat your oven to 375 F

In a large bowl, whisk together the flours, wheat germ, baking soda, and salt. Set aside.

In a separate bowl, whisk together the milk, banana, and vanilla. Set aside.

Using your electric mixer, beat butter with the sugars until light and fluffy. Mix in the eggs, one at a time, stopping to scrape down the bowl as you go.

Add the flour and milk/banana mixtures to the butter mixture alternately, starting and ending with the flour mixture until just combined. Fold in the blueberries. Spoon batter into paper lined muffin cups. At this point I love crunchy topped muffins so I often sprinkle on some coarse sugar, such as Sugar in the Raw and then bake the muffins 25 minutes, or until a toothpick inserted into the center comes out clean.

Let muffins cool in the pan for about 10 minutes before removing to a rack to cool completely.

Makes 12.

Read more...

Chewy Oatmeal Raisin Cookies

Crunchy Oatmeal cookie


It's January, and with all that chocolate after the holidays perhaps you're thinking of something a little healthier to go in the lunchbox. These cookies are chewy and delicious-a little on the crisp side on the edges, but chewy in the middle. I'm thinking that if I used old fashioned rolled oats like I should have, maybe then they would be even more chewy. It wasn't until I began typing the recipe out that I realized that I had in fact used quick oats, which the recipe clearly states NOT to use. No matter-the cookies are still delicious! Try subbing the raisins with dried tart cherries, cranberries, or other dried fruit for a bit of texture.

Adapted From Every Day Food September 2008

1 1/2 cups old fashioned rolled oats (not quick cooking)
1/2 cup all purpose flour
1/2 cup raisins
1/2 tsp baking soda
1/2 tsp salt
6 tbsp unsalted butter, softened
1/2 cup packed brown sugar
1/4 cup sugar
1 egg
1 tsp vanilla

Pre-heat oven to 350 F.

Measure out the oats, flour, baking soda, and salt into a bowl and stir. Set aside.

In the bowl of an electric mixer, beat butter until fluffy. Add your sugars and continue to beat until well combined. Scrape down the bowl, then add the egg and vanilla. Beat well.

Turn the mixer speed down to low and add the oats; mix until just combined. Fold in the raisins.

Spoon out by rounded tablespoons, placing 2 inches apart on the cookie sheet. Bake for about 10 minutes until set and golden brown.

Makes about 18-20 cookies

Read more...
© 2005-2012 all written and photographic content by Scattered Mom (unless otherwise specified) and may not be reproduced or used in any manner without consent. All rights reserved.

  © Blogger template Shush by Ourblogtemplates.com 2009

Back to TOP