Printfriendly

Showing posts with label Pies and Tarts. Show all posts

Friday, May 11, 2012

Strawberry Rhubarb Pie for Mother's Day


When I was a kid growing up in the country, we had rhubarb growing in our garden like most people we knew. I think it was one of the only things that would grow over in 100 Mile, and since we had a ton of it, Mom made everything with it.  Pie, jam, rhubarb crumble, crisp, even platz (a sort of coffee cake with fruit and crumble topping)  I admit, I overdosed on rhubarb.  For over 20 years I haven't touched it and even claimed that I hate the stuff.

Last weekend meant a trip to the Sechelt Farmer's Market (which I meant to blog, but I forgot my camera), and there I met Farmer Jon from Sechelt Farm.  We talked about a new farm to school program that's coming together, the new location of the market, and he talked me into some farm fresh spinach, rhubarb, and a ridiculously tasty rhubarb vinaigrette dressing.  I had planned to make salad, but some how the week got away from me.  Instead, it seemed as though pie was the only other option.

Oh, wow.  Tart, yet sweet and delicious, this pie is SO good.  You could reduce the sugar if you want to, but I think the amount called for is just perfect.  Orange zest adds wonderful flavour and compliments the tart rhubarb and sweet strawberries nicely.


Strawberry Rhubarb Pie


Adapted from Canadian Living

Pie crust

4 cups chopped rhubarb (1 inch pieces)
2 cups strawberries, hulled and quartered
1 cup sugar
1/2 cup flour
1 tsp vanilla
1/2 tsp finely grated orange zest
2 tbsp cold butter, cut into tiny cubes
egg yolk
2 tsp sugar

Pre-heat your oven to 425 F.

In a large bowl, toss together the rhubarb, strawberries, sugar, flour, vanilla, and orange zest.  Set aside.

On a lightly floured counter, roll out one of the disks of dough to about 1/8 thick and fit into a 9 inch pie pan, leaving about 3/4 inch (2cm) overhang.  I always find this a bit of a challenge, but you can do it!  Don't let the pastry win.  Spoon in the rhubarb filling.

In a small bowl, whisk together the egg yolk and 2 tsp water, then brush over the rim of the pie.  This is your glue to keep it together. Don't skip that step.

Roll out the other disk to 1/8 inch thickness and fit over top of the rhubarb filling, leaving about 3/4 inch (2 cm) overhang. Fold overhang under bottom pastry rim, seal, and flute edges.  Okay, I don't really know how to flute.  Fake it. Don't worry if it seems a little thick, the crust is tasty and you'll eat it anyway.

Brush the top with egg and sprinkle with sugar. Cut some steam vents in the top.

Bake the pie on a baking sheet in the bottom third of the oven for about 15 minutes.  You want to make sure that if there are any drips or bubbling that it's not all over the bottom of your oven.  Reduce the oven to 350 F and bake another 45-50 minutes, until the crust is golden and the filling bubbly.

Cool pie completely on a rack before serving.  I mean that, too.  If you don't and cut into it, you'll end up with soupy filling that will run all over the place.  Resist temptation, friends.

Serve with ice cream.  Yum!
Read More

Saturday, March 10, 2012

It's Pi Day! Time for Blueberry Pie!


Blueberry Pie


"I like pie. Can you make pie?"

Pie has never been my forte, but as we sat on the couch I began to think about Kevin's request. Is pie really that hard, or is it that I can't overcome my irritation of how mine never turns out perfect and actually produce one? Besides, I have blueberries in the fridge. Why not?

Rooting around in the freezer, I dug out the ingredients and that evening produced a delicious blueberry pie that has turned out to be my most successful effort to date. For once the crust was flakey, the filling sweet and delicious.

Always up to the challenge of teaching Kevin something new since he IS homeschooled (or 'online schooled' as we like to call it), I couldn't resist teaching Kevin about PI day on March 14. Did you know there was a whole day devoted to the Greek letter? Celebrate PI day at your house, by making pie with the kids and talking diameter and circumference of circles!

What's YOUR favorite pie?

Adapted from Canadian Living

Filling:

5 cups of blueberries (if frozen, thaw and drain them first)
3/4 cup sugar (I reduced it to 1/2 cup)
1/4 cup flour
1/2 tsp grated lemon rind
1 tbsp lemon juice
1/2 tsp cinnamon
1 egg yolk

Pastry crust:

2 1/2 cups flour (I used cake and pastry flour)
3/4 tsp salt
2/3 cup cold unsalted butter, cubed
1/3 cup lard
1/2 cup cold water

Mix together the flour and salt in a large bowl. Using a pastry cutter or two knives, cut the butter and lard until the mixture resembles crumbs. Stir in the cold water, a little at a time, until the flour comes together into a dough.

Turn the dough out onto a lightly floured counter and gather into a ball. Split into two portions and form each into a disk. Cover each with plastic wrap and chill for about 30 minutes to an hour.

When you are ready to make the pie, stir all the filling ingredients together in a bowl and set aside. On a lightly floured counter, roll out one of the disks of dough to about 1/8 thick and fit into a 9 inch pie pan, leaving about 3/4 inch (2cm) overhang. Spoon in the blueberry filling. In a small bowl whisk together the egg yolk and 2 tsp water, then brush over the rim of the pie.

Roll out the other disk to 1/8 inch thickness and fit over top of the blueberry filling, leaving about 3/4 inch (2 cm) overhang. Fold overhang under bottom pastry rim, seal, and flute edges. Brush the top with egg and sprinkle with sugar. Cut some steam vents in the top.

Pre-heat the oven to 425 F. Bake on a baking sheet in the bottom third of the oven for about 20 minutes. Reduce the oven to 350 F and bake another 50-60 minutes, until the crust is golden and the filling bubbly.

Remove the pie from the oven and allow it to cool before you slice it into 8 pieces and serve.  I like my pie room temperature with big scoops of vanilla ice cream.


Pie, anyone?
Read More

Monday, November 21, 2011

Chocolate Pecan Maple Butter Tarts

choc pecan tart 3


Christmas just isn't complete without butter tarts in my house, and while we tend to be butter tart purists, this recipe caught my eye immediately.     Delightfully gooey, pecans and dark chocolate are drenched in a custardy maple filling.  Tucked onto a Christmas cookie tray or served warm with scoops of ice cream, they are to DIE for.

 You could make your own tart pastry, but I prefer to skip that step and buy my tart shells so that they can be made in a snap.  Also, make sure to use the best chocolate you can find, and do not substitute margarine for the butter.  You need the butter to achieve the best results.

bite
I couldn't help but eat one after I broke it open for you to see the inside.


3/4 cup packed brown sugar
1/2 cup maple syrup (No. 1 medium grade)
1/3 cup unsalted butter, melted
2 eggs
1 Tbsp cider vinegar
1/2 tsp salt
3/4 cup chopped pecan halves, chopped
3/4 cup high quality bittersweet chocolate (such as Lindt 70%, Camino, Green and Blacks, or even Baker's bittersweet chocolate squares), chopped or 1/3 cup semi-sweet chocolate chips
About 20 tart shells

Pre-heat the oven to 350 F

In a bowl, mix together the brown sugar, maple syrup, butter, eggs, cider vinegar, and salt.  Set aside.  Divide the chopped nuts and chocolate evenly between the tart shells, then fill with the filling.

Bake until the pastry is set and the filling is golden, about 15-20 minutes.  Transfer to a wire rack to cool, being careful because the filling is very hot.  Let them cool and then store in an airtight container at room temperature for up to 1 day, or freeze for a few weeks.

Makes about 20 tarts
Read More

Sunday, October 9, 2011

Spinach Pie


spinach pie

The first time I ever made spanakopita, it was in a foods class with a group of grade 11 girls.  We were making the appetizer version, which had a lot of folding phyllo into tiny little triangles, this way and that.  I learned something valuable that day, and it wasn't that spanakopita is delicious.

I can't fold the $^%@ phyllo triangles, people.  No matter how I tried, it just wouldn't work-so spinach PIE is for me.  No folding phyllo!  Plus this pie is SO delicious, you can make it for your family and serve with a salad for a light lunch or dinner.  We loved it!  The leftovers re-heat nicely in the oven, too.  Don't let phyllo scare you off, this is really easy!  You can do it!

The bonus is that your kids will discover that spinach is DELICIOUS.

Adapted from Whining and Dining

3 packages of frozen chopped spinach, thawed and all the water squeezed out
2 cups chopped onion
1/2 cup chopped green onion
185 g feta cheese, crumbled
1/4 cup chopped flat leaf parsley
1/4 cup chopped fresh dill
1/2 cup freshly grated Parmesan Cheese
4 cloves of garlic, minced
salt and fresh cracked pepper
3 large eggs
olive oil
8 sheets of phyllo pastry, thawed

Pre-heat oven to 375 F.

In a large pan, fry the onion and garlic in a little olive oil until translucent and soft, about 5 minutes.  Add the green onions and fry about another 3 minutes.  Crumble in the drained and squeezed dry spinach into the pan and continue to fry a bit to get ride of any excess moisture.

Dump the spinach/onion mixture into a large bowl and set aside to cool.  When cool to touch, crumble in the feta, and add the freshly grated Parmesan cheese, parsley, dill, salt and pepper.  Beat the eggs in a small bowl and stir them in as well.  Set aside.

Line a large cookie sheet with parchment paper.  Lay one sheet of phyllo on the parchment, then brush it lightly with olive oil.  Lay another sheet of phyllo on top.  Continue, until you have used 4 sheets of phyllo.  Spread the spinach mixture on the phyllo stack, leaving about a 1 1/2 inch border around the edge.   Fold the phyllo edges up and over the sides of the filling, brushing them with olive oil.   On the counter, start another stack of phyllo-1 sheet, brush with oil, another sheet, brush again, etc until you have used four sheets.  When you are finished, pick up the stack and center it over the filling. Tuck the edges under the bottom of the pie, and brush the top with olive oil.  Bake in the very bottom rack of the oven for about 40 minutes or until the pastry is golden brown.

Makes six servings
Read More

Sunday, October 2, 2011

Fall Veggie Tarts with Roasted Tomato Sauce

Full of late summer vegetables, these tarts are crazy delicious-but also pretty work intensive. I don't think I would have made them for dinner one night weeks ago had I really known how much work they were, from the sauce to the pastry and filling.  On the other hand, they were so tasty I would make them again for a special occasion, such as Thanksgiving.  You do need mini tart pans to make these, which I don't have-and upon realizing it, I improved with a large muffin tin.

Adapted from Fresh

Roasted Tomato Sauce: 

4 large ripe tomatoes, cut in half
2 tsp olive oil
1/2 tsp salt
1/2 coarsely chopped onions
2 cloves garlic (not chopped)
1 cup water
1 tsp sugar

Pre heat your oven to 450 F. Toss the tomatoes, garlic, and onions with olive oil, sprinkle with salt and pepper, then put in an ovenproof dish. Roast for about 1/2 hour. Transfer to a small saucepan, and add water and sugar.

Simmer over medium heat for about 15 minutes before transferring to a food processor or blender and pureeing. Strain through a fine mesh sieve. At this point, I found the mixture to be kind of watery, so I continued to simmer for about an hour until the mixture became thick. I also added some tomato paste (about 2 tbsp) to get it to the consistency I wanted.

Meanwhile, make your tarts.

Pastry:

3/4 cup flour
1/4 cup cornmeal
1 tsp sugar
1/2 tsp salt
1/4 cup butter, cut into 1/2 inch pieces
2 tbsp cold water

Whisk flour, cornmeal, sugar, and salt together in a bowl. Cut in the butter with a pastry cutter or two knives until the mixture resembled coarse crumbs. Stir in the water with a fork until just combined, then turn mixture out onto a lightly floured counter and bring together with your hands, trying not to handle it too much. Let the dough sit and rest for about 20 minutes on the counter, covered. Divide dough into 4 pieces. Roll each piece out to about 1/8 inch thick, then cut into a 6 inch circle. Set aside.


veggie tarts

Filling: 

1 tbsp olive oil
2 cloves garlic, minced
1/2 cup diced onions
1 cup diced green zucchini
1 cup diced yellow zucchini
1/2 cup thinly sliced leeks
1/2 cup diced red peppers
1 cup green or yellow beans, thinly sliced
2 tbsp chopped fresh basil
1 tbsp parsley
1 tbsp chopped fresh thyme
4 oz fresh goat cheese (I used one rolled in herbs)

In a pan over medium heat, heat up your olive oil and saute the onions and garlic until translucent and soft.  Stir in zucchinis, leeks, peppers, and beans, continuing to cook and stir until they are just crisp tender.  Remove from the heat and stir in the basil, parsley, and thyme.

Assembly:

The original recipe called for tart shells, but I didn't have the right sized tart pans.  What's a girl to do? I had already mounded the filling on the uncooked pastry!  Here's what you do:  If you have 4 inch tart shells, line them with the pastry, allowing the dough to extend past the edges of the shell.  Mound 1/2 cup filling into the tart shells, dotting with goat cheese.  Fold the pastry up and around the filling, tucking it in.

Now, what to do if you don't have tart pans?  I mounded the filling on the pastry, dug out my large muffin tin (not a regular sized one-too small!), and gently set the filled pastry into a muffin cup.  It didn't quite fit all the way in, which was fine-I tucked it on the top as best I could, pushing it down slightly-not all the way, which was fine-as the tarts cooked, they sunk farther into the muffin tin anyhow.

Bake tarts until golden and cooked through-about 20 minutes.

To serve the tarts, spread 1/4 cup of the tomato sauce on a plate, and set a tart in it.

Serves 4.


veggie tarts 2
Read More

Sunday, March 20, 2011

Meyer Lemon Tarts

Meyer Lemon Tarts


Awhile ago I found Meyer Lemons at the store. To be honest I didn't even really know what they were (besides the obvious lemons, of course), but somehow knew they were special and slipped a package of 8 into my shopping cart. Once they were home with me, it was all what do I do with these things? I can't just make any old lemon item, I have to make something special. Something decadent. Something worthy.

Twitter offered all sorts of great suggestions, and at first I settled on a lemon vinagrette and marinade for a prawn salad. Good, but not quite what I was thinking of. Scouring the internets some more ideas, I finally stumbled across David Lebovitz's blog and his post about improved lemon curd.

At first I was a little skeptical. I've never enjoyed lemon meringue pie, with all that foamy meringue perched a top tart lemon stuff. Meh. As I read, the post drew me in and suddenly, all I could think of was creamy, tart, lemon curd.

I had made curd before, but it was never that great, and now I know why. I used *gasp* bottled lemon juice, once. Never, ever do that. The next time, I didn't press the mixture through a strainer. Don't skip that step. As much as you whisk, you will get little bits of cooked egg white in your curd. The strainer weeds those babies out and leaves you with a perfectly smooth concoction, which is what you are going for.

Adapted From David Lebovitz
Makes about 1 cup

1/2 cup freshly squeezed lemon juice
1/3 cup sugar (or if using regular lemons, 1/2 cup)
2 large egg yolks
2 large eggs
pinch salt
6 tbsp unsalted butter, cubed

Before you do anything else, put a mesh strainer over a bowl or in my case, a big 4 cup pyrex measuring cup.

In the top part of a double boiler over simmering water, whisk together the lemon juice, sugar, eggs, and salt. Add the butter cubes and continue to whisk constantly over low heat. The whisking is the trick to truly creamy, smooth curd-it keeps the bits of egg from cooking and floating around in it. Whisk away over low heat, and the butter will eventually melt, even though at times it will seem to clump up and try to drive you crazy.

Once the butter melts, increase the heat to medium and continue to whisk constantly. The mixture will suddenly thicken up into a thick pudding-like consistency, and you'll know it's finished when you lift the whisk from the mixture, and the mixture "holds it's shape when it falls back into the saucepan from the whisk". Immediately remove it from the stove and pour into the strainer, forcing it through by pressing with a spatula. That's when any little bits of egg white that globbed together will be weeded out of your delicious curd.

Transfer to a jar, seal, and keep in the fridge for up to a week. You can spread it on toast or crumpets, use as a filling for cake, eat by the spoonful, or make lemon tarts like I did.

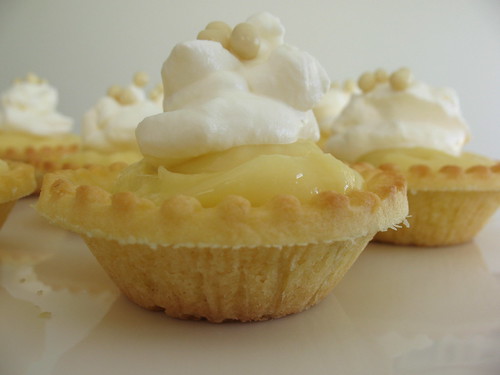
Now I'd love to say that I made those tart shells from scratch, but I didn't. I bought them. Then I pricked them all over with a fork and baked them at 400 F until they were browned, which was about 8-10 minutes or so. Removed them from the oven and let them cool before filling with the lemon curd and topping with whipped cream. The above recipe for curd filled about 9 tarts quite generously, so if you are making for a crowd I'd double the amount of curd you are making. Store the tarts in the fridge for a few days-but I doubt that they will last that long.

Makes about 9 or 10
Read More

Saturday, December 25, 2010

No Fail Pie Crust

This guest post is by Katie Trant! You may have noticed that I have featured Katie in some meal plans, and her yummy maple oatmeal pecan cookies were on here a little while ago. As Thanksgiving approached, I whined that pastry and I are are not friends. "I can't make pie crust", I pouted to anyone who would listen on Twitter.

Katie came to the rescue. She sent me the below instructions by email and when I followed them, I came out with the most flaky, amazing pie crust I have ever created. I asked if I could then post her instructions for this so that other pastry challenged pie makers could take her words of wisdom and create their own delicious pies.

She said YES. Because she's just AWESOME.

So here it is-a delicious, no fail Pie Crust lesson. If I can make it work, you certainly can.

By Katie Trant (go see The Muffin Myth, she has a great blog too)

I think the key to making a great pie crust is understanding a little bit about gluten. Gluten is the protein in wheat, and one of it's amazing properties is the ability to form polymers. In plain talk, a molecule of gluten is able to link up with another molecule of gluten which can link with another molecule of gluten . . . and it goes on and forms long chains. The chains are a really good thing if you're making, say, a bread, or a pizza crust, when you want your dough to be smooth and elastic and stretchy. The gluten chains are the reason bread dough can stretch and rise, and has that great chewy texture. When you're kneading a bread dough, what you're doing is encouraging gluten chains to form.

If you're making pastry, a cookie, a cake, or say, your pie crust, chewy and stretchy is NOT the thing you're looking for. This is why it's so critical not to over mix cake or cookie doughs - you don't want long gluten chains to form, or you'll end up with tough cookies. In a flaky pastry like a pie crust, this is where the fat is really important. The role of fat in pastry is to physically coat the individual molecules of gluten and prevent them from forming chains. Shortening does just that; it "shortens" the gluten chain. Neat, hey? It is important that the fat you're using is very cold - not frozen, but cold.

When you mix it into the pastry, you want to blend it in so that the dough just holds together, but you also want little flecks of fat to remain in your dough, little bits the size of grains of rice, or small peas. When you bake your crust they will melt and create steam, which will create teeny little pockets in your crust, giving you the flaky pastry you're after.

To recap, the key to a good pie crust is threefold:

1) handle it as little as possible - the more you handle it, the more gluten chains will form,
2) keep your ingredients very cold, and

3) make sure your fat is the right texture.

1/2 lb cold shortening or unsalted butter
2 1/2 c. unbleached all purpose flour
1/3 c. cold water
2 Tablespoons white vinegar
1/2 tsp. salt

In a large bowl combine the flour and salt. Add the fat, and using a pastry cutter, cut up into pea sized chunks (if you don't have a pasty cutter, cut into small cubes and then add into the bowl), then use your fingers to work the fat into the flour until you have a crumbly mix with bits the size of small peas or grains of rice remaining.

Add cold water - start with only 1/4 cup, and add the vinegar. Mix in with a wooden spoon. If the mixture seems really dry, add the rest of the water. Stir to combine, and then turn out onto clean counter top and gather the mixture together with your hands. It should hold together and not be crumbing and falling apart, but nor should it be wet and sticky.

Form into two flat disks (easier to roll out later than if you form into balls), wrap in plastic wrap, and put in the fridge for an hour, until firm (you can also put in the freezer for less time if you need it sooner). Dough will be much easier to roll out and handle when it is quite cold. When you're ready to roll it out, place on a lightly floured surface, and away you go.

Makes 2 pie crusts, or 1 two crust pie.
Read More

Tuesday, April 27, 2010

Blueberry Tarts

Over on Food Revolution Friday, the lovely Alex posted a link to her recipe for blueberry pie and I got to thinking....

I have blueberries. I have tart shells. Together they could make blueberry TARTS.

(Psst...I've never made blueberry tarts. Ever. This was totally an experiment. Let's take a look at how they turned out, shall we?)


How about a little closer up?


These were AMAZING with a capital A, and I would SO serve them warm with a scoopful of Chapman's frozen yogurt. Swoon!

I improvised with the recipe a bit-taking a blueberry pie recipe and changing the measurements so that it would work for the 15 tart shells I had, but I easily could have filled 20.

Filling:

20 pre-made tart shells
5 cups of fresh or frozen blueberries
1/2 cup sugar
1/4 cup flour
1 1/2 tsp lemon zest
2 1/4 tsp lemon juice

Toss together in a bowl. Fill your tart shells. Don't be shy here, those blueberries cook down so fill those suckers as fill as you can get them.

Topping:

1/2 cup brown sugar
1/2 cup rolled oats
1/4 cup flour
1/4 tsp cinnamon
1/4 cup cold butter

Stir the flour, cinnamon, oats, and brown sugar together in a bowl. With a pastry cutter, cut in the butter until the mixture resembles coarse crumbs. I found it hard to get this topping on the tarts when they were piled high so I just did the best I could, allowing the bits to fall all over the cookie sheet. Then I took out a clean cookie sheet and transferred the tarts to that one to bake on.

Bake in a pre-heated, 375 F oven for about 30 minutes. Keep a good eye on them. They should be bubbly, and the topping lightly browned.

Makes 20 tarts

Read More

Thursday, December 24, 2009

Butter Tarts


Nothing says holidays in my house like butter tarts. For you Americans out there scratching your heads, read about the history and what they are here. Sweet, full of raisins, a little bit messy to eat, these are scrumptious. I have to warn you, I do not make pastry from scratch. Instead I buy ready made tart shells, because it's just a whole lot easier. This picture to the left are my tart shells all ready to go in the oven.

Also, these freeze really well! I like to eat 'em straight from the freezer, actually. Just be careful how you pack them. They do best if you freeze them on a cookie sheet first until they are nice and hard, and then pack them into an airtight container with a sheet of waxed paper between the layers.

This recipe is from my mom, and I have no idea where it came from.

Ingredients:
1/2 cup seedless raisins (preferably golden)
1/4 cup butter (you must use butter, not margarine)
1/2 cup brown sugar
1/2 cup corn syrup
1/4 tsp salt
1 egg, beaten
1 tsp vanilla
and about 12-14 tart shells

Pre-heat oven to 400 F.Measure raisins into a bowl. Pour boiling water over to cover and allow to steep for 10 minutes. In a separate bowl, mix together brown sugar, corn syrup, salt, and vanilla. Drain raisins. Add butter directly to drained raisins and stir until butter is mostly melted. Add to sugar mixture and combine until butter is melted. Stir in beaten egg. Fill tart shells 3/4 full and bake for about 10-12 minutes, or until pastry is browned and filling is browned and bubbly.

Yummy! They freeze really well too. Makes about 12-14.


Read More

Sunday, June 22, 2008

Pumpkin Pie


Pumpkin pie is such a favourite in this house that we don't even wait for a holiday to eat it, we'll take any excuse. In fact we love it so much that during Christmas and Thanksgiving my family doesn't care about any of the other holiday food, they just want pie. We are pumpkin pie purists-no chocolate, no cream cheese, nothing weird in our pie, just pure, delicious, pie.

This is it.

Makes 1 pie

2 eggs
398 ml of canned pumpkin
1 cup of packed brown sugar
1 tsp cinnamon
1 tsp nutmeg
1/4 tsp ginger
1/4 tsp salt
3/4 cup evaporated milk
*1 deep dish unbaked pie shell (crust)

In a large bowl, combine the canned pumpkin with brown sugar, cinnamon, nutmeg, ginger, and salt. Stir until combined. Beat eggs in a seperate bowl and add to pumpkin mixture. Stir well. Add evaporated milk a gently stir until well combined. Pour into pie crust and bake at 425 F for 15 minutes, then reduce the oven heat to 350 F and bake for approximately 30-35 minutes. It is finished when a knife inserted into the center comes out clean. Cool, chill, top with real whipped cream, and enjoy with a hot cup of coffee.

*As for the pie shell, I do not make pastry from scratch. I don't buy it ready made either, I get this stuff which is sorta homemade, but also sorta cheating. But it's good for those of us that aren't so hot at making pastry entirely from scratch.
Read More
© 2005-2017 all written and photographic content by Scattered Mom/Karen Humphrey (unless otherwise specified) and may not be reproduced or used in any manner without consent. All rights reserved.

© 2014 Chasing Tomatoes, AllRightsReserved.

Designed by ScreenWritersArena