Printfriendly

Tuesday, March 27, 2012

Turkey Meatballs with Scallions and Soy Ginger Glaze


Turkey Meatballs with Balsamic Glaze, turkey meatballs


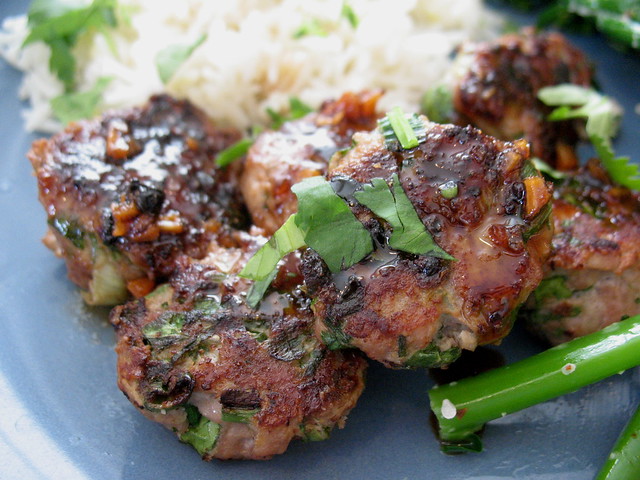
Meatballs are a great party food, but we also like them for dinner.  Sometimes when you make them with turkey they can be a bit dry and tasteless, but these ones are full of flavour.  We had them with coconut rice and brocollini, but you can also try serving them at a party with the glaze on the side.  If you are feeling adventurous, try slipping them into tiny bins and use the glaze as a sauce, while you add a bit of thinly sliced veggies.  There is quite a bit of sauce in this recipe, and I'd likely double the amount of meatballs while leaving the sauce as it is.

Adapted from Smitten Kitchen

1/2 cup brown sugar
1/2 cup water
1/2 cup reduced sodium soy sauce
1/2 cup mirin (Japanese rice wine, found in Asian or Japanese markets)
3 tbsp peeled, minced fresh ginger
1 tsp ground coriander
4 black peppercorns

In a medium sized pot, combine the water and sugar over medium high heat until the sugar melts.  Stir in the soy sauce, mirin, ginger, coriander, and peppercorns. Bring the mixture to a boil, then turn down and allow it to simmer for about 30-45 minutes until the mixture is reduced by half and syrup-like.  While it bubbles on the stove, make your meatballs!

Meatballs

1 lb ground turkey
4-6 green onions, chopped finely
1/2 cup coriander, chopped finely ( you could substitute flat leaf parsley if you like)
1 large egg
2 tbsp toasted sesame oil (regular is fine)
2 tbsp soy sauce
fresh cracked black pepper

Mix all the ingredients together in a large bowl.  Put a skillet over medium high heat and add a little oil before measuring out the mixture in tablespoon sized portions.  Roll into balls-although the mixture is fairly wet, so it's a bit hard to do.  Don't worry about getting them perfect.  Brown in a skillet, being careful not to have too many in the pan at once. They should take about 8 minutes to brown and cook through.

When you serve the meatballs, drizzle cooled glaze over top.  You can serve these with rice and a vegetable for dinner, or as an appetizer if you wish.

Serves 4
Read More

Monday, March 26, 2012

Creamy Broccoli Salad with Cranberries and Pecans

Creamy Broccoli Salad


This salad was inspired by a co-worker who brought it to work a few weeks ago.  I love the crunchy raw broccoli with the bite of red onion, crunchy pecans, and sweet dried cranberries.  I didn't use a lot of measurements in this salad because I think it pretty much is a no brainer-just throw the broccoli in a salad bowl, add a little onion, then a handful or two of each of the nuts and cranberries.

2 crowns of broccoli, cut into bite sized florets
1/2 red onion, minced
handful of dried cranberries
handful of pecans, chopped

Dressing:
1/2 cup mayonnaise
1 tbsp apple cider vinegar
2 tbsp sugar
lemon, zested

Mix the dressing ingredients together in a bowl.  Zest the lemon into it, then cut in half and squeeze the juice from one of the halves into the bowl.  Stir well.

In a large bowl, combine the salad ingredients and toss with the dressing.  I never add it all right away, but rather add some, mix, and then see if I need more.

Makes about 4 servings
Read More

Thursday, March 22, 2012

Noodles and Ginger Scallion Sauce

noodles and ginger scallion sauce

I really love soba noodles. Despite their odd slightly grey color, they have far more flavor that usual noodles, and require little to make a them worth eating. This simple sauce dresses them up a little without overpowering them, and makes for a light, kid friendly meal if yours don't mind green bits in their food. I served them with some crunchy raw veggies, but you can pair them with some roasted meat if you like.

Serve with some chopped cucumber, lime slices, sesame seeds, and extra soy sauce on the side.

Adapted from Simply Reem

1 1/2 cups finely chopped scallions
2 tbsp minced ginger
1/4 cup chopped fresh cilantro
2-3 tbsp grapeseed oil
2 tsp chili oil
1 tbsp soy sauce
2 tbsp rice wine vinegar
2 tbsp honey
1 tsp pepper

6 ounces of soba noodles
2 tbsp sesame seeds
lime wedges
julienned cucumber

Mix the first nine ingredients together in a bowl and allow to sit for about 20 minutes. This is crucial because the flavors need to develop.  Cook the noodles according to the package directions.  Drain noodles, then toss with the sauce, sesame seeds,  and add more salt, pepper, or soy if you want.  I like to squeeze some lime over and toss in some cucumber as well.
Read More

Monday, March 19, 2012

Sun Maid Raisin French Toast

A little while ago, Sun Maid asked if I wanted to try a loaf of their raisin bread.  I know that Hubs loves raisin bread so I said yes, and the package soon arrived at my front door. I plunked that little baby in the freezer and went about my week, plotting to have my way with it later and make something delicious.

Only, I had forgotten about how much Hubs loves his raisin bread and when I pulled it out of the freezer last night, it was almost all gone!  What's a girl to do? I didn't even get to enjoy a slice!

A friend of mine suggested that I bake some raisin bread, but the truth is, it's too much work. There are many things that I will make from scratch, but raisin bread is not one of them.  I buy it, and Sun Maid makes some really great bread!

The recipe I had was for waffle toast, but since I don't have a waffle iron and just fried the bread up in a skillet and made french toast for Kevin's Sunday breakfast.  He said it was really good, and asked if I can make it again on Easter.  I think I just might! (but of course I'll hide the bread from Hubs so we have some)


IMG_0751


3 eggs
3 tbsp milk
2 tbsp packed brown sugar
1/4 tsp vanilla
6-8 slices slightly stale Sun Maid Raisin bread

Pre-heat oven to 350F.

Mix the eggs, milk, sugar, and vanilla together in a shallow dish or pie plate with a fork.  Set aside.

Get your skillet warmed up, and add a little butter.  You don't want too much to make the French toast soggy, but enough for it to brown in.  I used about 2 tsp.  Dip the bread pieces in the egg mixture, letting each side sit for about 30 seconds so they can soak up the moisture.  Hold over the dish and allow the excess to drip off before placing the bread pieces on the hot griddle.

Cook until lightly browned, about 2 minutes or so per side, before flipping over and browning the other side. When finished, place on a baking sheet in the oven for about 2 minutes while you cook the rest of the pieces.

Serve warm with maple syrup, or dusted with icing sugar.

Makes 6-8 slices

Disclosure:  I was not paid for this post, but I did receive a loaf of bread to cook with  and a few coupons for free product. Since we love the bread so much, I thought it would be nice to share the recipe with all of you!

Giveaway:  Since I have some extra free product coupons, tell me what you love to do with raisin bread in your kitchen in the comments!  I'll randomly choose someone and send them to you.   
Read More

Thursday, March 15, 2012

Mom's Old Fashioned Banana Cake with Cream Cheese Icing


banana cake 2


I have a shirt from Paper Chef that says, "The Best Things in Life Are Simple".  It's so true, too-when I was a kid, the easiest way to make me happy was to make this cake and slather it with cream cheese icing.  Not only is this cake easy to make, but the dense, moist crumb makes it very easy to eat!

When I was a child this cake was often my pick for my birthday and since my 41st birthday is on March 25, it seemed fitting to dig out this recipe to share with all of you! Kevin greedily wolfed down a piece today after dinner and then used his finger to scrape up every last bit of icing.

I think someone else may have found a new favorite.  

This recipe comes from my Mom, and I don't know the source.  If you recognize it, please let me know!

1/2 cup butter
1 1/2 cups sugar
2 eggs, beaten
1 cup mashed ripe banana (about 2)
1 tsp. vanilla
2 cups flour
1/2 tsp baking soda
1/4 tsp salt
1/2 cup milk

Pre-heat oven to 350 F.  Butter a 9x9 inch pan and then line with parchment paper.

Using an electric mixer, beat the butter and sugar together until light and fluffy. Add eggs, banana and vanilla, beating well. In a separate bowl, sift together the flour, baking soda, and salt. Add to the butter mixture, alternating with the milk and blend well. Pour into the prepared pan and bake for 30-40 minutes, or until a toothpick inserted into the center comes out clean. Remove to a rack and allow to cool completely.

Cream Cheese Icing

You may be tempted to reduce the fat in this icing by using low fat products, but I don't recommend it.  What makes the icing so rich and creamy is the fat, and lower fat items contain a lot of water, which would make the icing soupy instead.  Just eat and enjoy!

3/4 brick of full fat cream cheese, softened (do NOT use spreadable, it won't work)
2 1/2 cups of icing sugar 
1 tsp vanilla
1/4 cup whipping cream  (do NOT use milk, it won't work)

Whip the cream cheese in a bowl using an electric mixer until creamy.  Add in the vanilla and icing sugar, 1/2 cup at a time, blending well.  Pour in the whipping cream and turn the mixer to high, letting it whip up and get nice and creamy.  Slather all over the top of the cake.

Store the cake, covered, in the fridge for a few days.

Makes 12 servings.
Read More

Tuesday, March 13, 2012

Kevin Cooks: Spicy Lamb Meatball Pizza

Kevin cooking dinner


With a bunch of classes behind him and onto the second half of Kevin's school year, he's moved on to take a Foods 11 course through online school!  The first assignment was to find a pizza or hamburger recipe, change one thing about it, and cook it.

Of course Kevin's response was, "Only change one thing? Can't I make my OWN recipe?" Um, sure, but that's not the assignment.  I threw him my latest issue of Bon Appetit for inspiration and he was enthralled with this recipe.  Spicy lamb meatballs, nestled in cheese and vegetables, on top of a tender crust was just the thing he wanted to make.  We happened to have a fridge just bursting with all sorts of pizza topping options, which made things really easy!


Browning the meatballs


Adapted from Bon Appetit

First, the meatballs:


½ tsp caraway seeds
½ tsp coriander seeds
½ tsp cumin seeds
1 whole 2 inch dried chipolte chile or 2 tsp ground chipolte chiles  (see *notes below)
1 small (3 inch diameter) potato, peeled
1 lb ground lamb
1 heaping tbsp minced scallion (white parts only)
1 ½ tsp grated pecorino cheese (we used Parmesan)
1 tsp salt
½ tsp finely grated peeled ginger
2 tbsp extra virgin olive oil

(*note:  If you can't find these, try getting a can of chipolte chiles in abodo sauce.  Dump them in a food processor and make a puree.  Skip the step of roasting/grinding the chipolte pepper and add a tbsp of the puree to the meat mixture before you combine everything together)

In a dry skillet, toast the caraway, coriander, and cumin seeds until aromatic and a little darker in color (about 2 min). Let cool. 

Broil the chile on a baking sheet, watching it carefully, until it puffs up.  Don’t let it burn!  Cut the chile in half and discard the seeds and stem.  Cool and transfer, along with the caraway, coriander, and cumin seeds into a spice mill.   Grind them together until they are fine.   If you use the ground chipolte chiles instead, just add to the seeds mixture and then grind. 

Meanwhile, submerge the potato in a pot of cold water and bring to a boil before reducing the heat and simmering for about 10 minutes, or until just cooked through.  Drain and allow the potato to cool, then grate. 

In a large bowl combine the chile mixture, the potato, ground lamb, scallions, cheese, salt,  and ginger.  Mix well with your hands and form into tablespoon sized meatballs.

Brown the meatballs in a skillet with a little oil, but leave them a little pink in the center as they will finish cooking on the pizza.

Now, the pizza!


Unbaked pizza


Make a batch of this pizza dough.  If you don't want make the dough from scratch, you can use a pre-made shell or get ready made dough at the store.  Roll it out and fit it into a 12 inch pizza pan.

Pre-heat oven to 450 F.

Kevin chose to skip the traditional pizza sauce and instead drained a 14 oz can of plum tomatoes. Then take the whole tomatoes and seed them, discarding the juices from the insides.  Chop them up and spread them over the crust.  Follow with mozzarella cheese, red onion, feta, sweet peppers, slivers of garlic, and sliced black olives.

Bake for about 10-15 minutes until the bottom is golden.  I like to then remove the pizza from the oven, turn the oven to broil, move the rack to a higher position and broil the top of the pizza until it's nicely browned.  At this point you have to watch it carefully so that it doesn't burn.

Cool the pizza in the pan for about 5 minutes and then slice into pieces to be fought over at the table, snacked on cold at night, or taken for lunch the next day.

**NOTE: We didn't use all the meatballs on one pizza.  They would easily divide between two pizzas, so cook through any that you don't use and freeze them for another day.  Also, the meatballs cook faster if they are on the smaller rather than larger side.


Meatball Pizza
Read More

Saturday, March 10, 2012

It's Pi Day! Time for Blueberry Pie!


Blueberry Pie


"I like pie. Can you make pie?"

Pie has never been my forte, but as we sat on the couch I began to think about Kevin's request. Is pie really that hard, or is it that I can't overcome my irritation of how mine never turns out perfect and actually produce one? Besides, I have blueberries in the fridge. Why not?

Rooting around in the freezer, I dug out the ingredients and that evening produced a delicious blueberry pie that has turned out to be my most successful effort to date. For once the crust was flakey, the filling sweet and delicious.

Always up to the challenge of teaching Kevin something new since he IS homeschooled (or 'online schooled' as we like to call it), I couldn't resist teaching Kevin about PI day on March 14. Did you know there was a whole day devoted to the Greek letter? Celebrate PI day at your house, by making pie with the kids and talking diameter and circumference of circles!

What's YOUR favorite pie?

Adapted from Canadian Living

Filling:

5 cups of blueberries (if frozen, thaw and drain them first)
3/4 cup sugar (I reduced it to 1/2 cup)
1/4 cup flour
1/2 tsp grated lemon rind
1 tbsp lemon juice
1/2 tsp cinnamon
1 egg yolk

Pastry crust:

2 1/2 cups flour (I used cake and pastry flour)
3/4 tsp salt
2/3 cup cold unsalted butter, cubed
1/3 cup lard
1/2 cup cold water

Mix together the flour and salt in a large bowl. Using a pastry cutter or two knives, cut the butter and lard until the mixture resembles crumbs. Stir in the cold water, a little at a time, until the flour comes together into a dough.

Turn the dough out onto a lightly floured counter and gather into a ball. Split into two portions and form each into a disk. Cover each with plastic wrap and chill for about 30 minutes to an hour.

When you are ready to make the pie, stir all the filling ingredients together in a bowl and set aside. On a lightly floured counter, roll out one of the disks of dough to about 1/8 thick and fit into a 9 inch pie pan, leaving about 3/4 inch (2cm) overhang. Spoon in the blueberry filling. In a small bowl whisk together the egg yolk and 2 tsp water, then brush over the rim of the pie.

Roll out the other disk to 1/8 inch thickness and fit over top of the blueberry filling, leaving about 3/4 inch (2 cm) overhang. Fold overhang under bottom pastry rim, seal, and flute edges. Brush the top with egg and sprinkle with sugar. Cut some steam vents in the top.

Pre-heat the oven to 425 F. Bake on a baking sheet in the bottom third of the oven for about 20 minutes. Reduce the oven to 350 F and bake another 50-60 minutes, until the crust is golden and the filling bubbly.

Remove the pie from the oven and allow it to cool before you slice it into 8 pieces and serve.  I like my pie room temperature with big scoops of vanilla ice cream.


Pie, anyone?
Read More

Wednesday, March 7, 2012

Meyer Lemon Buttons

Meyer Lemon Buttons


I made two recipes today, and neither really turned out like the original, but it's okay-they both tasted really good.  I did change this one up a bit and that's likely why this one was a bit different, but it could also be the fact that the power went out just as I was about to put them into the oven.  With a couple Meyer lemons leftover from last weekend's excursion to see Alexis, I needed to come up with something in order to use them up.  These cookies sounded great!  The thing with Meyer lemons is that because they have less acidity, you don't need quite as much sugar so I reduced it a bit, then added more lemon juice and peel.  The cookies didn't spread out like they did for the original photo, but that's fine with me.  I also didn't roll them in icing sugar, but granulated sugar instead.

Fresh, not too sweet with a hint of lemon, these are perfect with a cup of tea.  I think they would be a great addition to a tea party!  Make sure to use a real lemon, and if it's a regular lemon from the store, you may want to up the sugar to 1 cup from 3/4 cup.

Adapted from LDS Living

1/2 cup butter, softened
3/4 cup sugar
1/2 tsp vanilla
1 egg
zest of 1 lemon
2 tbsp fresh lemon juice
1/4 tsp salt
1/4 tsp baking powder
1/8 tsp baking soda
1 1/2 cups flour
1/2 cup icing/powdered sugar (optional)

Pre-heat oven to 350 F

Cream the butter and sugar together until it's fluffy.  Add the vanilla, egg, lemon juice, and zest, then whip until it's light and fluffy.  In a separate bowl, stir together the flour, baking powder, baking soda, and salt.  Add into the butter mixture and mix until just combined.

Measure the dough out in heaping teaspoons and roll into balls. Roll the balls in either granulated sugar or the powdered sugar and set on a cookie sheet about an inch and a half apart.

Bake about 9-11 minutes, until they are set and just starting to turn golden.

Makes about 2 1/2 dozen
Read More

Monday, March 5, 2012

Chicken Provencal

Chicken Provencal


Awhile back when I visited Alexis to go an event in Vancouver, I walked into her apartment to the smell of something absolutely amazing. While I didn't get to eat the amazing dish because we were going out for dinner, Alexis did point me in the direction of the great recipe. I wasn't surprised at all to see it was in my friend Emma's book "Whining and Dining" and promptly made it for my own family.

The result? It's so delicious. Don't let anchovies scare you off, they don't taste fish and meld right into the dish. Make sure to buy really good tomatoes (I like Cortina) and the best black olives you can find. It's worth it, trust me on that one. Alexis recommended I double the anchovies and garlic. Mmm...she's right!

Adapted from Whining and Dining

3 tbsp olive oil
1 cup flour
1 salt and freshly cracked pepper
1 lb boneless, skinless, chicken thighs (or you could use breasts, just don't cook as long)
1 cup chopped onion
4 anchovy filets
one 19 oz can italian plum tomatoes
2 tbsp chopped garlic
1/2 cup chicken stock
2 tsp chopped fresh thyme
1 bay leaf
1/2 cup pitted black olives
2 tbsp chopped fresh parsley

Stir the flour with a little salt and pepper in a pie plate and set aside. Get your dutch oven or a deep fry pan heated up on the stove with the olive oil, then dredge the chicken in the flour and add to the pan. You might have to work in batches, but you want to brown up the chicken so it gets some color. Set browned pieces aside on a clean plate as you go.

Add a little more oil to the pan and turn the heat down to medium low. Stir in the onions and anchovies, stirring and moving them around to keep from burning or sticking. They will get nice and soft. When they are, add the garlic and cook about a minute or so longer. Add the tomatoes and their juices, breaking them up with a spoon. Stir in the thyme, stock, and bay leaf before you bring to a bubble.

Return the chicken to the pan along with the olives. Make sure the chicken is covered with sauce and simmer for about 20 minutes or so until the chicken is cooked through. Make sure to turn it now and then so all sides are cooked evenly.  Taste and add more salt or pepper if you think it needs it.

Top with parsley and serve with some delicious crusty bread!

Makes 4 servings.
Read More
© 2005-2017 all written and photographic content by Scattered Mom/Karen Humphrey (unless otherwise specified) and may not be reproduced or used in any manner without consent. All rights reserved.

© 2014 Chasing Tomatoes, AllRightsReserved.

Designed by ScreenWritersArena