Printfriendly

Tuesday, October 27, 2009

Ghoulish Halloween Brownies


Aren't these adorable? Yogurt coated pretzels make fantastic ghoulish faces with out any effort whatsoever!

1. Bake One Bowl Brownies. I added some white chocolate chips instead of nuts, for effect. Allow to cool.

2. Make the glaze and pour over top of the brownies, spreading and smoothing to cover them evenly.

3. While the glaze is still liquidy, place the pretzels on top. I placed them 4 across, in 6 rows.

4. Gently pop in the Mini M&Ms. Careful not to get the glaze on your fingers and mess up the pretzels. If you get some on your fingers, just lick it off.

5. Allow glaze to cool and harden a bit. While it was still soft I sliced the brownies, then put them on a pan in a single layer in the fridge to harden up. Store brownies in an airtight container.


Boo!
Read More

Saturday, October 24, 2009

Halloween Cookie Pops


Cookies? Like a giant lollipop? You betcha'-these babies are so easy, you won't believe you hadn't thought of it before. First, I bought some Cookie Pop sticks at Michael's. The ones pictured are by Wilton's.

Then, I made a basic chocolate chip cookie dough. I spooned it out onto a parchment paper lined cookie sheet, making the cookies bigger then I normally do. About 2 Tbsp was enough dough. Then, I stuck in a bunch of candy coated chocolates (*see note at the end). When you spoon out the dough, shape the cookies at either end of the cookie sheet, only doing 2 at each end, so 4 cookie pops total. Why am I telling you to do this? You will need room for the sticks! Push sticks into the dough, making sure the entire end of the stick is covered.


Bake as usual. They may take a few minutes longer because they are bigger. When they are finished baking, allow them to cool on the cookie sheet before you attempt to move them. Moving them too soon will cause the stick to break through the soft cookie.


When they are all baked and cooled, cover with a plastic sleeve, tie with ribbon or twine, and they are good to go!

*Note: While the candies used in the photo are Smarties, I can't recommend them. Smarties have changed-and while their website says they taste the same, I strongly disagree. I disliked the new "no artificial color" Smarties so much, I actually threw the remaining ones in the garbage. Anyone who knows me would gasp at that last statement-I NEVER throw chocolate away. Especially Smarties!

Try using Dark Chocolate M&Ms instead. They are delicious!
Read More

Saturday, October 17, 2009

Beef and Cabbage Soup


I'm not a big fan of cabbage, but this soup is delicious. On a cool fall day, paired with a thick, buttery piece of bread, it's a filling and tasty lunch. You can top it with a spoonful of sour cream, or just eat it as is. I followed the recipe fairly closely, but added about 2/3 of a cup of red wine to the broth.

Original recipe is from Crazy Plates by Janet and Greta Podleski

1 pound lean ground beef
1 cup each chopped celery and onions
1/2 cup chopped green bell pepper (I used red-don't like green)
1 clove garlic, minced
1 (28 oz) can diced tomatoes
1 can tomato paste
5 cups of low sodium beef broth
2 cups peeled, cubed potatoes
1 cup chopped carrots
1/4 cup chopped fresh parsley
2 Tbsp red wine vinegar
1 Tbsp sugar
1 bay leaf
1 1/2 tsp dried basil
1 tsp paprika
1/2 tsp each salt and pepper
3 cups thinly sliced savoy cabbage

In a large soup pot with a little bit of oil, saute your ground beef until no longer pink. Transfer to a plate and set aside. Drain out most of the oil, but save a little bit and saute your onion, celery, garlic, red pepper, and carrots in it until they are tender. Add in the cooked ground beef and all the other ingredients, except the cabbage; bring to a boil.

Turn the heat down to low and simmer, covered, for 30 minutes. Add the cabbage, and then simmer another 30 minutes.

Serve topped with a spoonful of sour cream, if you like.
Read More

Tuesday, October 13, 2009

Rocky Road Cookies


One can never have too many cookie recipes. I found this one over at the 
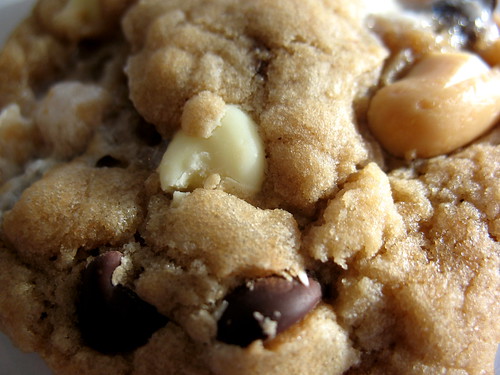
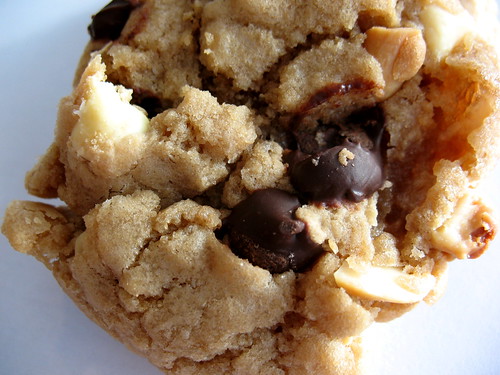
Crepes of Wrath and immediately noted that I must try it. Yummy! The cookies are nice and chewy, and the bits of chocolate, peanuts, and even melted marshmallowy pieces are delicious. I admit that I was a bit skeptical, since the recipe calls for melted butter and seemed completely different from any other recipe I've tried. They were easy to put together and bake, even though I was a bit anxious until I finally finished and greedily pulled one apart to eat it, gooey melted chocolate and all.

I did learn something the hard way-make sure to line your cookie sheets with parchment paper or your cookies will stick to the pan and you will be chiseling them off.

Oh well. They still tasted good, anyway.

2 cups all-purpose flour
1/2 teaspoon baking soda
1/2 teaspoon salt
3/4 cup butter, melted
1 cup packed brown sugar
1/2 cup white sugar
1 egg
1 egg yolk
1 tablespoon vanilla extract
1/2 cup chopped nuts
1 cup chocolate chips
1/2 cup white chocolate chips
1 cup mini marshmallows

**note: I had a lot of nuts, chips, and marshmallows left over because I just couldn't get enough squished into the cookie dough. Jake enjoyed eating them, but those ingredients could possibly be reduced just a little.

Pre-heat your oven to 325 F.

Combine the flour, baking soda, and salt in a bowl. Set aside. With an electric mixer, beat the melted butter and sugars together. Beat in the egg, then egg yolk, and vanilla. Add the flour mixture and beat on low speed until just moistened.

Fold in the chocolate chips, nuts, and marshmallows using a wooden spoon. Line your cookie sheets with parchment paper.

Scoop up the dough and roll into balls, mashing in as much of the chocolate, peanuts, and marshmallows as you can. I made the balls about the size of a walnut. Place them 2 inches apart on a cookie sheet and press down on them just slightly to flatten a bit. They will spread out, I promise, so not too much!

Bake about 10-15 minutes until golden. Now, don't follow my usual rules for touching the top to make sure it's set. Take them out and let them cool right on the pan-the tops will be squishy, but they will firm up as they cool.

The original recipe says it makes 10-15 cookies, but I got about 2 dozen. I must have made them smaller.

Read More

Saturday, October 10, 2009

Mexy-ish Chicken Wraps

Jake's new love is the sort-of-Mexy-but not really stuff that comes out of my kitchen. Real Mexican food, I'm sure, is nothing like the stuff I make. Usually it has a lot of calories and milk products in it (like cheese!) which he can't eat. So I find myself being a bit inventive when it comes to doing pseudo-Mexican.

This recipe is screamingly easy. I came home from work, threw it together, and in about 1/2 hr we were happily digging in. Don't believe me? Go on, read!

This recipe is ©Karen Humphrey 2009

1 box of Spanish Rice mix(whatever brand you like)
2 whole chicken breasts, sliced into thin strips
2 batches of Andrea's No Fail Tortillas (only if you are ambitious. They taste best, but if you don't have the time go with a pack of the small fajita sized flour tortillas)
2 tsp cumin
2 tsp chili powder
salt and pepper
1-2 limes
2 avocados, chopped
1 tomato, chopped
1 onion
2 sweet peppers (I used 1 red, 1 yellow)
La Grille's Vegetable seasoning
vegetable oil

Start prepping the rice as per the package instructions.

In a skillet over medium heat, begin by frying up the onion in a bit of extra virgin olive oil. Sprinkle with some La Grille vegetable spice and cook until they are soft and a nice brown. Transfer to plate.

Add a little more oil to the pan and saute the peppers, also sprinkling with the La Grille vegetable spice, until they are tender. Transfer to plate.

Lastly, the chicken goes into the same skillet. Sprinkle it with chili powder, cumin, salt and pepper and cook until the pieces are no longer pink. Lastly, zest a lime right over top, then cut the lime in half and squeeze all the juice into the pan, stirring to bring up the browned bits from the bottom of the pan. Remove from heat and transfer to plate.

Serve everything in a "help yourself" style. I had a plate of chopped tomato and avocado, another with the sauteed peppers, onions, and chicken. The tortillas are incredible piled high with the spicy rice, chicken, onions, peppers, and topped with creamy avocado. We didn't even miss sour cream or cheese, but you could add those in as well.

Serves 4
Read More

Tuesday, October 6, 2009

Pumpkin Muffins with Cream Cheese Icing

I'm usually skeptical about pumpkin in a muffin, because most recipes I try end up with a very heavy, wet, and sticky end product. This recipe is not like that at all! Moist but light, these are a cross between a cupcake and a muffin. Do NOT skimp on the cream cheese icing, because these are just crying out to be ripped apart and greedily devoured, as you lick the decadent sweetness from your fingers.

If you are worried about calories, use light cream cheese and note the muffins have little oil in them.

Makes 12

2 cups flour
1 cup sugar
1 1/2 tsp pumpkin pie spice
1 1/2 tsp baking powder
1 tsp baking soda
1/2 tsp salt
2 eggs
1 cup canned pumpkin
1/2 cup buttermilk
1/4 cup vegetable oil

Icing
4 oz (1/2 pk) cream cheese, softened
1 Tbsp butter, softened
1 tsp vanilla
2 cups icing sugar

In a large bowl, whisk together the flour, sugar, pie spice, baking powder, baking soda, and salt.

In a separate bowl, beat the eggs; stir in pumpkin, buttermilk, and vegetable oil. Pour into flour mixture and stir until just moistened. Spoon into large paper lined cups, filling to the top. Bake at 375 F for about 25 min, or until cake tester inserted into the center comes out clean. Cool on rack.

Icing: Beat cream cheese, butter, and vanilla until fluffy. Add icing sugar and beat until smooth; frost cooled cupcakes.

Store in an airtight container in the fridge.

Read More

Saturday, October 3, 2009

Sauteed Chicken With Mushrooms and Green Beans

Sauteed Chicken and Mushrooms

This is a super fast recipe that I like to make when I'm a bit short on time. You can pair it up with some potatoes or rice on the side, but we often just have a salad or more veggies.

The original recipe is from Every Day Food, November 2008

1 lb green (or yellow) beans, trimmed
1 tbsp olive oil
1 1/2 lbs chicken cutlets (I often use breasts that I pound to 1/2 inch thickness)
salt and pepper
10 oz white mushrooms, trimmed and quartered (brown cremini mushrooms are delicious as well, with a more woodsy flavor)
2 cloves of garlic, minced
3 Tbsp butter
3 Tbsp fresh lemon juice (I use a whole lemon; zest and the juice too)
1/2 cup fresh parsley, chopped (or, I've used some chopped chives right from my herb garden)

Put the beans in a steamer basket and cook until tender crisp.

Meanwhile, in a large skillet heat up some oil. Season,the chicken with salt and pepper, and saute until cooked through. Transfer to plate and loosely tent with foil. Using the same skillet, melt 1 tbsp of butter and toss in the mushrooms and garlic. Cook over medium heat, stirring, until the mushrooms are tender (don't let the garlic brown-turn the heat down a bit if you have to). Remove from the heat and stir in the remaining 2 Tbsp of butter. Zest the lemon right over top of the pan and then cut it in 1/2. Juice the lemon and add about 3 Tbsp right into the pan, stirring. The juice will de-glaze the pan, bringing up all the yummy brown bits from the chicken and mushrooms. Add the parsley.

Serve the chicken with mushrooms and sauce spooned on top, and the green beans on the side.
Read More
© 2005-2017 all written and photographic content by Scattered Mom/Karen Humphrey (unless otherwise specified) and may not be reproduced or used in any manner without consent. All rights reserved.

© 2014 Chasing Tomatoes, AllRightsReserved.

Designed by ScreenWritersArena